6 接口、多态、断言、项目【Go语言教程】
1 接口
1.1 概念
Golang 中 多态特性主要是通过接口来体现的。
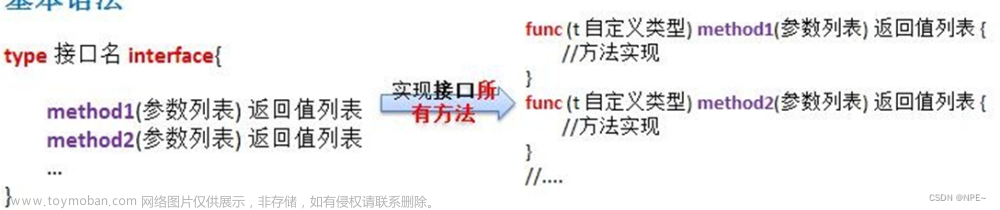
- interface 类型可以定义一组方法,但是这些不需要实现。并且 interface 不能包含任何变量。到某个自定义类型(比如结构体 Phone)要使用的时候,在根据具体情况把这些方法写出来(实现)。
说明:
- 接口里的所有方法都没有方法体,即接口的方法都是没有实现的方法。接口体现了程序设计的多态和高内聚低偶合的思想。
- Golang 中的接口,不需要显式的实现。只要一个变量,含有接口类型中的所有方法,那么这个变量就实现这个接口。因此,Golang 中没有 implement 这样的关键字
1.2 使用场景及注意细节
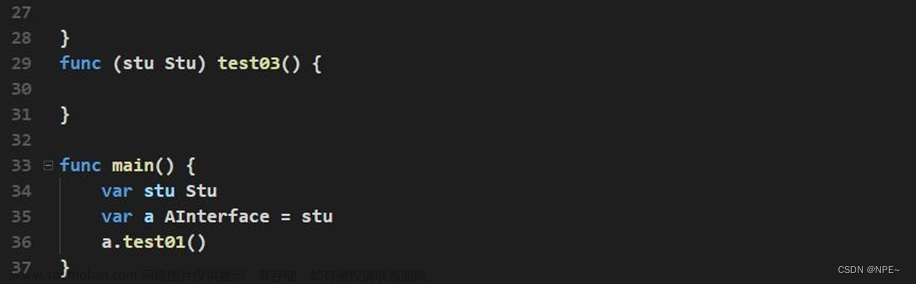
- 接口本身不能创建实例,但是可以指向一个实现了该接口的自定义类型的变量(实例)
package main

import (
	"fmt"
	_ "go_code/project01/main/model"
)

//定义一个A接口
type AInterface interface {
	Say()
}

type Stu struct {
	Name string
}


//结构体Stu实现了AInterface中的所有方法,相当于Stu实现了AInterface
func (s Stu) Say(){
	fmt.Println("stu Say()...")
}

func main(){
	var stu Stu //结构体变量,实现了Say()  实现了AInterface
	var a AInterface = stu
	a.Say()
	//stu Say()...
}
- 接口中所有的方法都没有方法体,即都是没有实现的方法。
- 在 Golang 中,一个自定义类型需要将某个接口的所有方法都实现,我们说这个自定义类型实现了该接口。
- 一个自定义类型只有实现了某个接口,才能将该自定义类型的实例(变量)赋给接口类型
- 只要是自定义数据类型,就可以实现接口,不仅仅是结构体类型。
//自定义一个integer
type integer int

type AInteger interface {
	Say()
}

func (i integer) Say(){
	fmt.Println("integer Say i=", i)
}

func main(){
	var i integer = 10
	var b AInteger = i
	b.Say() //integer Say i= 10
}
- 一个自定义类型可以实现多个接口
- Golang 接口中不能有任何变量
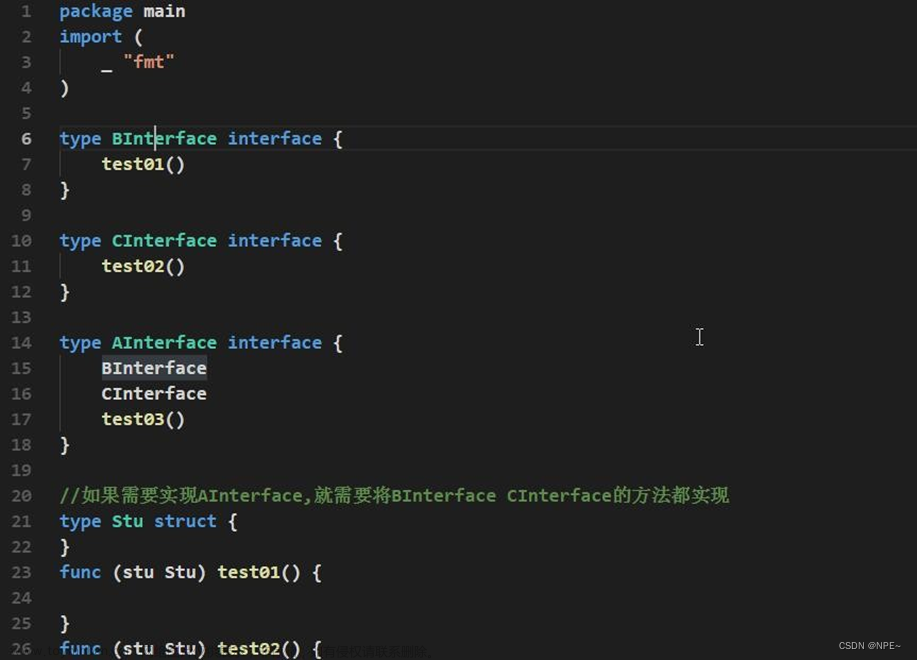
- 一个接口(比如 A 接口)可以继承多个别的接口(比如 B,C 接口),这时如果要实现 A 接口,也必须将 B,C 接口的方法也全部实现。
- interface 类型默认是一个指针(引用类型),如果没有对 interface 初始化就使用,那么会输出 nil
空接口 interface{} 没有任何方法,所以所有类型都实现了空接口, 即我们可以把任何一个变量赋给空接口
//定义一个T空接口
type T interface {
}

type Stu struct {
	Name string
}

func main(){
	var stu Stu
	stu.Name = "jack"
	var t T = stu
	fmt.Println(t)	//{jack}

	var t2 interface{} = stu
	var num1 float64 = 8.9
	t2 = num1
	t = num1
	fmt.Println(t2, t)	// 8.9 8.9
}
1.3 接口与继承的区别与联系
- 当 A 结构体继承了 B 结构体,那么 A 结构就自动的继承了 B 结构体的字段和方法,并且可以直接使用
- 当 A 结构体需要扩展功能,同时不希望去破坏继承关系,则可以去实现某个接口即可,因此我们可以认为:实现接口是对继承机制的补充.
- 实现接口可以看作是对 继承的一种补充
- 接口和继承解决的解决的问题不同
继承的价值主要在于:解决代码的复用性和可维护性。
接口的价值主要在于:设计,设计好各种规范(方法),让其它自定义类型去实现这些方法。
- 接口比继承更加灵活 Person Student BirdAble LittleMonkey
接口比继承更加灵活,继承是满足 is - a 的关系,而接口只需满足 like - a 的关系。
- 接口在一定程度上实现代码解耦
2 多态
2.1 概念
变量(实例)具有多种形态。面向对象的第三大特征,在 Go 语言,多态特征是通过接口实现的。可以按照统一的接口来调用不同的实现。这时接口变量就呈现不同的形态。
2.2 接口体现多态的两种形式
①多态参数
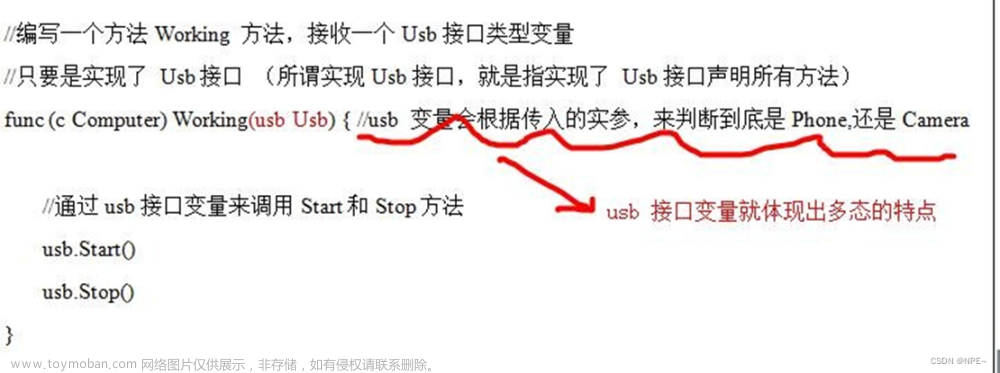
在前面的 Usb 接口案例,Usb usb ,即可以接收手机变量,又可以接收相机变量,就体现了 Usb 接口 多态。
②多态数组
演示一个案例:给 Usb 数组中,存放 Phone 结构体 和 Camera 结构体变量
package main
import (
"fmt"
_ "go_code/project01/main/model"
)
//定义一个usb接口
type Usb interface{
Start()
Stop()
}
type Phone struct{
Name string
}
func (p Phone) Start(){
fmt.Println(p.Name + "手机开始工作....")
}
func (p Phone) Stop(){
fmt.Println(p.Name + "手机停止工作")
}
type Computer struct{
Name string
}
func (c Computer) Start(){
fmt.Println(c.Name + "电脑开始工作....")
}
func (c Computer) Stop(){
fmt.Println(c.Name + "电脑停止工作")
}
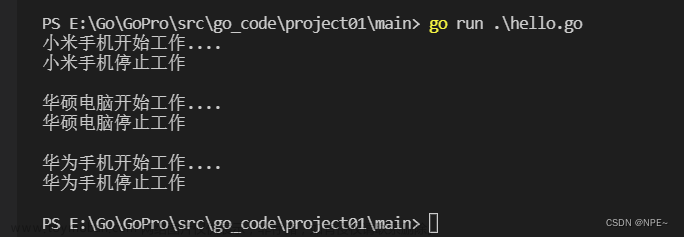
func main(){
var arr [3]Usb
arr[0] = Phone{"小米"}
arr[1] = Computer{"华硕"}
arr[2] = Phone{"华为"}
for i := 0; i < len(arr); i++ {
arr[i].Start()
arr[i].Stop()
fmt.Println()
}
}
3 类型断言
3.1 概念
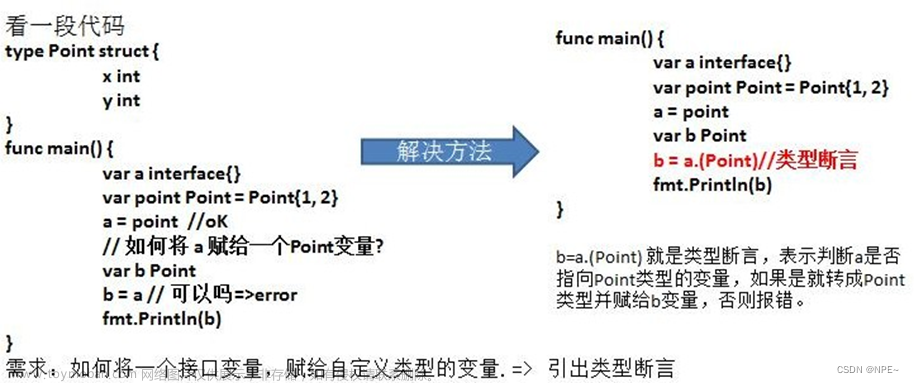
类型断言,由于接口是一般类型,不知道具体类型,如果要转成具体类型,就需要使用类型断言, 具体的如下:
- 对上面代码的说明:
- 在进行类型断言时,如果类型不匹配,就会报 panic, 因此进行类型断言时,要确保原来的空接口指向的就是断言的类型- 如何在进行断言时,带上检测机制,如果成功就 ok,否则也不要报 panic
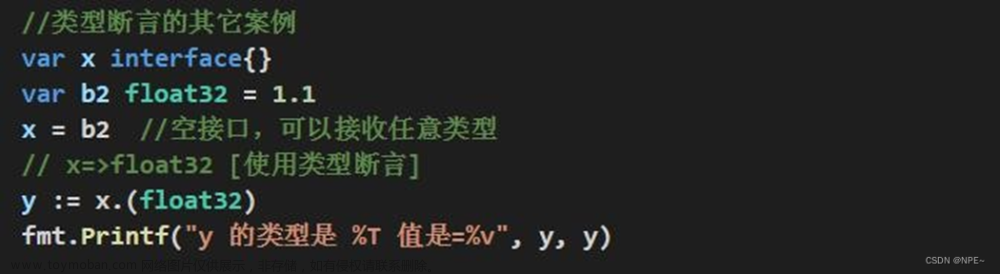
	// 类型断言(带检测的)
	var x interface{}
	var b2 float32 = 2.1
	x = b2 //空接口,可以接收任意类型
	// x => float32 [使用类型断言]
	// val, ok := x.(float32) //判断x是否能转换为float32
	if y, ok := x.(float32); ok {
		fmt.Println("convert success..")
		fmt.Printf("y 的类型是 %T, 值是=%v", y, y)
	} else {
		fmt.Println("convert fail..")
	}
	fmt.Println("继续执行。。。")
	//convert success..
	//y 的类型是 float32, 值是=2.1继续执行。。。
3.2 实践
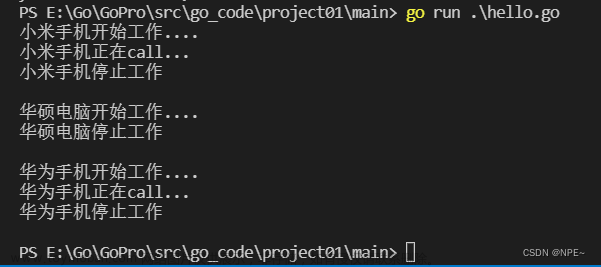
给 Phone 结构体增加一个特有的方法 call(), 当 Usb 接口接收的是Phone 变量时,还需要调用 call方法
package main

import (
	"fmt"
	_ "go_code/project01/main/model"
)

//定义一个usb接口
type Usb interface{
	Start()
	Stop()
}

type Phone struct{
	Name string
}

func (p Phone) Start(){
	fmt.Println(p.Name + "手机开始工作....")
}

func (p Phone) Stop(){
	fmt.Println(p.Name + "手机停止工作")
}

//Phone多一个Call方法
func (p Phone) Call(){
	fmt.Println(p.Name + "手机正在call...")
}

type Computer struct{
	Name string
}

func (c Computer) Start(){
	fmt.Println(c.Name + "电脑开始工作....")
}

func (c Computer) Stop(){
	fmt.Println(c.Name + "电脑停止工作")
}

func main(){
	var arr [3]Usb
	arr[0] = Phone{"小米"}
	arr[1] = Computer{"华硕"}
	arr[2] = Phone{"华为"}
	for i := 0; i < len(arr); i++ {
		arr[i].Start()
		//使用类型断言判断是否是手机
		val, ok := arr[i].(Phone)
		if ok {
			val.Call()
		}
		arr[i].Stop()
		fmt.Println()
	}
}
4 项目
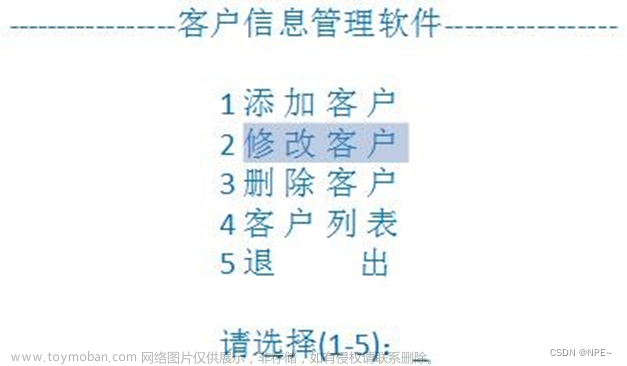
4.1 需求分析及UI图
使用Go编译一个客户信息关系系统
- 模拟实现基于文本界面的《客户信息管理软件》。
- 该软件能够实现对客户对象的插入、修改和删除(用切片实现),并能够打印客户明细表
-
主菜单页面:
-
添加客户页面
-
修改客户页面
-
删除客户页面
-
客户列表页面
4.2 分析及代码实现
①分析
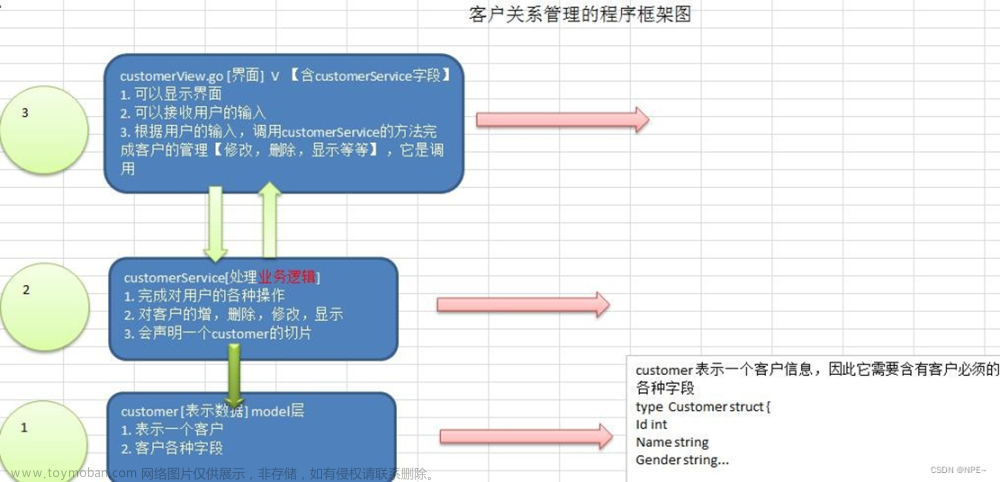
- 完成显示项目主菜单和退出软件
编写 customerView.go ,另外可以把 customer.go 和 customerService.go 写上.
涉及代码:
- customerManage/model/customer.go
- customerManage/view/customerView.go
- 完成显示客户列表功能
- customerManage/model/customer.go
- customerManage/service/customerService.go[增加了两个方法]
- customerManage/view/customerView.go
- 添加客户功能实现
- customerManage/model/customer.go
- customerManage/service/customerService.go
- customerManage/service/customerView.go
- 删除客户功能实现
- customerManage/model/customer.go [没有变化]
- customerManage/service/customerService.go
- customerManage/view/customerView.go
- 完善退出确认功能
- 功能说明:
要求用户在退出时提示 " 确认是否退出(Y/N):",用户必须输入 y/n, 否则循环提示。- 思路分析:
需要编写 customerView.go
②代码实现
项目结构: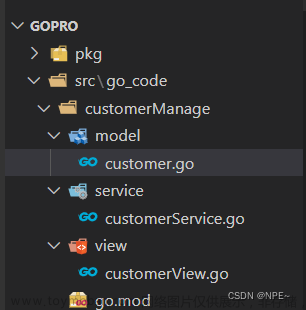
1. 完成显示项目主菜单和退出软件
- customerManger/model/customer.go
package model

//定义Customer结构体
type Customer struct {
	Id int
	Name string
	Gender string
	Age int
	Phone string
	Email string
}

//工厂模式实现构造函数效果
func NewCustomer(id int, name string, gender string, age int, phone string, email string) Customer{
	//TODO 未来可以在此对传入的参数合法性进行校验
	return Customer {
		Id : id,
		Name : name,
		Gender : gender,
		Age : age,
		Phone : phone,
		Email : email,
	}
}
- customerManager/service/customerService.go
package service

import (
	"../model/"
)

//该 CustomerService, 完成对 Customer 的操作,包括
//增删改查
type customerService {
	//定义用户切片,用于存储用户信息
	customers []model.Customer
	//用于后面执行用户id自增效果
	//声明一个字段,表示当前切片含有多少个客户
	//该字段后面,还可以作为新客户的 id+1
	customerCount int
}
- customerManager/view/customerView.go
package main

import (
	"fmt"
)

type customerView struct {
	key string //用于接收用户输入,从而进行下一步操作
	loop bool  //是否循环展示主菜单
}

func (this *customerView) mainMenu(){
	for {
		fmt.Println("-----------------客户信息管理软件	")

		fmt.Println("	1	添	加	客	户")
		fmt.Println("	2	修	改	客	户")
		fmt.Println("	3	删	除	客	户")
		fmt.Println("	4	客	户	列	表")
		fmt.Println("	5	退			出")
		fmt.Print("请选择(1-5):")
		//接收用户输入
		fmt.Scanln(&this.key)
		switch this.key {
			case "1" :
				fmt.Println("添加用户")
			case "2" :
				fmt.Println("修改用户")
			case "3":
				fmt.Println("删除用户")
			case "4":
				fmt.Println("客户列表")
			case "5":
				fmt.Println("退出")
				this.loop = false
			default :
				fmt.Println("输入有误,请重新输入..")
		}
		if !this.loop {
			break
		}

	}
	fmt.Println("您退出了管理系统..")
}

func main(){
	//在main函数中创建customerView并运行主菜单
	customerView := customerView {
		key : "",
		loop : true,
	}
	customerView.mainMenu()
}
2. 完成显示客户列表功能
- model/customer.go:
package model

import(
	"fmt"
)
//定义Customer结构体
type Customer struct {
	Id int
	Name string
	Gender string
	Age int
	Phone string
	Email string
}

//工厂模式实现构造函数效果
func NewCustomer(id int, name string, gender string, age int, phone string, email string) Customer{
	//TODO 未来可以在此对传入的参数合法性进行校验
	return Customer {
		Id : id,
		Name : name,
		Gender : gender,
		Age : age,
		Phone : phone,
		Email : email,
	}
}

//定义返回信息方法【toString】
func (this Customer) GetInfo() string {
	info := fmt.Sprintf("%v\t%v\t%v\t%v\t%v\t%v\t", this.Id,
		this.Name, this.Gender, this.Age, this.Phone, this.Email)
	return info
}
- service/customerService.go:
package service

import (
	"go_code/customerManage/model"
)

//该 CustomerService, 完成对 Customer 的操作,包括
//增删改查
type CustomerService struct {
	//定义用户切片,用于存储用户信息
	customers []model.Customer
	//用于后面执行用户id自增效果;
	//声明一个字段,表示当前切片含有多少个客户
	//该字段后面,还可以作为新客户的 id+1
	customerCount int
}

func NewCustomerService() *CustomerService {
	//为了可以看到有客户在切片中,我们在这里初始化一个客户
	customerService := &CustomerService{}
	customerService.customerCount = 1
	c := model.NewCustomer(1, "张三", "男", 20, "112", "zs@163.com")
	customerService.customers = append(customerService.customers, c)
	return customerService
}

//返回客户切片
func (this *CustomerService) List() []model.Customer{
	return this.customers
}
- view/customerView.go:
package main
import (
"fmt"
"go_code/customerManage/service"
)
type customerView struct {
key string //用于接收用户输入,从而进行下一步操作
loop bool //是否循环展示主菜单
//指针类型,保证每次调用时候都是一个
customerService *service.CustomerService
}
func (this *customerView) mainMenu(){
for {
fmt.Println("-----------------客户信息管理软件 ")
fmt.Println(" 1 添 加 客 户")
fmt.Println(" 2 修 改 客 户")
fmt.Println(" 3 删 除 客 户")
fmt.Println(" 4 客 户 列 表")
fmt.Println(" 5 退 出")
fmt.Print("请选择(1-5):")
//接收用户输入
fmt.Scanln(&this.key)
switch this.key {
case "1" :
fmt.Println("添加用户")
case "2" :
fmt.Println("修改用户")
case "3":
fmt.Println("删除用户")
case "4":
this.list()
case "5":
fmt.Println("退出")
this.loop = false
default :
fmt.Println("输入有误,请重新输入..")
}
if !this.loop {
break
}
}
fmt.Println("您退出了管理系统..")
}
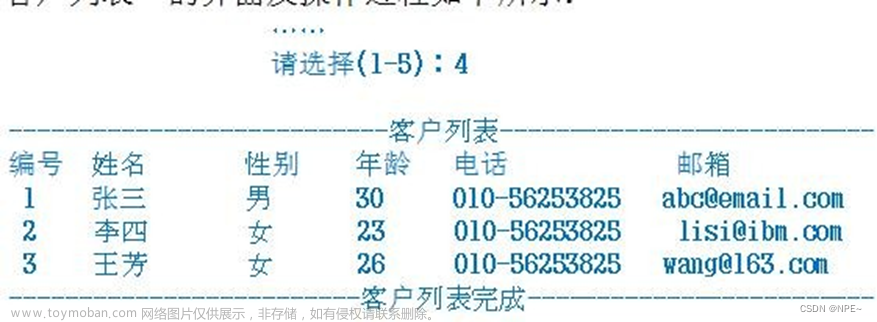
func (this *customerView) list(){
customers := this.customerService.List()
//显示
fmt.Println("---------------------------客户列表 ")
fmt.Println("编号\t 姓名\t 性别\t 年龄\t 电话\t 邮箱")
for i := 0; i < len(customers); i++ {
fmt.Println(customers[i].GetInfo())
}
fmt.Printf("\n-------------------------客户列表完成 \n\n")
}
func main(){
//在main函数中创建customerView并运行主菜单
customerView := customerView {
key : "",
loop : true,
customerService : service.NewCustomerService(),
}
customerView.mainMenu()
}
3. 添加删除功能实现
①添加功能
model/customer.go:
//定义不带ID创建Customer的方法[customer的id由customerNum来判断]
func NewCustomer2(name string, gender string, age int, phone string, email string) Customer {
	return Customer {
		Name : name,
		Gender : gender,
		Age : age,
		Phone : phone,
		Email : email,
	}
}
service/customerService.go:
//添加用户到customers切片
func (this *CustomerService) Add(customer model.Customer) bool {
	//我们确定一个分配id的规则,就是添加的顺序【customerNum(customerCount)】
	this.customerCount++
	customer.Id = this.customerCount
	this.customers = append(this.customers, customer)
	return true
}
view/customerView.go:
//添加customer
func(this *customerView) add(){
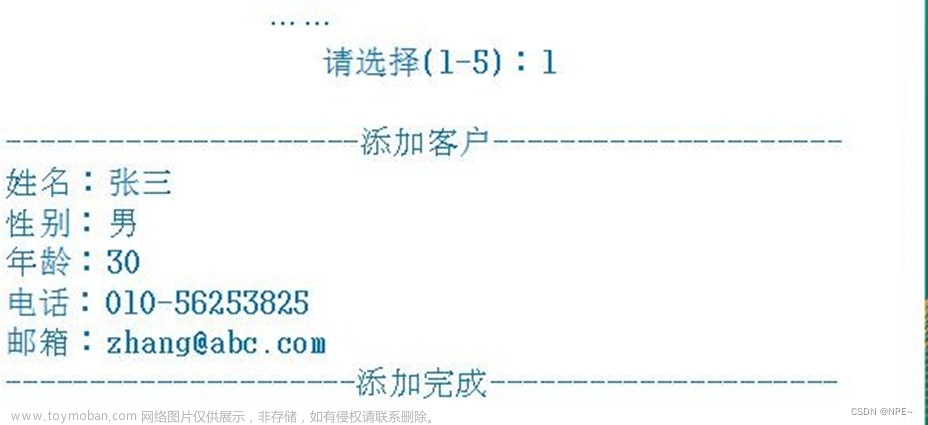
fmt.Println(" 添加客户 ")
fmt.Println("姓名:")
name := ""
fmt.Scanln(&name)
fmt.Println("性别:")
gender := ""
fmt.Scanln(&gender)
fmt.Println("年龄:")
age := 0
fmt.Scanln(&age)
fmt.Println("电话:")
phone := ""
fmt.Scanln(&phone)
fmt.Println("邮箱:")
email := ""
fmt.Scanln(&email)
//创建一个新的customer实例【id没有让用户输入,而是直接从customerCount中获取】
customer := model.NewCustomer2(name, gender, age, phone, email)
if this.customerService.Add(customer) {
fmt.Println(" 添加完成 ")
}else {
fmt.Println(" 添加失败 ")
}
}
customerView中调用方法: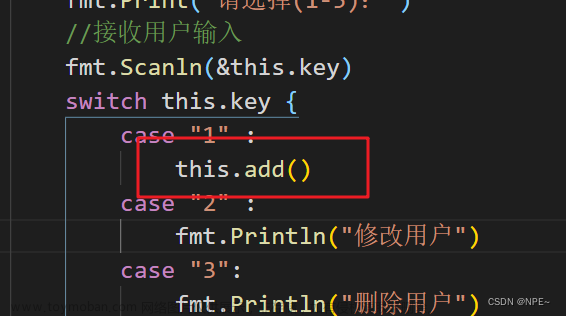
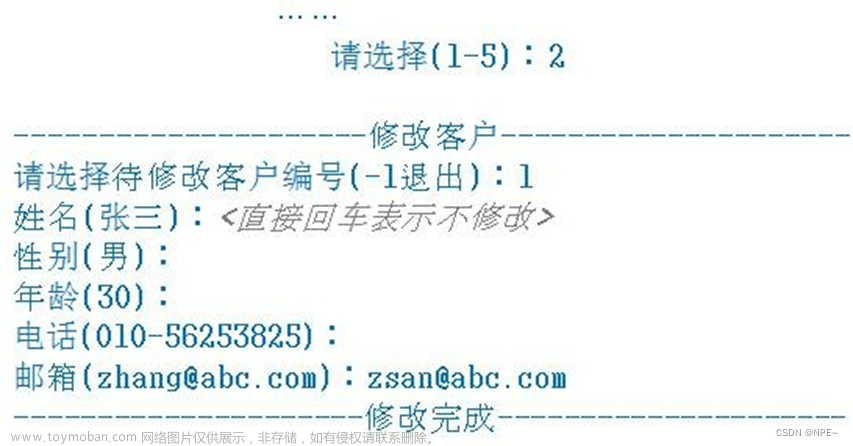
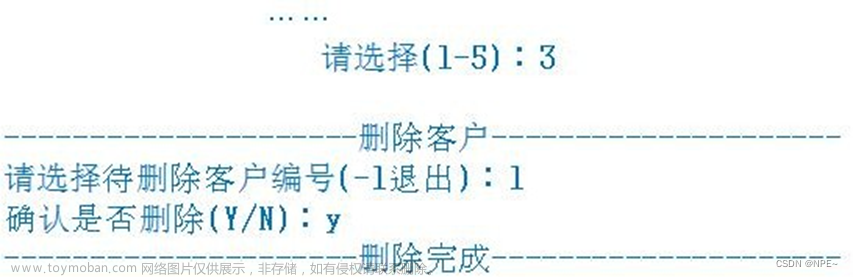
②删除功能
view/customerView.go:
//删除用户
func (this *customerView) delete(){
	fmt.Println("-----------------删除用户-----------------")
	fmt.Println("请选择待删除客户编号(-1退出):")
	id := -1
	fmt.Scanln(&id)
	if id == -1 {
		return //放弃删除操作
	}
	flag := false
	choice := ""
	for {
		if flag {
			break
		}
		fmt.Println("确认是否删除(Y/N):")
		fmt.Scanln(&choice)
		if choice == "y" || choice == "Y" {
			flag = true
			//调用customerService的Delete方法
			if this.customerService.Delete(id) {
				fmt.Println("-------------删除完成-------------")
			} else {
				fmt.Println("------删除失败,输入的id号不存在---")
			}
		} else if choice == "n" || choice == "N" {
			flag = true
		} else {
			fmt.Println("输入不合理,请重新输入....")
		}
	}
}
4. 完善退出功能=>全部代码
- model/customer.go:
package model

import(
	"fmt"
)
//定义Customer结构体
type Customer struct {
	Id int
	Name string
	Gender string
	Age int
	Phone string
	Email string
}

//工厂模式实现构造函数效果
func NewCustomer(id int, name string, gender string, age int, phone string, email string) Customer{
	//TODO 未来可以在此对传入的参数合法性进行校验
	return Customer {
		Id : id,
		Name : name,
		Gender : gender,
		Age : age,
		Phone : phone,
		Email : email,
	}
}
//定义不带ID创建Customer的方法[customer的id由customerNum来判断]
func NewCustomer2(name string, gender string, age int, phone string, email string) Customer {
	return Customer {
		Name : name,
		Gender : gender,
		Age : age,
		Phone : phone,
		Email : email,
	}
}

//定义返回信息方法【toString】
func (this Customer) GetInfo() string {
	info := fmt.Sprintf("%v\t%v\t%v\t%v\t%v\t%v\t", this.Id,
		this.Name, this.Gender, this.Age, this.Phone, this.Email)
	return info
}
- service/customerService.go:
package service

import (
	"go_code/customerManage/model"
	_ "fmt"
)

//该 CustomerService, 完成对 Customer 的操作,包括
//增删改查
type CustomerService struct {
	//定义用户切片,用于存储用户信息
	customers []model.Customer
	//用于后面执行用户id自增效果;
	//声明一个字段,表示当前切片含有多少个客户
	//该字段后面,还可以作为新客户的 id+1
	customerCount int
}

func NewCustomerService() *CustomerService {
	//为了可以看到有客户在切片中,我们在这里初始化一个客户
	customerService := &CustomerService{}
	customerService.customerCount = 1
	c := model.NewCustomer(1, "张三", "男", 20, "112", "zs@163.com")
	customerService.customers = append(customerService.customers, c)
	return customerService
}

//返回客户切片
func (this *CustomerService) List() []model.Customer{
	return this.customers
}

//添加用户到customers切片
func (this *CustomerService) Add(customer model.Customer) bool {
	//我们确定一个分配id的规则,就是添加的顺序【customerNum(customerCount)】
	this.customerCount++
	customer.Id = this.customerCount
	this.customers = append(this.customers, customer)
	return true
}

//删除用户
func (this *CustomerService) Delete(id int) bool {
	index := this.FindById(id)
	//如果index == -1, 说明没有这个用户
	if index == -1 {
		return false
	}
	//如何从列表中删除一个元素=>从[0,index)位置 + [index+1, 最后]
	this.customers = append(this.customers[:index], this.customers[index+1:]...)
	return true
}


//根据id查找用户在切片中对应下标,如果没有则返回-1
func (this *CustomerService) FindById(id int) int {
	index := -1
	for i := 0; i < len(this.customers); i++ {
		if this.customers[i].Id == id {
			return i
		}
	}
	return index
}
- view/cutomerView.go:
package main

import (
	"fmt"
	"go_code/customerManage/service"
	"go_code/customerManage/model"
)

type customerView struct {
	key string //用于接收用户输入,从而进行下一步操作
	loop bool  //是否循环展示主菜单
	//指针类型,保证每次调用时候都是一个
	customerService *service.CustomerService
}

func (this *customerView) mainMenu(){
	for {
		fmt.Println("-----------------客户信息管理软件-----------------")

		fmt.Println("	1	添	加	客	户")
		fmt.Println("	2	修	改	客	户")
		fmt.Println("	3	删	除	客	户")
		fmt.Println("	4	客	户	列	表")
		fmt.Println("	5	退			出")
		fmt.Print("请选择(1-5):")
		//接收用户输入
		fmt.Scanln(&this.key)
		switch this.key {
			case "1" :
				this.add()
			case "2" :
				fmt.Println("更新用户")
				// this.update()
			case "3":
				this.delete()
			case "4":
				this.list()
			case "5":
				this.exit()
			default :
				fmt.Println("输入有误,请重新输入..")
		}
		if !this.loop {
			break
		}

	}
	fmt.Println("您退出了管理系统..")
}

func (this *customerView) list(){
	customers := this.customerService.List()
	//显示
	fmt.Println("---------------------------客户列表	")
	fmt.Println("编号\t 姓名\t 性别\t 年龄\t 电话\t 邮箱")
	for i := 0; i < len(customers); i++ {
		fmt.Println(customers[i].GetInfo())
	}
	fmt.Printf("\n-------------------------客户列表完成	\n\n")
}

//添加customer
func(this *customerView) add(){
	fmt.Println("	添加客户	")
	fmt.Println("姓名:")
	name := ""
	fmt.Scanln(&name)
	fmt.Println("性别:")
	gender := ""
	fmt.Scanln(&gender)
	fmt.Println("年龄:")
	age := 0
	fmt.Scanln(&age)
	fmt.Println("电话:")
	phone := ""
	fmt.Scanln(&phone)
	fmt.Println("邮箱:")
	email := ""
	fmt.Scanln(&email)
	//创建一个新的customer实例【id没有让用户输入,而是直接从customerCount中获取】
	customer := model.NewCustomer2(name, gender, age, phone, email)
	if this.customerService.Add(customer) {
		fmt.Println("     添加完成     ")
	}else {
		fmt.Println("     添加失败     ")
	}
}

//删除用户
func (this *customerView) delete(){
	fmt.Println("-----------------删除用户-----------------")
	fmt.Println("请选择待删除客户编号(-1退出):")
	id := -1
	fmt.Scanln(&id)
	if id == -1 {
		return //放弃删除操作
	}
	flag := false
	choice := ""
	for {
		if flag {
			break
		}
		fmt.Println("确认是否删除(Y/N):")
		fmt.Scanln(&choice)
		if choice == "y" || choice == "Y" {
			flag = true
			//调用customerService的Delete方法
			if this.customerService.Delete(id) {
				fmt.Println("-------------删除完成-------------")
			} else {
				fmt.Println("------删除失败,输入的id号不存在---")
			}
		} else if choice == "n" || choice == "N" {
			flag = true
		} else {
			fmt.Println("输入不合理,请重新输入....")
		}
	}
}

//退出功能
func (this *customerView) exit(){
	fmt.Println("确认是否退出(Y/N):")
	for{
		fmt.Scanln(&this.key)
		if this.key == "Y" || this.key == "y" || this.key == "N" || this.key == "n" {
			break
		}
		fmt.Println("你的输入有误,请重新输入,确认是否退出(Y/N):")
	}
	if this.key == "Y" || this.key == "y" {
		this.loop = false
	}
}


func main(){
	//在main函数中创建customerView并运行主菜单
	customerView := customerView {
		key : "",
		loop : true,
		customerService : service.NewCustomerService(),
	}
	customerView.mainMenu()
}
5 Go相关Bug合集
1. xxx is not in GOROOT
在项目中输入以下代码报错:
import (
	"fmt"
	"go_code/customerManage/service"
)
package go_code/customerManage/service is not in GOROOT (E:\Go\go\src\go_code\customerManage\service)go
方法一:
关闭go mod
Go.mod是Golang1.11版本新引入的官方包管理工具用于解决之前没有地方记录依赖包具体版本的问题,方便依赖包的管理,可以理解为java中的maven;
go env -w GO111MODULE=off
方法二:文章来源:https://www.toymoban.com/news/detail-443423.html
在项目根目录下开启mod文章来源地址https://www.toymoban.com/news/detail-443423.html
go mod init
// 下载依赖
go mod tidy
到了这里,关于6 接口、多态、断言、项目【Go语言教程】的文章就介绍完了。如果您还想了解更多内容,请在右上角搜索TOY模板网以前的文章或继续浏览下面的相关文章,希望大家以后多多支持TOY模板网!