要求: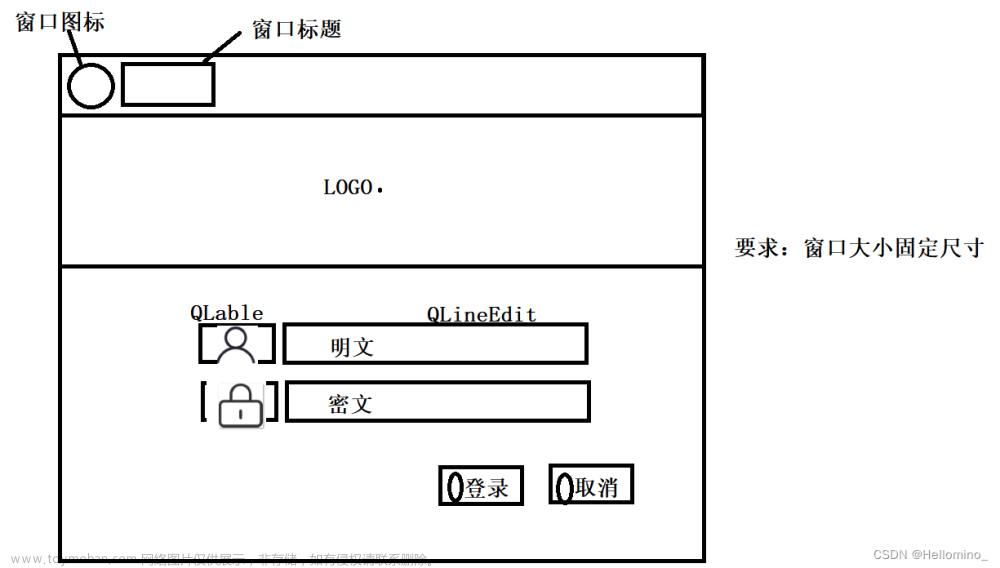
功能函数模块
#include "mainwindow.h"
#include "ui_mainwindow.h"


MainWindow::MainWindow(QWidget *parent) :
    QMainWindow(parent),
    ui(new Ui::MainWindow)
{

    qDebug("%s","hello world");
    //qDebug() << "hello world" ;


    //设置固定尺寸
    this->setFixedSize(QSize(500,420));

    qDebug()<<"title : "<<this->windowTitle();

    //设置窗口名称
    this->setWindowTitle("QQ");
    qDebug()<<"title : "<<this->windowTitle();

    this->setWindowIcon(QIcon("E:/QQdownload/icon_nhgbq8i4bf/QQ.png"));
    this->setStyleSheet("background-color:white;");
    //设置透明度
   // this->setWindowOpacity(0.8);
    QLabel *lab3=new QLabel(this);
    lab3->resize(500,200);
    lab3->setScaledContents(true);
    lab3->setPixmap(QPixmap("E:/QQdownload/icon_nhgbq8i4bf/hhh.jpg"));

    //设置纯净窗口
    //this->setWindowFlags(Qt::FramelessWindowHint);

    //按钮类QPushButton

    //手动定义一个按钮,取名按钮1;
    QPushButton *bin1 = new QPushButton(QIcon("E:/QQdownload/icon_nhgbq8i4bf/denglu_1.png"),"登录",this);

    //重新设置大小
    bin1->resize(100,30);
    bin1->move(180,350);
    bin1->setStyleSheet("background-color:skyblue;");

    //2.手动构造一个按钮,并在构造时给定父组件
    QPushButton *bin2=new QPushButton(this);
    bin2->resize(bin1->size());
    bin2->setIcon(QIcon("E:/QQdownload/icon_nhgbq8i4bf/quxiao.png"));
    bin2->setText("取消");
    bin2->move(300,350);
    bin2->setStyleSheet("background-color:skyblue;");

    QPushButton *bin3 = new QPushButton("忘记密码",this);
    bin3->resize(100,20);
    bin3->move(330,314);

    bin3->setStyleSheet("background-color:white;""border-radius:8px;");

    QPushButton *bin4 = new QPushButton(QIcon("E:/QQdownload/icon_nhgbq8i4bf/QQ.png"),"注册",this);
    bin4->resize(bin1->size());
    bin4->move(10,380);
    bin4->setStyleSheet("background-color:white;""border-radius:8px;");


    //5,手动构造行编辑器
    QLineEdit *edit1 = new QLineEdit(this);
    edit1->resize(200,35);
    edit1->move(150,220);
    edit1->setStyleSheet("background-color:white;");
    edit1->setPlaceholderText("账号");
    QLineEdit *edit2 = new QLineEdit(this);
    edit2->move(150,270);
    edit2->resize(edit1->size());
    edit2->setEchoMode(QLineEdit::Password);
    edit2->setPlaceholderText("密码");
    edit2->setStyleSheet("background-color:white;");

    QCheckBox *box1=new QCheckBox("记住密码",this);
    box1->move(150,310);

    QCheckBox *box2=new QCheckBox("自动登录",this);
    box2->move(250,310);


    //清空文本内容
    edit2->clear();

    ///
    //7、手动构造一个标签
    QLabel *lab1=new QLabel(this);
    lab1->resize(30,35);
    lab1->move(100,220);
    lab1->setScaledContents(true);
    lab1->setPixmap(QPixmap("E:/QQdownload/icon_nhgbq8i4bf/denglu.png"));
    QLabel *lab2=new QLabel(this);
    lab2->resize(lab1->size());
    lab2->move(100,270);
    //  lab2->setStyleSheet("background-color:skyblue;");
    lab2->setScaledContents(true);
    lab2->setPixmap(QPixmap("E:/QQdownload/icon_nhgbq8i4bf/denglumima.png"));

    QPixmap pixmap("E:/QQdownload/icon_nhgbq8i4bf/qww.png"); // 加载图像
    QPixmap roundedPixmap(pixmap.size()); // 创建一个圆形图像
    roundedPixmap.fill(Qt::transparent); // 填充透明色

    QPainter painter(&roundedPixmap);
    painter.setRenderHint(QPainter::Antialiasing, true); // 设置抗锯齿
    QPainterPath path;
    path.addEllipse(roundedPixmap.rect()); // 创建圆形路径
    painter.setClipPath(path); // 设置剪裁路径
    painter.drawPixmap(pixmap.rect(), pixmap); // 在剪裁的路径内绘制原图像

    QLabel *lab4=new QLabel(this);
    lab4->resize(100,100);
    lab4->move(200,110);
    lab4->setStyleSheet("background-color:skyblue;""border-radius:50px;");
    lab4->setScaledContents(true);
    lab4->setPixmap(roundedPixmap);
    lab4->setStyleSheet("border-radius:50px;");

}

MainWindow::~MainWindow()
{
    delete ui;
}
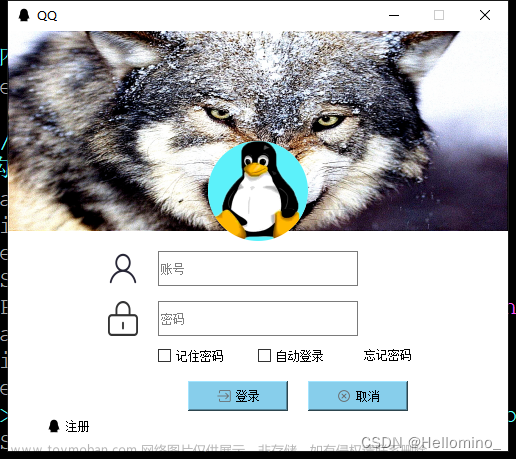
做出如下效果图:
 文章来源:https://www.toymoban.com/news/detail-480307.html
文章来源地址https://www.toymoban.com/news/detail-480307.html
到了这里,关于QT day1 (图形界面设计)的文章就介绍完了。如果您还想了解更多内容,请在右上角搜索TOY模板网以前的文章或继续浏览下面的相关文章,希望大家以后多多支持TOY模板网!


