创建与配置
RabbitTemplate是我们在与SpringAMQP整合的时候进行发送消息的关键类
该类提供了丰富的发送消息的方法,包括可靠性消息投递、回调监听消息接口ConfirmCallback、返回值确认接口
ReturnCallback等等同样我们需要注入到Spring容器中,然后直接使用。
在与spring整合时需要实例化,但是在与Springboot整合时,只需要添加配置文件即可
首先将其注入到bean里面:
如果自己不注入
那么RabbitAutoConfiguration中也会最RabbitTemplate进行自动装配。
        @Bean
        @ConditionalOnSingleCandidate(ConnectionFactory.class)
        @ConditionalOnMissingBean({RabbitOperations.class})
        public RabbitTemplate rabbitTemplate(RabbitTemplateConfigurer configurer, ConnectionFactory connectionFactory) {
            RabbitTemplate template = new RabbitTemplate();
            configurer.configure(template, connectionFactory);
            return template;
        }
connectionFactory是用于创建与rabbitMq服务器之间通信的链接工场类。
configurer对rabbitTemplate进行配置
配置方法
    public void configure(RabbitTemplate template, ConnectionFactory connectionFactory) {
        PropertyMapper map = PropertyMapper.get();
        template.setConnectionFactory(connectionFactory);
        if (this.messageConverter != null) {
            template.setMessageConverter(this.messageConverter);
        }

        template.setMandatory(this.determineMandatoryFlag());
        Template templateProperties = this.rabbitProperties.getTemplate();
        if (templateProperties.getRetry().isEnabled()) {
            template.setRetryTemplate((new RetryTemplateFactory(this.retryTemplateCustomizers)).createRetryTemplate(templateProperties.getRetry(), Target.SENDER));
        }

        templateProperties.getClass();
        map.from(templateProperties::getReceiveTimeout).whenNonNull().as(Duration::toMillis).to(template::setReceiveTimeout);
        templateProperties.getClass();
        map.from(templateProperties::getReplyTimeout).whenNonNull().as(Duration::toMillis).to(template::setReplyTimeout);
        templateProperties.getClass();
        map.from(templateProperties::getExchange).to(template::setExchange);
        templateProperties.getClass();
        map.from(templateProperties::getRoutingKey).to(template::setRoutingKey);
        templateProperties.getClass();
        map.from(templateProperties::getDefaultReceiveQueue).whenNonNull().to(template::setDefaultReceiveQueue);
    }
从配置方法中可以看出来,用户可以对rabbitTemplate做的一些自定义操作。
mandatory
一. Confirm消息确认机制和Return机制
Confirm消息确认机制: 生产者向MQ投递完消息后,要求MQ返回一个应答,生产者异步接收该应答,用来确定该消息是否正常的发送到了Broker, 从而保障消息的可靠性投递
Return消息返回机制:该机制用于处理一些不可路由的消息。如果生产在发送消息时,发现当前的exchange不存在或者指定的路由key找不到时,生产者可以开启该模式来监听这种不可达的消息,以进行后续。(如果不开启的话,broker会自动删除该消息)
这里要注意的是,只要消息到达了MQ就换返回Confirm消息,接下来MQ再去判断能不能找到路由方式,找不到再返回Return消息
Confirm消息确认机制的实现
confirm-type有none、correlated、simple这三种类型
none:表示禁用发布确认模式,默认值,使用此模式之后,不管消息有没有发送到Broker都不会触发 ConfirmCallback回调。
correlated:表示消息成功到达Broker后触发ConfirmCalllBack回调
simple:simple模式下如果消息成功到达Broker后一样会触发
- 首先在配置文件中设置
spring:
  rabbitmq:
    publisher-confirm-type: correlated
开启消息确认模式
- 实现ConfirmCallback接口
RabbitTemplate.ConfirmCallback confirmCallback = new RabbitTemplate.ConfirmCallback() {
            @Override
            public void confirm(CorrelationData correlationData, boolean ack, String cause) {
                if (ack){
                    log.info(correlationData.toString() + "发送成功");
                }else {
                    log.error(correlationData.toString() + "发送失败, 原因: " + cause);
                }
            }
        };
其中重写的方法包含三个参数:
correlationData:发送消息时设置的correlationData。由于confirm消息是异步监听的,因此需要在发送消息时传递一个correlationData,从而在返回confirm消息时判断其属于哪个消息,所以correlationData通常设置为消息的唯一ID;
ack:broker返回的应答,如果broker成功接收消息,则返回true代表接收成功,如果因为各种原因没有成功接收(如消息队列满了),则返回false
这里要注意,由于各种原因(如网络波动),生产端可能并没有收到confirm消息,因此不能将后续的补偿处理仅仅寄希望于在else内完成,else内做的补偿仅仅是在生产端收到confirm消息后nack的情况
- cause: 如果没有被成功接收,则返回原因
- 为rabbitTemplate添加刚刚的Confirm监听器
rabbitTemplate.setConfirmCallback(confirmCallback());
Return消息返回机制的实现
- Return消息返回机制的实现与上面的Confirm消息确认机制的实现类似
spring:
  rabbitmq:
    publisher-returns: true
    template:
      mandatory: true
注意,mandatory一定要设置为true,否则找不到路由规则的消息会被broker直接抛弃
- 实现returnCallback接口
RabbitTemplate.ReturnCallback returnCallback = new RabbitTemplate.ReturnCallback() {
            @Override
            public void returnedMessage(Message message, int replyCode, String replyTest, String exchange, String routingKey) {
               log.error("消息{}路由失败,失败原因:{}",message.getMessageProperties().getMessageId(),replyTest);
            }
};
MessageConverter
Rabbit原始的序列化方法是把数据转化为字节数组。
我们调用rabbitTemplate的convertAndSend方法时
	@Override
	public void convertAndSend(String exchange, String routingKey, final Object object,
			@Nullable CorrelationData correlationData) throws AmqpException {

		send(exchange, routingKey, convertMessageIfNecessary(object), correlationData);
	}
rabbitmq会进行序列化操作
protected Message convertMessageIfNecessary(final Object object) {
		if (object instanceof Message) {
			return (Message) object;
		}
		return getRequiredMessageConverter().toMessage(object, new MessageProperties());
	}
private MessageConverter messageConverter = new SimpleMessageConverter();
如果不指定。那么使用的是SimpleMessageConverter
使用的是转化为二进制字节数组
	public final class SerializationUtils {
    private SerializationUtils() {
    }

    public static byte[] serialize(Object object) {
        if (object == null) {
            return null;
        } else {
            ByteArrayOutputStream stream = new ByteArrayOutputStream();

            try {
                (new ObjectOutputStream(stream)).writeObject(object);
            } catch (IOException var3) {
                throw new IllegalArgumentException("Could not serialize object of type: " + object.getClass(), var3);
            }

            return stream.toByteArray();
        }
    }
	 /**
     * Creates a newly allocated byte array. Its size is the current
     * size of this output stream and the valid contents of the buffer
     * have been copied into it.
     *
     * @return  the current contents of this output stream, as a byte array.
     * @see     java.io.ByteArrayOutputStream#size()
     */
    public synchronized byte toByteArray()[] {
        return Arrays.copyOf(buf, count);
    }
接受消息的时候需要准换回string,再进一步进行操作
new String(message.getBody()));
  public void ListenerQueue01(Message message){
        String body =  new String(message.getBody()));
        System.out.println("body===="+body);
        logger.info("[onMessage][线程编号:{} 消息内容:{}]", Thread.currentThread().getId(), message);
    }
那么如果我们需要指定序列化方法,只要自定义一个返回json数据类型的MessageConverter就可以了。
代码:
@Configuration
public class MyMsgConverter {

    @Bean
    public MessageConverter messageConverter(){
        return new Jackson2JsonMessageConverter();
    }
}
在发送和接受消息的时候,会自动进行序列化操作
可以这么接收消息
  @RabbitListener(queues = "QUEUE_DEMO_DIRECT")
    public void ListenerQueue01(Message message, Map data){
        System.out.println("mess===="+message);
        logger.info("[onMessage][线程编号:{} 消息内容:{}]", Thread.currentThread().getId(), message);
    }
RetryTemplate
这个等待研究rabbitMq的重试策略的时候再进行说明
receiveTimeout
receive() 操作的超时时间
这个方法是消费者使用的方法
rabbitTemplate的receive方法是用来接收消息的方法
例如配置
spring:
  # RabbitMQ 配置项,对应 RabbitProperties 配置类
  rabbitmq:
    template:
      receiveTimeout: 5s
  @Test
    public void receiveTest() {
        Message queue_demo_direct = rabbitTemplate.receive("QUEUE_DEMO_DIRECT");
        System.out.println(queue_demo_direct);
    }
那么receive方法会阻塞5秒。等待拉消费的新消息,如5秒内都没有新消息过来,那么返回空
ReplyTimeout
sendAndReceive() 操作的超时时间
这个方法是生产者会使用的方法
// 向发布订阅模式里面发送消息
public void sendPublish() {
    for (int i = 0; i < 5; i++) {
        // rabbitTemplate.convertSendAndReceive("exchange_fanout", "", "测试发布订阅模型:" + i);
        rabbitTemplate.convertAndSend("exchange_fanout", "", "测试发布订阅模型:" + i);
    }
}
使用 convertAndSend 方法时的结果:输出时没有顺序,不需要等待,直接运行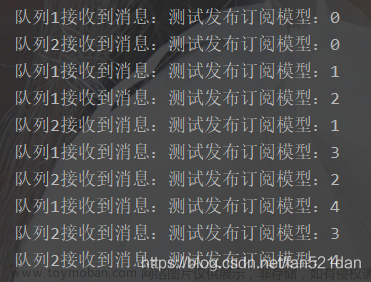
使用 convertSendAndReceive 方法时的结果:使用此方法,只有确定消费者接收到消息,才会发送下一条信息,每条消息之间会有间隔时间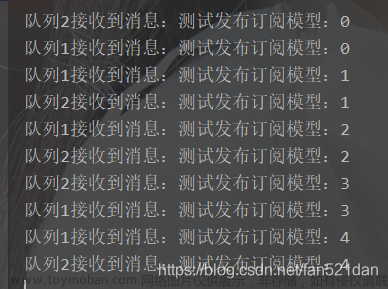 总结
总结
convertSendAndReceive(…):可以同步消费者。使用此方法,当确认了所有的消费者都接收成功之后,才触发另一个convertSendAndReceive(…),也就是才会接收下一条消息。RPC调用方式。
convertAndSend(…):使用此方法,交换机会马上把所有的信息都交给所有的消费者,消费者再自行处理,不会因为消费者处理慢而阻塞线程。
示例
rabbitmq:
   # host: 192.168.19.128 # RabbitMQ 服务的地址
    host: 192.168.159.100 # RabbitMQ 服务的地址
    port: 5672 # RabbitMQ 服务的端口
    username: ping # RabbitMQ 服务的账号
    password: 123456 # RabbitMQ 服务的密码
    template:
      mandatory: true
      receiveTimeout: 5s
      replyTimeout: 60s
生产者
  @Test
    public void DirectExchange() {
        Map map =  new HashMap<>();
        CorrelationData correlationData = new CorrelationData();
        map.put("msg","json");
        rabbitTemplate.convertSendAndReceive (RabbitmqDirectConfig.EXCHANGE_NAME, "ROUTING_KEY_01", map, correlationData);
        System.out.println("发送消息boot mq hello Direct成功");
    }
消费者需要使用 receiveAndReply进行恢复,达到rpc调用的效果文章来源:https://www.toymoban.com/news/detail-485151.html
 @Test
    public void receiveTest() {
      rabbitTemplate.receiveAndReply("QUEUE_DEMO_DIRECT",
                (o)->{
                    System.out.println(o);
                    return o;
                });
       // System.out.println(queue_demo_direct);
    }
Exchange,routingKey,defaultReceiveQueue
三个默认值,如果不指定将使用默认配置的交换机和routingkey
defaultReceiveQueue的作用是,receive方法默认拉取消息的队列文章来源地址https://www.toymoban.com/news/detail-485151.html
@Override
	@Nullable
	public Message receive() throws AmqpException {
		return this.receive(getRequiredQueue());
	}
到了这里,关于RabbitTemplate的创建与配置的文章就介绍完了。如果您还想了解更多内容,请在右上角搜索TOY模板网以前的文章或继续浏览下面的相关文章,希望大家以后多多支持TOY模板网!