准备工作
在搭建系统之前,需要详细阅读讯为公司提供的一些资料(虽然他们家资料一直都做的不完善),搭建好用于开发的Ubuntu虚拟机环境,熟练使用一些常用工具如烧录系统的工具RKDevTool、传输文件的工具FileZilla、远程连接工具MobaXterm等等。当然,本章只针对根文件系统,uboot、kernel的镜像文件和驱动文件需要提前准备好,编译讯为提供的Rockchip的SDK即可得到这些文件。
最小Ubuntu根文件系统
Ubuntu在镜像网站Index of / (ubuntu.com)提供了各种版本的镜像文件,我们从下面的连接下载最小系统,之后继续安装桌面软件包,进行一系列的配置就可以获得我们需要的系统。
ubuntu-base-20.04.1-base-arm64.tar.gz |
先寻找一个空白的文件夹放置ubuntu-base-20.04.1-base-arm64.tar.gz,然后以root权限建立一个文件夹,将根文件系统解压到这个文件夹中。
sudo mkdir ubuntu-rootfs
sudo tar -xvpf ubuntu-base-20.04.5-base-arm64.tar.gz -C ubuntu-rootfs
接下来在Ubuntu虚拟机上模拟运行arm64架构的最小文件系统,为此需要安装qemu-user-static。
sudo apt-get install qemu-user-static
# 适用于arm 32位架构
sudo cp /usr/bin/qemu-arm-static ubuntu-rootfs/usr/bin/
# 适用于aarch64即arm64架构
sudo cp /usr/bin/qemu-aarch64-static ubuntu-rootfs/usr/bin/
为了连接网络,需要拷贝resolv.conf文件以及配置国内的镜像源。
# 拷贝文件
sudo cp -b /etc/resolv.conf ubuntu-rootfs/etc/resolv.conf
# 修改镜像源
sudo gedit ubuntu-rootfs/etc/apt/sources.list
下面是阿里云镜像源,可以直接复制内容覆盖源镜像列表文件。
# See http://help.ubuntu.com/community/UpgradeNotes for how to upgrade to
# newer versions of the distribution.
deb http://mirrors.aliyun.com/ubuntu-ports/ focal main restricted
# deb-src http://mirrors.aliyun.com/ubuntu-ports/ focal main restricted

## Major bug fix updates produced after the final release of the
## distribution.
deb http://mirrors.aliyun.com/ubuntu-ports/ focal-updates main restricted
# deb-src http://mirrors.aliyun.com/ubuntu-ports/ focal-updates main restricted

## N.B. software from this repository is ENTIRELY UNSUPPORTED by the Ubuntu
## team. Also, please note that software in universe WILL NOT receive any
## review or updates from the Ubuntu security team.
deb http://mirrors.aliyun.com/ubuntu-ports/ focal universe
# deb-src http://mirrors.aliyun.com/ubuntu-ports/ focal universe
deb http://mirrors.aliyun.com/ubuntu-ports/ focal-updates universe
# deb-src http://mirrors.aliyun.com/ubuntu-ports/ focal-updates universe

## N.B. software from this repository is ENTIRELY UNSUPPORTED by the Ubuntu
## team, and may not be under a free licence. Please satisfy yourself as to
## your rights to use the software. Also, please note that software in
## multiverse WILL NOT receive any review or updates from the Ubuntu
## security team.
deb http://mirrors.aliyun.com/ubuntu-ports/ focal multiverse
# deb-src http://mirrors.aliyun.com/ubuntu-ports/ focal multiverse
deb http://mirrors.aliyun.com/ubuntu-ports/ focal-updates multiverse
# deb-src http://mirrors.aliyun.com/ubuntu-ports/ focal-updates multiverse

## N.B. software from this repository may not have been tested as
## extensively as that contained in the main release, although it includes
## newer versions of some applications which may provide useful features.
## Also, please note that software in backports WILL NOT receive any review
## or updates from the Ubuntu security team.
deb http://mirrors.aliyun.com/ubuntu-ports/ focal-backports main restricted universe multiverse
# deb-src http://mirrors.aliyun.com/ubuntu-ports/ focal-backports main restricted universe multiverse

## Uncomment the following two lines to add software from Canonical's
## 'partner' repository.
## This software is not part of Ubuntu, but is offered by Canonical and the
## respective vendors as a service to Ubuntu users.
# deb http://archive.canonical.com/ubuntu focal partner
# deb-src http://archive.canonical.com/ubuntu focal partner

deb http://mirrors.aliyun.com/ubuntu-ports/ focal-security main restricted
# deb-src http://mirrors.aliyun.com/ubuntu-ports/ focal-security main restricted
deb http://mirrors.aliyun.com/ubuntu-ports/ focal-security universe
# deb-src http://mirrors.aliyun.com/ubuntu-ports/ focal-security universe
deb http://mirrors.aliyun.com/ubuntu-ports/ focal-security multiverse
# deb-src http://mirrors.aliyun.com/ubuntu-ports/ focal-security multiverse
编写一个挂载脚本mount.sh,方便进入和退出arm64的文件系统
#!/bin/bash
function mnt() {
  echo "MOUNTING"
  sudo mount -t proc /proc ${2}proc
  sudo mount -t sysfs /sys ${2}sys
  sudo mount -o bind /dev ${2}dev
  #sudo mount -t devpts -o gid=5,mode=620 devpts ${2}dev/pts
  sudo mount -o bind /dev/pts ${2}dev/pts
  sudo chroot ${2}
}
function umnt() {
  echo "UNMOUNTING"
  sudo umount ${2}proc
  sudo umount ${2}sys
  sudo umount ${2}dev/pts
  sudo umount ${2}dev
}
if [ "$1" == "-m" ] && [ -n "$2" ] ;
then
  mnt $1 $2
elif [ "$1" == "-u" ] && [ -n "$2" ];
then
  umnt $1 $2
else
  echo ""
  echo "Either 1’st, 2’nd or both parameters were missing"
  echo ""
  echo "1’st parameter can be one of these: -m(mount) OR -u(umount)"
  echo "2’nd parameter is the full path of rootfs directory(with trailing ‘/’)"
  echo ""
  echo "For example: ch-mount -m /media/sdcard/"
  echo ""
  echo 1st parameter : ${1}
  echo 2nd parameter : ${2}
fi
更新与安装
进入arm64的根文件系统后,终端将只能操作arm64的根文件系统,通过exit命令退出并返回Ubuntu虚拟机的终端。
# 进入arm64的根文件系统
./mount.sh -m ubuntu-rootfs/
更新并升级根文件系统。
apt update
apt upgrade
安装一些必要的软件,如vim、sudo、网络管理、蓝牙管理等等。
apt install apt-utils dialog
apt install vim sudo
apt install bash-completion
apt install net-tools iputils-ping ifupdown ethtool
apt install wireless-tools network-manager
apt install ssh rsync udev htop rsyslog
apt install bluetooth* bluez* blueman*
# 可装可不装
apt install curl
apt install openssh-server
apt install git
apt install ffmpeg
配置系统的时区、文字编码。
apt install locales tzdata
# 时区选择
# Asia/Shanghai
dpkg-reconfigure locales
# 勾选英文和中文环境
# en_US.UTF-8 UTF-8
# zh_CN.UTF-8 UTF-8
安装图形环境,依赖非常多,占用空间3G多。
apt install ubuntu-desktop开机默认切换到图形界面。
systemctl set-default graphical.targetNetwork-Manager服务会自动配置网卡,但是其默认配置文件将Ethernet加入了黑名单,以至于Ubuntu提示unmanned。
vi /usr/lib/NetworkManager/conf.d/10-globally-managed-devices.conf
# 文件内容改为如下内容
[keyfile]
unmanaged-devices=*,except:type:ethernet,except:type:wifi,except:type:gsm,except:type:cdma
设置主机名,增加用户,修改账户密码。
# 主机名
echo "RK3588" > /etc/hostname
# 主机IP地址
echo "127.0.0.1 localhost RK3588" > /etc/hosts
# 添加用户
useradd -s '/bin/bash' -m -G adm,sudo user
# 设置密码
passwd user
passwd root
安装中英文语言包和中文输入法。
# 英文环境
apt install language-pack-en-base
apt install language-pack-gnome-en-base

# 中文环境
apt install language-pack-zh-hans-base
apt install language-pack-gnome-zh-hans-base

# 中文输入法
apt install ibus-table-wubi ibus-pinyin ibus-sunpinyin
服务配置
桌面环境需要的包已经基本安装完成,接下来需要一些别的配置。
Ubuntu根文件系统打包成镜像并烧录到emmc后,所占分区大小和镜像的大小一样,为了充分利用emmc的空间,需要在第一次运行时扩充分区大小。根据parameter.txt中rootfs分区对应的名称配置, 默认是对/dev/mmcblk0p6分区进行扩充。创建一个脚本和服务来扩充分区。
vi etc/init.d/firstboot.sh
# 以下是firstboot.sh的内容
#!/bin/bash -e
# first boot configure
# resize filesystem mmcblk0p6
if [ ! -e "/usr/local/first_boot_flag" ] ;
then
  echo "Resizing /dev/mmcblk0p6..."
  resize2fs /dev/mmcblk0p6
  touch /usr/local/first_boot_flag
fi
添加运行权限。
chmod +x etc/init.d/firstboot.shvi lib/systemd/system/firstboot.service
# 以下是firstboot.service的内容
#start
[Unit]
Description=Setup rockchip platform environment
Before=lightdm.service
After=resize-helper.service
[Service]
Type=simple
ExecStart=/etc/init.d/firstboot.sh
[Install]
WantedBy=multi-user.target
#end启动firstboot.service服务。
systemctl enable firstboot.service启用ssh的root帐号登录。
vi /etc/ssh/sshd_config
# 将下面这项设置成yes
PermitRootLogin yes
Ubuntu默认不能用root登录界面,可以配置启用以root登录界面。
vi /usr/share/lightdm/lightdm.conf.d/50-ubuntu.conf
# 添加下面的内容
greeter-show-manual-login=true
all-guest=false

vi /etc/pam.d/gdm-autologin
# 注释掉下面这行
#auth   required        pam_succeed_if.so user != root quiet_success

vi /etc/pam.d/gdm-password
# 注释掉下面这行
#auth   required        pam_succeed_if.so user != root quiet_success

vi /root/.profile
# 添加下面的内容,替换掉 mesg n || true 这一行
tty -s && mesg n || true
可以设置界面的自动登录。
vi /etc/gdm3/custom.conf
# 添加下面的内容,user即账户名
[daemon]
AutomaticLoginEnable=true
AutomaticLogin=user
TimedLoginEnable=true
TimedLogin=user
TimedLoginDelay=10
为方便在没有网络的时候调试,设置通过串口登录root。
vi /lib/systemd/system/serial-getty\@.service
# 替换ExecStart这行
ExecStart=-/sbin/agetty --autologin root --noclear %I $TERM
打包镜像
退出arm64文件系统环境,回到宿主机环境,卸载挂载的目录
# 退出arm64的根文件系统
exit
# 卸载挂载的目录
./mount.sh -u ubuntu-rootfs/
讯为RK3588平台采用RTL8723du这款wifi和Bluetooth二合一基于USB总线的无线设备,其驱动被编译成了模块,需要安装这些模块才能启用无线和蓝牙,其中蓝牙还需要RTL官方的固件。这些文件可以在编译Debian后的输出目录的中(/lib/firmware)找到,需要将这些文件拷贝到我们的根文件系统中。8723du.ko是wifi的驱动,rtk_btusb.ko是蓝牙的驱动。
# copy 8723du.ko to ubuntu-rootfs/lib/modules/5.10.66
# copy rtk_btusb.ko to ubuntu-rootfs/lib/modules/5.10.66
# copy rtl8723du_config rtl8723du_fw to /lib/firmware
# Linux会自动安装modprobe安装过的驱动
# depmod也许会提示缺少modules.order modules.builtin文件,这些文件是编译内核后生成的,同样复制到ubuntu-rootfs/lib/modules/5.10.66即可
depmod
modprobe 8723du.ko
modprobe rtk_btusb.ko
制作镜像脚本,空间分配6G
vi mkimage.sh
# mkimage.sh内容如下
#!/bin/bash
rootfs_dir=$1
rootfs_file=$2
rootfs_mnt="mnt"
if [ ! $rootfs_dir ] || [ ! $rootfs_file ];
then
  echo "Folder or target is empty."
  exit 0
fi
if [ -f "$rootfs_file" ]; then
  echo "-- Delete exist $rootfs_file ..."
  rm -f "$rootfs_file"
fi
echo "-- Create $rootfs_file ..."
dd if=/dev/zero of="$rootfs_file" bs=1M count=6144
sudo mkfs.ext4 -F -L linuxroot "$rootfs_file"
if [ ! -d "$rootfs_mnt" ]; then
  mkdir $rootfs_mnt
fi
echo "-- Copy data to $rootfs_file ..."
sudo mount $rootfs_file $rootfs_mnt
sudo cp -rfp $rootfs_dir/* $rootfs_mnt
sudo sync
sudo umount $rootfs_mnt
rm -r $rootfs_mnt
echo "-- Resize $rootfs_file ..."
/sbin/e2fsck -p -f "$rootfs_file"
/sbin/resize2fs -M "$rootfs_file"
echo "-- Done."
制作镜像,制作完成后即可进行烧录。
./mkimage.sh ubuntu-rootfs rootfs.img待解决的问题
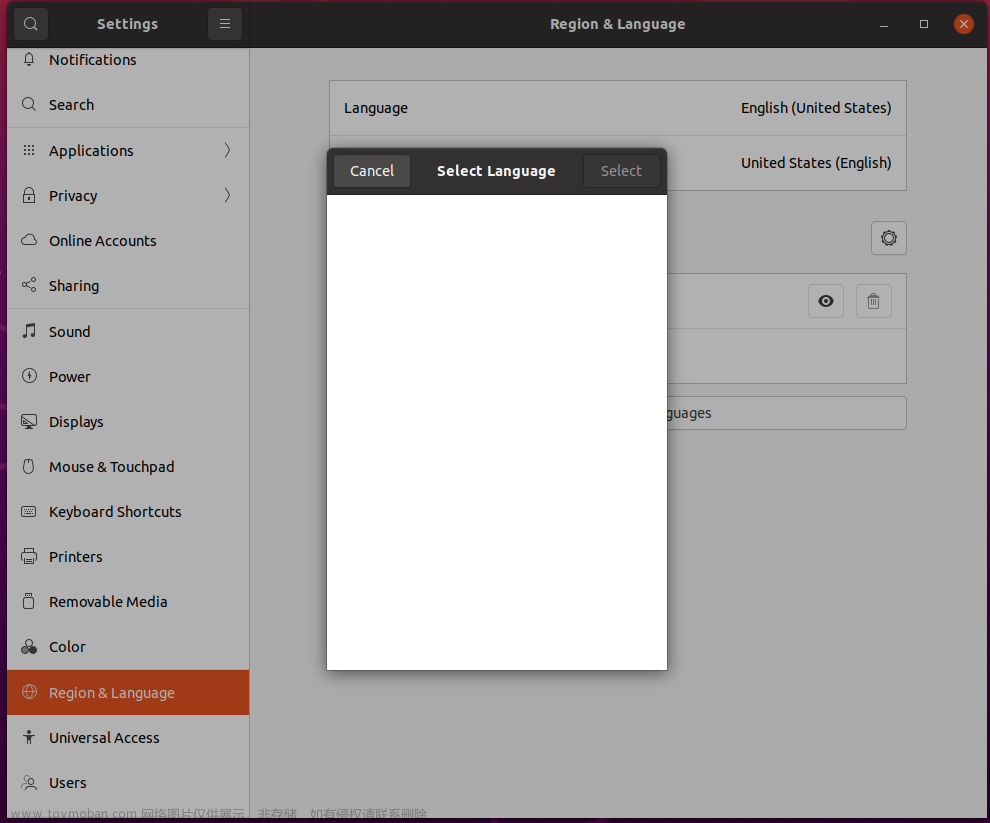
1)Ubuntu选择语言的界面为空,选择输入法的界面为空,原因未知。文章来源:https://www.toymoban.com/news/detail-781730.html

2)firefly的Ubuntu镜像优化的很不错,用wayland替代了XServer,界面非常流畅,但是运行在非firefly的设备上,会在开机显示logo时提示 This's not a firefly's product。文章来源地址https://www.toymoban.com/news/detail-781730.html
到了这里,关于基于讯为RK3588平台搭建Ubuntu20.04.5根文件系统的文章就介绍完了。如果您还想了解更多内容,请在右上角搜索TOY模板网以前的文章或继续浏览下面的相关文章,希望大家以后多多支持TOY模板网!