写在最前,先附上可视化后的效果:

一.问题描述
迷宫问题可以表述为:一个二维的网格,0 表示点可走,1 表示点 不可以走,点用(x,y)表示,寻找从某一个给定的起始单元格出发, 经由行相邻或列相邻的单元格(可以通过的),最终可以到达目标单元 格的、所走过的单元格序列。在任一个单元格中,都只能看到与它邻 近的 4 个单元格(如果位于底边,则只有 3 个;位于 4 个角上,则只 有 2 个是否能通过)。
该问题可用A*启发式搜索算法的思想求解。

本次评估函数中的
g(n):从起点到当前点所走的步数
h(n):当前点与终点之间的曼哈顿距离

二.算法实现【理论部分】
1.对问题的抽象
①.操作算子的选取
在不考虑附加条件的情况下,迷宫中的每一个数码块可选择的操作算子有:
- 上移 UP - 下移 DOWN - 左移 LEFT - 右移 RIGHT

②.执行操作算子的抽象过程
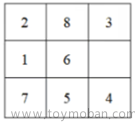
可将迷宫抽象为一个二维数组(以下图3*3的迷宫为例),这样每次数码块在迷宫中的移动将抽象为二维数组下标的变化,如下图的例子所示:
a.【①号】 执行【RIGHT操作】 移动到 【③号】的位置
- 下标变化:(0,0) => (0,1)
b. 【①号】 执行【DOWN操作】 移动到 【②号】的位置
- 下标变化:(0,0) => (1,0)

至此,数码在迷宫中的移动问题转为为数码的二维数组下标转换的问题。
不难得出 UP操作 = 行坐标 - 1 列坐标不变
DOWN操作 = 行坐标 + 1 列坐标不变
LEFT操作 = 行坐标不变 列坐标 - 1
RIGHT操作 = 行坐标不变 列坐标 + 1
③.操作算子的限制条件
在实际执行过程中,每个节点并不是任何情况下都能执行四个操作算子的,操作算子的选取应该具有如下几个限制条件:
A.迷宫四周边界的限制条件
这个非常好理解,不过多解释了,直接看图:

为避免此类现象,可在选取操作算子时加上对于边界的限制条件。当数码块的二维坐标满足边界条件时直接禁用相应的操作算子。
B.防止循环
前一次执行了UP操作,下一次操作算子选取应该禁用DOWN操作
前一次执行了LEFT操作,下一次操作算子选取应该禁用RIGHT操作
反之亦然,目的是为了避免出现程序在两个互相可达的数码块之间无限往返
为避免此类现象,在设计数据结构时可为每个节点保存上一次执行的操作(lastOperation)
C.迷宫中原有的不可达的点
实际情况下,用户可限制迷宫中的某些块不可走(参考"下一小节"实际执行过程"中 4*4迷宫图"),在程序中体现为灰色块可走,白色块不可走。
为实现该种限制条件,可为每个二维数组的元素设置对应的值:
0 表示 该数码块 可走 =》灰色
1 表示 该数码块 不可走 =》白色
为每个块设置不同的值后,在选取操作算子时以此作为判断条件,以此判断相应的操作算子是否可被选取。
举例说明: ①号在不考虑限制条件的情况下可选取DOWN和RIGHT操作分别到达③和②,但由于②号块的位置人为设置的不可走,因此不能选取RIGHT作为①的操作算子

④.无解的情况
对于无解的情况需要进行单独处理,以便算法出现无法预计的错误。
当起点或终点在迷宫初始化时本身不可达时,即其可选择的操作算子为0时,则不用执行寻路算法,直接返回该情况无解。用图例给出几种操作算子选取为0的常见情况。
只要起点或终点其中一个点满足不可达操作算子为0的条件,本次寻路算法便无需执行。因此在每次进行A*搜索路径前应该先判断起点和终点是否满足【操作算子为0】的条件。
文章来源地址https://www.toymoban.com/news/detail-781834.html

2.实际执行过程
以下图4*4的迷宫为例:
- 起点为(0,0) 终点为(3,3) 【二维数组下标从0开始】
- 灰色块为可走的数码块
- 白色块为不可走的数码块

①.搜索树的建立
为简化搜索树,对灰色块进行如下的编号

根据上图绘制如下的搜索树:

由上图的搜索树可知:
树中的每一个节点应该包含如下信息:
- 该点在树中的深度 deep
- 该点的估价函数值fn
- 该点的父节点father (用于溯源)
②.open表和closed表
open表中存放的是:按估价函数值fn排序的节点,
closed表中存放的是:每次从open表中取出的第一个节点
直到closed表中取到终止节点时迷宫寻路结束。

③.执行结果分析:
根据①中的搜索树和②中的open表和closed表分析可知:
根据例子可知【起点①-终点⑩】之间应该有两条路可达,分别为:
线路一: ①-②-③-⑥-⑧-⑨-⑩
线路二: ①-②-③-④-⑤-⑦-⑩
当起点和终点之间有多条估价函数值相同的的路径时,先找到谁则先返回谁。
假设本次执行结果返回的线路为 ①-②-③-⑥-⑧-⑨-⑩,具体可见下图:

3.数据结构设计
根据前文的各自分析,程序中最重要的数据结构是closed表中的每一个节点的结构。我对每一个节点的数据结构进行了如下的设计:
      mazePoint: {
        rowIndex: 0,        // 二维数组行索引
        colIndex: 0,       // 二维数组列索引
        lastOperation: "", // 该点由何种操作算子执行得到
        deep: 0,          // 该点在搜索树中的深度
        fn: 0,            // 该点的估价函数值
        father:{}         // 该点的父亲节点【用于溯源路径】
      },
三.算法实现【代码部分】
由于博主在编写时硬性要求需要有简单的界面并且用户可自定义迷宫的长宽和形状,我不想每次都输入很长的二维数组,于是编写时直接选用了JavaScript配合Vue,这样可用交互点击的方式代替繁琐的输入,DEMO已部署在公网了,读者可自行访问网站使用可视化的方式看到每次迷宫问题的解。
使用方法参考网站左侧的【使用步骤】或下方GIF图
网址在这:A*算法 可视化网站https://sls-website-ap-nanjing-evpmzcc-1313270013.cos-website.ap-nanjing.myqcloud.com/
放一个效果图:
1.流程图

2.源码
整个Vue项目小文件很多,这里只贴出主要的JS部分逻辑代码:
所有函数的功能在源码中基本都有注释了,有不懂的地方欢迎交流。
贴出DEMO的github仓库地址,感兴趣的读者可自行去仓库查看源码
A164759920/A--maze (github.com)https://github.com/A164759920/A--maze
代码小结:
- Vue2更新二维数组不能通过简单的赋值,需要使用this.$set
- 涉及引用数据类型的拷贝时,需要注意是深拷贝还是浅拷贝
- 若为深拷贝,推荐用Object.assign({},待拷贝对象)
- input框双向绑定的值默认读取类型为String(编写过程中貌似是这样)
- 若需要Number类型,使用Number()进行类型转换
- 可用shift和pop简化对数组的操作
- 可用动态class实现背景色切换
<script>
export default {
  name: 'HelloWorld',
  data: function () {
    return {
      rowNum: 1,  // 接收用户输入的行数
      colNum: 1,    // 接收用户输入的列数
      startInput: "0,0", // 接收用户输入的起点坐标
      endInput: "0,0",    // 接收用户输入的终点坐标
      startPoint: {    // 起点
        rowIndex: 0,
        colIndex: 0,
        lastOperation: "",
        deep: 0,
        fn: 0,
      },
      endPoint: {    // 终点
        rowIndex: 0,
        colIndex: 0,
        lastOperation: "",
        deep: 0,
        fn: 0,
      },
      mazeArray: [    // 迷宫二维数组
      ]
    }
  },
  methods: {
    /**
     * 设置迷宫块的类名
     * @param {String} rowIndex 行索引
     * @param {String} colIndex 列索引
     */
    setColorClass: function (rowIndex, colIndex) {
      let flag = ""
      switch (this.mazeArray[rowIndex][colIndex]) {
        case 0:
          flag = `selected`
          break;
        case 1:
          break;
        case 2:
          flag = `steped`
          break;
        case 3:
          flag = `start-end`
          break;
      }
      return flag
    },
    /**
     * 迷宫块点击事件
     * @param {String} rowIndex
     * @param {Srting} colIndex
     */
    setArray: function (rowIndex, colIndex) {
      // this.mazeArray[rowIndex][colIndex] = 1
      this.$set(this.mazeArray[rowIndex], colIndex, 0)
    },
    /**
     * 设置计算路径前的所有参数
     */
    saveParams: function () {
      const tempStart = this.startInput.split(",")
      // 先pop列后pop行
      this.startPoint.colIndex = Number(tempStart.pop())
      this.startPoint.rowIndex = Number(tempStart.pop())
      const tempEnd = this.endInput.split(",")
      // 先pop列后pop行
      this.endPoint.colIndex = Number(tempEnd.pop())
      this.endPoint.rowIndex = Number(tempEnd.pop())
      this.initParams()
      this.$set(this.mazeArray[this.startPoint.rowIndex], this.startPoint.colIndex, 0)
      this.$set(this.mazeArray[this.endPoint.rowIndex], this.endPoint.colIndex, 0)
    },
    /**
     * 计算路径并设置迷宫块颜色
     */
    getPath: function () {
      // 先判断起点和终点旁边是否有一步可达的通路,没有则一定不可达
      const isEndConnect = this.selectOperation("", this.endPoint.rowIndex, this.endPoint.colIndex)
      const isStartConnect = this.selectOperation("", this.startPoint.rowIndex, this.startPoint.colIndex)
      if (isEndConnect.length > 0 && isStartConnect.length > 0) {
        // 计算路径
        const closedList = this.computedRoute()
        // 回溯路径
        // 设置起点/终点样式
        this.$set(this.mazeArray[this.startPoint.rowIndex], this.startPoint.colIndex, 3)
        this.$set(this.mazeArray[this.endPoint.rowIndex], this.endPoint.colIndex, 3)
        console.log("最终closed表", closedList)
        // TODO:溯源需要修改
        let Father = closedList.pop().father
        while (Father.deep >= 1) {
          this.$set(this.mazeArray[Father.rowIndex], Father.colIndex, 2)
          Father = Father.father
        }
      } else {
        alert("起点-终点之间不可达")
      }

    },
    /**
     * 重写sort排序
     * @param {String} props 排序属性名
     */
    sortBy: function (props) {
      return function (a, b) {
        return a[props] - b[props]
      }
    },
    /**
     * 初始化迷宫二维数组
     */
    initParams: function () {
      //创建二维数组
      const arr = new Array(Number(this.rowNum))
      for (var i = 0; i < arr.length; i++) {
        arr[i] = new Array(Number(this.colNum)).fill(1)
      }
      this.mazeArray = arr
    },
    /**
     * 获取当前迷宫块可选择的操作算子
     * @param {String} lastOperation 上一次的操作算子
     * @param {String} rowIndex 行索引
     * @param {String} colIndex 列索引
     */
    selectOperation: function (lastOperation, rowIndex, colIndex) {
      const selectd = []
      // up操作
      if (lastOperation !== "down" && rowIndex !== 0) {
        if (this.mazeArray[rowIndex - 1][colIndex] === 0) {
          selectd.push("up")
        }
      }
      // down操作
      if (lastOperation !== "up" && rowIndex !== this.rowNum - 1) {
        if (this.mazeArray[rowIndex + 1][colIndex] === 0) {
          selectd.push("down")
        }
      }
      // left操作
      if (lastOperation !== "right" && colIndex !== 0) {
        if (this.mazeArray[rowIndex][colIndex - 1] === 0) {
          selectd.push("left")
        }
      }
      // right操作
      if (lastOperation !== "left" && colIndex !== this.colNum - 1) {
        if (this.mazeArray[rowIndex][colIndex + 1] === 0) {
          selectd.push("right")
        }
      }
      return selectd
    },
    /**
     * 获取执行操作算子后的迷宫块坐标
     * @param {String} operation 操作算子
     * @param {String} currentPoint 执行操作的迷宫块
     */
    getOperatedPoint(operation, currentPoint) {
      switch (operation) {
        case "up":
          currentPoint.rowIndex -= 1
          break;
        case "down":
          currentPoint.rowIndex += 1
          break;
        case "left":
          currentPoint.colIndex -= 1
          break;
        case "right":
          currentPoint.colIndex += 1
          break;
      }
      return currentPoint
    },
    /**
     * 计算曼哈顿距离
     * @param {String} rowIndex
     * @param {String} colIndex
     */
    computed_MHT_Distance(rowIndex, colIndex) {
      const distance = Math.abs(rowIndex - this.endPoint.rowIndex) + Math.abs(colIndex - this.endPoint.colIndex)
      return distance
    },
    /**
     * A*思想计算路线函数
     */
    computedRoute: function () {
      const that = this
      let openList = []
      openList.push(that.startPoint)
      const closedList = []
      let count = 1
      while (true) {
        if (openList[0].rowIndex === this.endPoint.rowIndex && openList[0].colIndex === this.endPoint.colIndex) {
          // 更新closed表
          closedList.push(openList[0])
          closedList.shift()
          // 更新open表
          openList.shift()
          // 退出循环
          // console.log("最终closed表", closedList)
          return closedList
        } else {
          // 操作算子集
          const currentOperation = this.selectOperation(openList[0].lastOperation, openList[0].rowIndex, openList[0].colIndex)
          // 遍历操作算子集,构建每一个Point对象
          currentOperation.forEach(operation => {
            const currentPoint = Object.assign({}, openList[0]) // 深拷贝
            const fatherPoint = Object.assign({}, openList[0]) // 深拷贝
            const nextPoint = that.getOperatedPoint(operation, currentPoint)
            const openlistObj = {
              rowIndex: nextPoint.rowIndex,
              colIndex: nextPoint.colIndex,
              lastOperation: operation,
              deep: currentPoint.deep + 1,
              fn: currentPoint.deep + 1 + that.computed_MHT_Distance(nextPoint.rowIndex, nextPoint.colIndex),
              father: fatherPoint
            }
            console.log(`第${count}次open表.元素`, openlistObj)
            openList.push(openlistObj)
          })
          // 更新closed表
          closedList.push(openList[0])
          // 更新open表
          openList.shift()
          openList.sort(that.sortBy("fn"))
          // 打印open表和closed表
          count = count + 1
        }
      }
    }
  },
}
</script>
写在最后:
博主也是代码小白,若读者在阅读过程中发现问题欢迎留言交流。
- 写于2022年最后一天文章来源:https://www.toymoban.com/news/detail-781834.html
到了这里,关于人工智能 - A*算法解决迷宫问题 附源码和可视化显示的文章就介绍完了。如果您还想了解更多内容,请在右上角搜索TOY模板网以前的文章或继续浏览下面的相关文章,希望大家以后多多支持TOY模板网!