Qt Installation and Setup in Windows with OpenCV ||Embedded Object Detection Project (Part 1)

这篇具有很好参考价值的文章主要介绍了Qt Installation and Setup in Windows with OpenCV ||Embedded Object Detection Project (Part 1)。希望对大家有所帮助。如果存在错误或未考虑完全的地方,请大家不吝赐教,您也可以点击"举报违法"按钮提交疑问。

Qt Installation and Setup in Windows with OpenCV || Qt with OpenCV - Embedded Object Detection Project using Hikvision Industrial Camera (Part 1)

Readme

I am documenting my experience in Qt development and hope that this article will be helpful to developers who are interested in learning and applying Qt. Don’t forget to click the “Follow” button to stay updated with our future posts. Let’s get startttttttttttted!

Introduction to Qt

Qt is a cross-platform application development framework that can run on different operating systems such as Windows, macOS, Linux, Android, and iOS.

Another important feature of Qt is its powerful and flexible GUI (Graphical User Interface) functionality.

Setting up Qt Environment with OpenCV for Windows

Downloading and Installing Qt

I am using an integrated development environment with Visual Studio because it allows me to use Microsoft Visual C++ (MSVC) compiler for Windows program development.

Make sure to install a compiler version that matches your Qt version.

Qt Installation and Setup in Windows with OpenCV ||Embedded Object Detection Project (Part 1),qt,opencv

Here’s the download reference:Setting up Visual Studio + Qt Development Environment
My version: Qt 5.12, which also matches MSVC2015.
Qt Installation and Setup in Windows with OpenCV ||Embedded Object Detection Project (Part 1),qt,opencv

Installing and Configuring OpenCV

Obtain the installation package

compiled version of OpenCV 4.5:

BaiduNetdisk Resources
Enter Code:gfql

Configuring Qt Project to Use OpenCV Library
//Remember to change the path to the local path of your own opencv.
INCLUDEPATH += \
       D:\opencv\build\include\opencv2  \
       D:\opencv\build\include\opencv \
       D:\opencv\build\include \

LIBS += \
       D:\opencv\build\x64\vc14\lib\opencv_world452d.lib \
       D:\opencv\build\x64\vc14\lib\opencv_world452.lib
Executing the Executable File
Method 1: Configuring Environment Variables
D:\opencv\build\bin
D:\opencv\build\x64\vc15\bin
D:\opencv\build\x64\vc15\lib
Method 2: Copying Application Extension Files

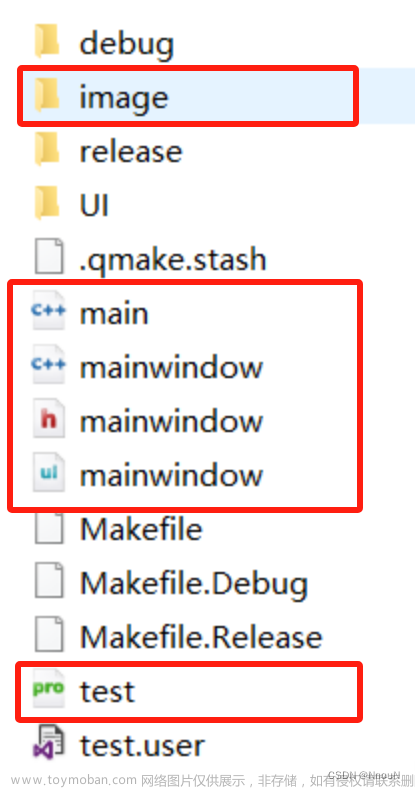
Put the following documents under the debug/release directory of your project. Qt Installation and Setup in Windows with OpenCV ||Embedded Object Detection Project (Part 1),qt,opencv

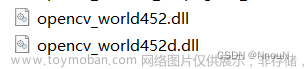
Where are these files?

opencv\build\x64\vc15\bin

What are these files?

They are dynamic link library files for the OPENCV library.

Why the debug/release directory ?

The debug/release directories are used to store the respective versions of the OpenCV library’s dynamic link library (DLL) files. To ensure that the application runs correctly, it is necessary to copy the required DLL files to the same directory as the executable file of the application.

The path to the debug directory depends on whether you have chosen shadow build.
Apparently, I didn’t choose and my version is debug.
Qt Installation and Setup in Windows with OpenCV ||Embedded Object Detection Project (Part 1),qt,opencv

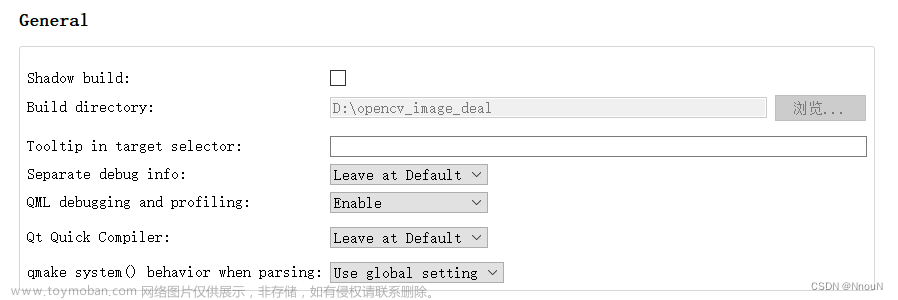
Shadow build means the build process and generated build artifacts are kept separate from the source code directory.

Example Code

Replace “path_to_image” with the actual path to your image file.
Windows path: D://document//image//44.jpg
Linux path: /home/orin/document/image/44.jpg

#include <QApplication>
#include <opencv2/opencv.hpp>

int main(int argc, char *argv[])
{
    QApplication a(argc, argv);

    // Create OpenCV window
    cv::namedWindow("Image", cv::WINDOW_NORMAL);

    // Load image
    cv::Mat image = cv::imread("path_to_your_image.jpg");

    // Display the image
    cv::imshow("Image", image);

    // 等待键盘输入,以保持窗口打开
    cv::waitKey(0);

    return a.exec();
}

the Issue of the UI Interface Not Updating

Delete all the generated files and Keep only the source files:

This includes any build directories, object files, and executable files that were generated during the compilation process.
The source files typically have extensions like .cpp, .h, .ui (for Qt UI files).

.Qt Installation and Setup in Windows with OpenCV ||Embedded Object Detection Project (Part 1),qt,opencv

Conclusion

In this blog post, we have introduced the Qt framework and discussed its capabilities for cross-platform application development. We have also provided an overview of the installation and setup process for integrating Qt with OpenCV.

In the next part of this series, we will dive deeper into the implementation of the embedded object detection project using the Hikvision industrial camera. Stay tuned!

Don’t forget to click the “Follow” button to stay updated with our future posts. Thank you!文章来源地址https://www.toymoban.com/news/detail-832806.html

到了这里,关于Qt Installation and Setup in Windows with OpenCV ||Embedded Object Detection Project (Part 1)的文章就介绍完了。如果您还想了解更多内容,请在右上角搜索TOY模板网以前的文章或继续浏览下面的相关文章,希望大家以后多多支持TOY模板网!

本文来自互联网用户投稿,该文观点仅代表作者本人,不代表本站立场。本站仅提供信息存储空间服务,不拥有所有权,不承担相关法律责任。如若转载,请注明出处: 如若内容造成侵权/违法违规/事实不符,请点击违法举报进行投诉反馈,一经查实,立即删除!

领支付宝红包赞助服务器费用

相关文章

  • 解决Command “python setup.py egg_info“ failed with error code 1 in C:\Users\AppData\

    目录 解决Command \\\"python setup.py egg_info\\\" failed with error code 1 in C:UsersAppData 错误原因 解决方法 1. 确保安装了正确的依赖项 2. 更新pip和setuptools 3. 检查Python环境 4. 清理缓存 5. 手动安装依赖包 6. 检查错误信息 总结 在Python开发过程中,有时我们会遇到一些错误信息,其中之一是​

    2024年02月05日
    浏览(30)
  • 2023+HuggingGPT: Solving AI Tasks with ChatGPT and itsFriends in Hugging Face

    2023+HuggingGPT: Solving AI Tasks with ChatGPT and itsFriends in Hugging Face

    摘要: 语言是llm(例如ChatGPT)连接众多AI模型(例如hugs Face)的接口,用于解决复杂的AI任务。在这个概念中,llms作为一个控制器,管理和组织专家模型的合作。LLM首先根据用户请求规划任务列表,然后为每个任务分配专家模型。专家执行任务后,LLM收集结果并响应用户。 问题:

    2024年02月12日
    浏览(7)
  • HuggingGPT Solving AI Tasks with ChatGPT and its Friends in Hugging Face

    HuggingGPT Solving AI Tasks with ChatGPT and its Friends in Hugging Face

    HuggingGPT 让LLM发挥向路由器一样的作用,让LLM来选择调用那个专业的模型来执行任务。 HuggingGPT搭建LLM和专业AI模型的桥梁。 Language is a generic interface for LLMs to connect AI models Task Planning: 将复杂的任务分解。但是这里是将任务分解为一系列的structured tasks。还可以通过之前的 ch

    2024年02月15日
    浏览(14)
  • 《2023 HuggingGPT: Solving AI Tasks with ChatGPT and its Friends in Hugging Face》阅读笔记

    《2023 HuggingGPT: Solving AI Tasks with ChatGPT and its Friends in Hugging Face》阅读笔记

    借助大语言模型(LLMS)在语言理解生成推理等方面表现出的出色能力,考虑将其作为控制器来管理现有的各种AI模型, 把语言作为通用接口 。基于这一理念,提出了HuggingGPT框架,利用LLMS(ChatGPT)来连接机器学习社区(Hug face)中的各种AI模型,具体来说就是在接收用户请求

    2024年02月02日
    浏览(14)
  • 【Threads and QObjects,Thread-Support in Qt Modules】线程和QObjects,Qt模块中的线程支持

    【Threads and QObjects,Thread-Support in Qt Modules】线程和QObjects,Qt模块中的线程支持

    Threads 继承了 QObjects类。它发出信号来指示线程已开始执行或已完成执行,并提供一些槽函数。 更有趣的是,QObjects可以在多个线程中使用,发出调用其他线程中槽的信号,并将事件发布到“live”在其他线程中的对象。这是可能的,因为每个线程都允许有自己的事件循环。

    2024年02月04日
    浏览(29)
  • opencv拉流出现missing picture in access unit with size 4错误解决

    opencv拉流出现missing picture in access unit with size 4错误解决

    我们使用opencv作为拉流客户端,获取画面后进行图像处理并推流(使用ffmpeg库)。 opencv解码同样使用ffmpeg库。 我们要求opencv能根据业务不断进行拉流操作,等效的逻辑代码如下: 注意代码中 // 无流时会有20-30s超时时间 注释的地方cap.open() 和 cap.read(frame),后面会用到。 在一

    2024年01月20日
    浏览(20)
  • Neo4j文档阅读笔记-Installation and Launch Guide

    Neo4j文档阅读笔记-Installation and Launch Guide

    ①找到下载好的Neo4j Desktop文件,然后双击进行安装; ②安装Neo4j Desktop根据下一步进行安装。 ①激活 打开Neo4j Desktop应用程序后,将激活码输入到“Activation Key”窗口中。 ②创建数据库 激活后,点击“New Graph”按钮,选择“Create a local graph”。然后输入“Database name”和“pa

    2024年02月14日
    浏览(9)
  • OpenCV 报错:FFMPEG: tag 0x34363258/‘X264‘ is not supported with codec id 27 and format ‘mp4 / MP4‘

    首先说一下报错的地方,是在使用VideoWriter保存视频时: 出现如下错误: 经过查找网上资料,发现是cv2.VideoWriter_fourcc()参数存在问题, 解决方法: 将 修改为: 即可完美解决问题。

    2024年02月07日
    浏览(17)
  • 【已解决】Please install Node.js and npm before continuing installation.

    【已解决】Please install Node.js and npm before continuing installation.

    给juopyter lab安装插件时报这个错 原因是,conda本身有nodejs,但是版本很低,只有0.几 所以需要卸载掉原来的nodejs,重新安装10版本以上的nodejs

    2024年02月11日
    浏览(19)
  • windows11编译OpenCV4.5.0 with CUDA(附注意事项)

    windows11编译OpenCV4.5.0 with CUDA(附注意事项)

    从OpenCV4.2.0 版本开始允许使用 Nvidia GPU 来加速推理。本文介绍最近使用windows11系统编译带CUDA的OpenCV4.5.0的过程。 文中使用【 特别注意 :…】为大家标识出容易出错的地方。 安装成功后,使用CPU与GPU调用yolov4模型进行推理的耗时测试结果: GPU CPU 4ms 311ms 从差距上看,还是值

    2024年02月12日
    浏览(74)

觉得文章有用就打赏一下文章作者

支付宝扫一扫打赏

博客赞助

微信扫一扫打赏

请作者喝杯咖啡吧~博客赞助

支付宝扫一扫领取红包,优惠每天领

二维码1

领取红包

二维码2

领红包