1. 用简化的方式手动创建ca(生成证书文件)
使用cryptogen模板,修改配置
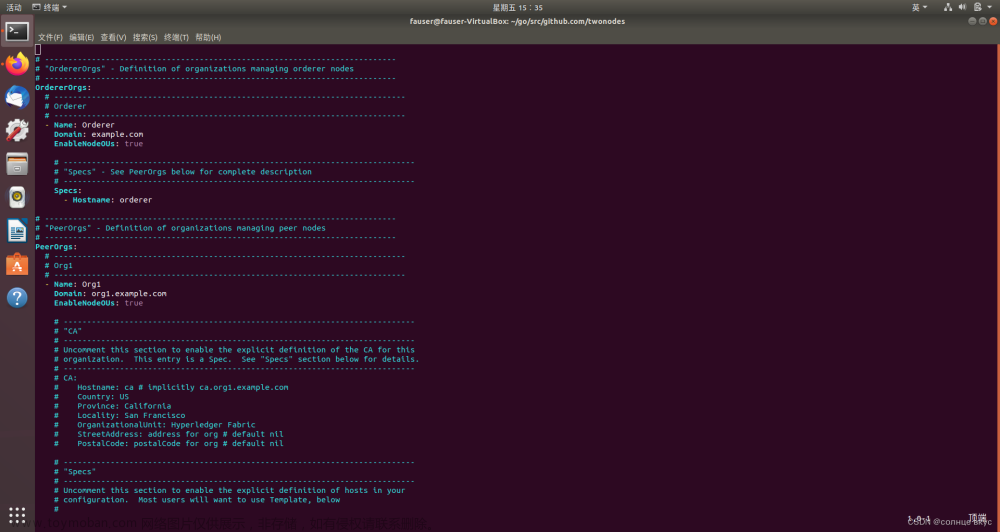
EnableNodeOUs:表示是否在组织底下设置组织单元,将false改为true。将文件保存到crypto-config.yaml.
-
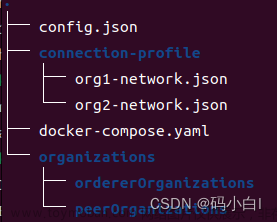
ca:该文件夹包含证书颁发机构(Certificate Authority)相关的文件,用于生成和管理证书。 -
msp:该文件夹包含成员服务提供者(Membership Service Provider)相关的文件,用于管理组织的成员身份和权限。 -
orderers:该文件夹包含排序节点(Ordering Node)相关的文件,用于配置和管理排序服务。 -
tlsca:该文件夹包含TLS CA(Transport Layer Security Certificate Authority)相关的文件,用于生成和管理TLS证书。 -
users:该文件夹包含用户相关的文件,用于管理用户的证书和密钥。
crptogen generate --config=crypto-config.yaml2. 创建通道配置
初始通道配置文件
复制测试网络给定的通道配置文件,在文件中进行简单修改。
文件路径test-network/configtx/configtx.yaml
主要就是把官方那个文档中MSPDir和ClientTLSCert及ServerTLSCert修改为步骤1我们创建的ca里的config中的相关路径,把官方文档中profiles的配置加进取
使用configtxgen允许用户创建和检查通道配置
(1)生成创世块文件
configtxgen -profile TwoOrgsApplicationGenesis -outputBlock ./channel-artifacts/genesis_block.pb -channelID hellofabric-channel(2)生成通道文件(fabric2.2及以前会用到)
configtxgen -profile TwoOrgsChannel -outputCreateChannelTx ./channel-artifacts/channel.tx -channelID hellofabric-channel(3)检查创世块文件
configtxgen -inspectBlock genesis_block.pb(4) 检查通道文件(fabric2.2及以前会用到)
configtxgen -inspectChannelCreateTx channel.tx3. 部署节点(通过docker-compose配置文件)
创建节点的方式有两种:
(1)在创建任何节点之前,必须在本机上自定义其配置文件。对于peer节点,该文件称为core.yaml,而orderer节点的配置文件称为orderer.yaml;
(2)使用一个docker容器,将docker节点跑在一个docker容器里面。
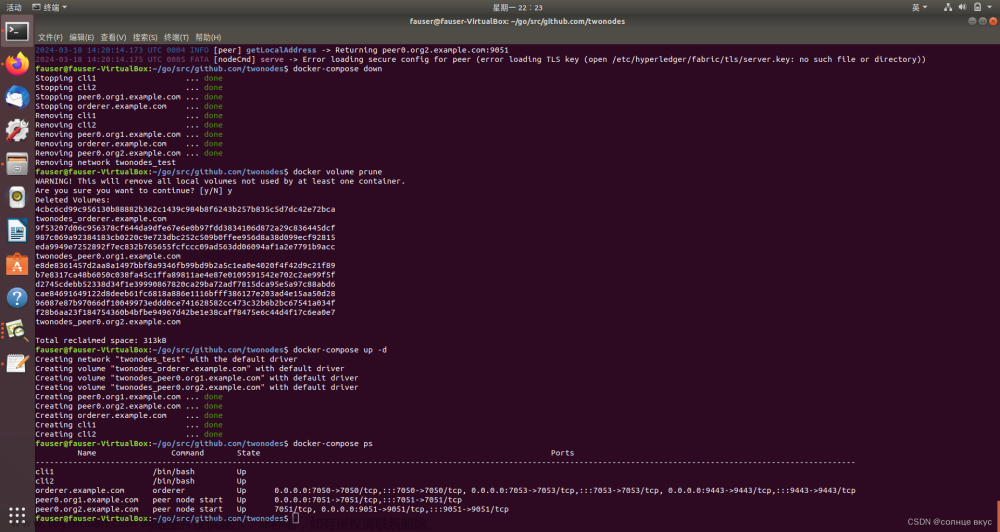
这里使用的是第二种方法,使用docker容器,首先将原来test-network里的compose文件夹下的compose-test-net.yaml和compose文件夹下的docker文件夹里的docker-compose-test-net.yaml两个文件结合成一个docker-compose.yaml文件,这里面包含了orderer和peer节点及相应的cli的配置信息,将里面相关环境变量的路径换成自己的路径
注意事项!!!!在创建peer节点时,我的peer节点每次一创建就会自动退出,查看日志说是缺少core文件,但通过docker容器创建节点时,core.yaml的配置信息其实都是放在了docker-compose.yaml里面的,所以一直找不到原因
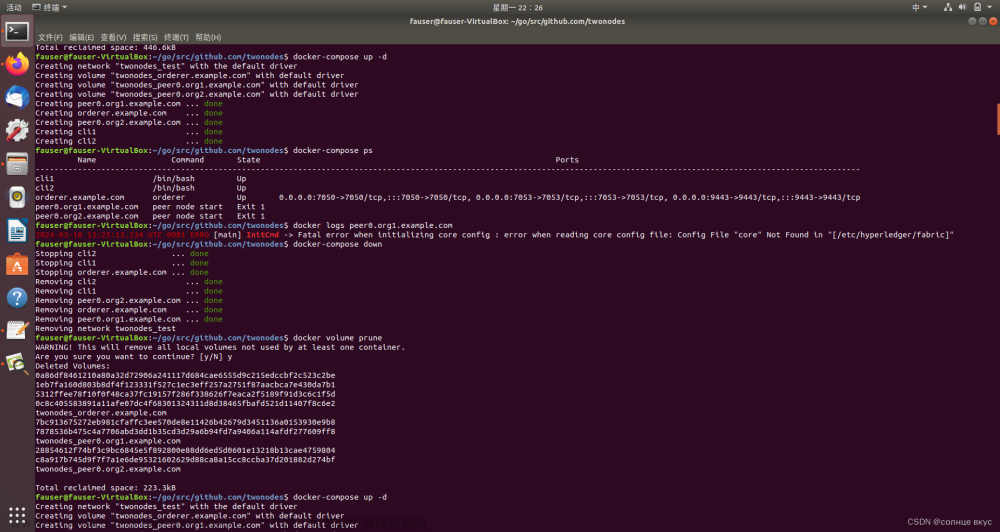
最后发现问题出现在
- ./crypto-config/peerOrganizations/org2.example.com/peers/peer0.org2.example.com:/etc/hyperledger/fabric卷映射上。在 Docker 中,当使用 - ./some/path:/another/path 这样的语法时,是在指定一个卷(volume)映射。这意味着 Docker 会将宿主机上的 ./some/path 目录或文件的内容复制到容器内的 /another/path 目录。注意这里的复制,严格意义来说,它并不是复制,而是替换。
例如./crypto-config/peerOrganizations/org1.example.com/peers/peer0.org1.example.com文件夹里有tsl和msp两个文件夹,而/etc/hyperledger/fabric有msp,tsl,ca等等文件或文件夹,这个映射生效后,/etc/hyperledger/fabric里的文件就只有映射过来的msp和tsl文件夹,其他文件夹和文件会丢失。因此,为了避免意外地覆盖容器内的现有文件和子目录,应该确保每个卷映射都是精确的,只映射确实想要替换的文件或目录。
在docker-compose.yaml文件夹的节点 volumes配置里,将上面的内容该为下面的
 - ./crypto-config/peerOrganizations/org2.example.com/peers/peer0.org2.example.com/msp:/etc/hyperledger/fabric/msp
 - ./crypto-config/peerOrganizations/org2.example.com/peers/peer0.org2.example.com/tls:/etc/hyperledger/fabric/tls
得到了正确的创建效果,节点也不会自动关闭退出网络。状态均为up。
4.将节点加入通道
4.1 加入orderer节点进入通道,激活通道
创建了创世块文件之后,通道相当于进行了初始化,但里面什么都没有,并且也没有任何节点加入里面,加入第一个节点进入通道,类似于激活通道。
export OSN_TLS_CA_ROOT_CERT=${PWD}/crypto-config/ordererOrganizations/example.com/orderers/orderer.example.com/msp/tlscacerts/tlsca.example.com-cert.pem
export ADMIN_TLS_SIGN_CERT=${PWD}/crypto-config/ordererOrganizations/example.com/orderers/orderer.example.com/tls/server.crt
export ADMIN_TLS_PRIVATE_KEY=${PWD}/crypto-config/ordererOrganizations/example.com/orderers/orderer.example.com/tls/server.key
osnadmin channel join --channelID hellofabric-channel --config-block ./channel-artifacts/genesis_block.pb -o orderer.example.com:7053 --ca-file $OSN_TLS_CA_ROOT_CERT --client-cert $ADMIN_TLS_SIGN_CERT --client-key $ADMIN_TLS_PRIVATE_KEY因为在这个过程中,我的代码报了很多错误,总是在tls连接时出错,为此我检查了很多地方,但总是感觉没什么问题,弄了很久都没弄出来。
辅助验证错误的工具
证书检查
检查证书是否存在并正确配置
openssl verify -verbose -CAfile $OSN_TLS_CA_ROOT_CERT $ADMIN_TLS_SIGN_CERT
检查证书的有效性
openssl x509 -text -noout -in /opt/gopath/src/github.com/hyperledger/fabric/peer/crypto/peerOrganizations/org1.example.com/users/Admin@org1.example.com/msp/signcerts/Admin@org1.example.com-cert.pem
网络检查
docker inspect <容器名/容器id>可以查看到容器的ip配置
然后通过ping和talnet命令来进行检测
检查防火墙配置
sudo iptables -L INPUT -n -v | grep :7050
最后查出来原因在于我的-o写的有问题,端口要和orderer节点所监听的端口对应,也不能忘了写端口。-o这一部分出错,就会对网络配置产生影响,在控制台就会出现tls握手出错的问题。
4.2 加入普通节点
首先要进入容器内部来创建通道
docker exec -it cli1 bash
peer channel join -b ./channel-artifacts/genesis_block.pb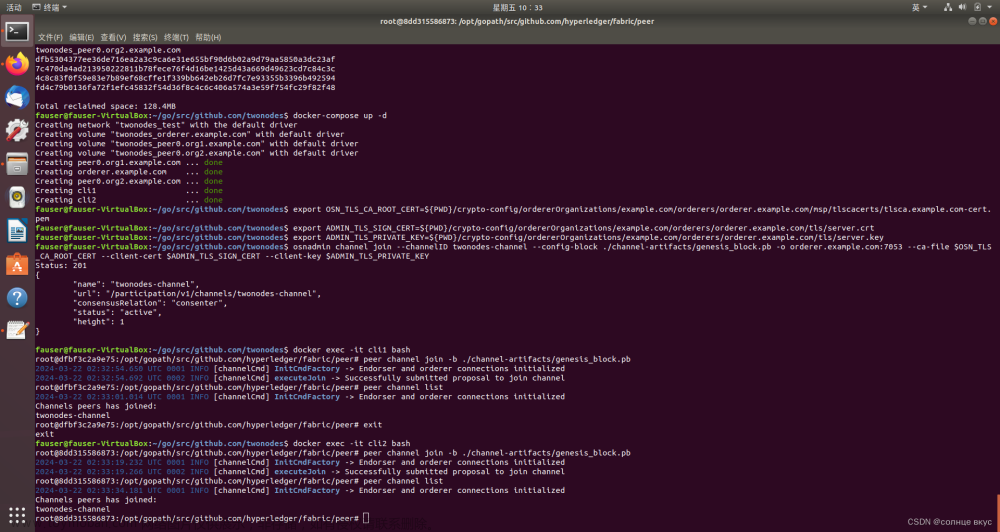
我这里是把节点放在两个cli容器的
4.3 为通道设置锚节点
锚节点的作用就是让不同组织底下的节点互相能够进行通讯,发现对方的节点。
进入cli1容器中,获取配置文件并输入到指定文件
peer channel fetch config channel-artifacts/config_block.pb -o orderer.example.com:7050 --ordererTLSHostnameOverride orderer.example.com -c hellofabric-channel --tls --cafile /opt/gopath/src/github.com/hyperledger/fabric/peer/crypto/ordererOrganizations/example.com/orderers/orderer.example.com/msp/tlscacerts/tlsca.example.com-cert.pem进入channel-artifacts文件夹下,使用 configtxlator 工具来进行通道配置任务(该工具主要由两个功能,一个是执行 protobuf 和 json 两种数据结构的转换,另一个是执行配置更新)。
首先,将配置块信息从 protobuf 类型转换为可读的 json 类型
configtxlator proto_decode --input config_block.pb --type common.Block --output config_block.json
jq '.data.data[0].payload.data.config' config_block.json > config.json
这样我们才可以让我们读懂配置文件并进行一些修改。
拷贝一个 config.json 的副本作为备份
cp config.json config_copy.json使用 jq 修改配置文件,将 Org1 中的普通节点(peer0.org1.example.com:7051)加入到配置文件中,这样我们就有了更新版本的配置文件了
jq '.channel_group.groups.Application.groups.Org1MSP.values += {"AnchorPeers":{"mod_policy": "Admins","value":{"anchor_peers": [{"host": "peer0.org1.example.com","port": 7051}]},"version": "0"}}' config_copy.json > modified_config.json将修改的文件重新转换为 protobuf 格式,更新后的锚节点配置信息放在特定文件夹里
configtxlator proto_encode --input config.json --type common.Config --output config.pb
configtxlator proto_encode --input modified_config.json --type common.Config --output modified_config.pb
configtxlator compute_update --channel_id hellofabric-channel --original config.pb --updated modified_config.pb --output config_update.pb
打包交易信封
configtxlator proto_decode --input config_update.pb --type common.ConfigUpdate --output config_update.json
echo '{"payload":{"header":{"channel_header":{"channel_id":"hellofabric-channel", "type":2}},"data":{"config_update":'$(cat config_update.json)'}}}' | jq . > config_update_in_envelope.json
configtxlator proto_encode --input config_update_in_envelope.json --type common.Envelope --output config_update_in_envelope.pb
更新通道配置
peer channel update -f channel-artifacts/config_update_in_envelope.pb -c hellofabric-channel -o orderer.example.com:7050 --ordererTLSHostnameOverride orderer.example.com --tls --cafile "/opt/gopath/src/github.com/hyperledger/fabric/peer/crypto/ordererOrganizations/example.com/orderers/orderer.example.com/msp/tlscacerts/tlsca.example.com-cert.pem"org2锚节点用类似方法加入

5. 部署链码
5.1 打包链码
先把链码放到指定的文件目录中,生成链码依赖包
go env -w GOPROXY=https://goproxy.cn,direct
go mod init
go mod vendor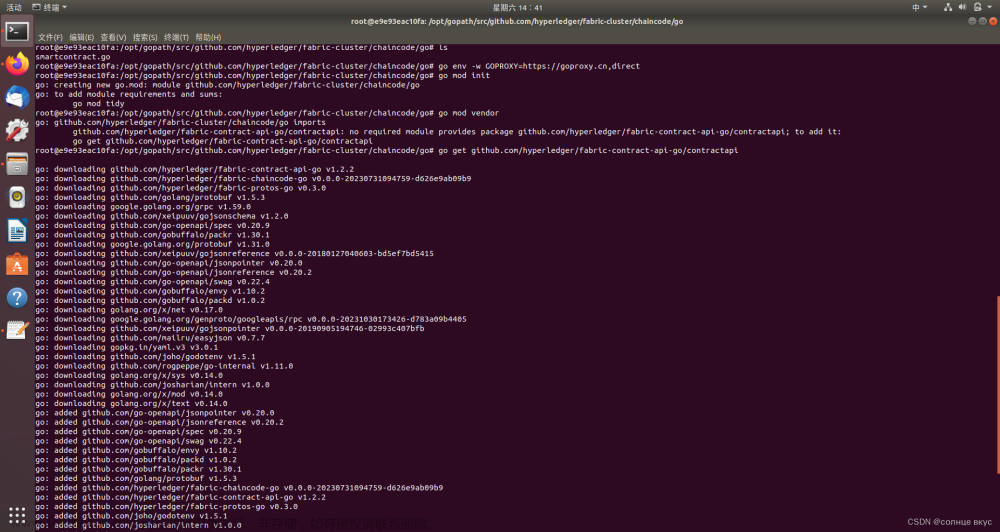
打包链码
peer lifecycle chaincode package helloworld.tar.gz --path /opt/gopath/src/github.com/hyperledger/fabric-cluster/chaincode/go --lang golang --label helloworld_1因为我使用了两个cli容器,所以将这个链码包又复制到了cli2容器里
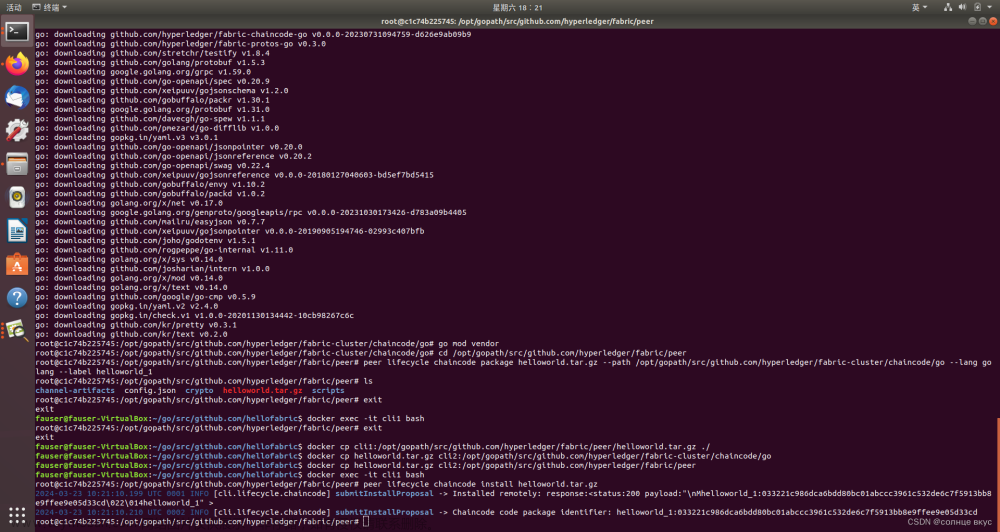
5.2 安装链码
在每个节点上安装
peer lifecycle chaincode install helloworld.tar.gz5.3 让组织批准链码
peer lifecycle chaincode approveformyorg --channelID hellofabric-channel --name helloworld --version 1.0 --package-id <对应id> --sequence 1 --tls true --cafile "/opt/gopath/src/github.com/hyperledger/fabric/peer/crypto/ordererOrganizations/example.com/orderers/orderer.example.com/msp/tlscacerts/tlsca.example.com-cert.pem"查询批准情况
peer lifecycle chaincode checkcommitreadiness --channelID hellofabric-channel --name helloworld --version 1.0 --sequence 1 --tls true --cafile "/opt/gopath/src/github.com/hyperledger/fabric/peer/crypto/ordererOrganizations/example.com/orderers/orderer.example.com/msp/tlscacerts/tlsca.example.com-cert.pem" --output json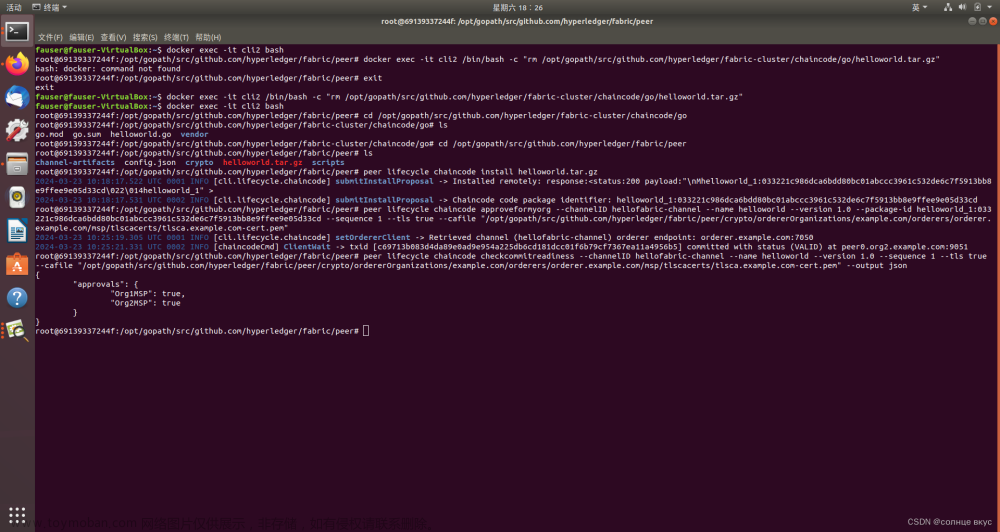
5.4 将链码提交到通道(实例化链码)
peer lifecycle chaincode commit -o orderer.example.com:7050 --channelID hellofabric-channel --name helloworld --version 1.0 --sequence 1 --tls true --cafile /opt/gopath/src/github.com/hyperledger/fabric/peer/crypto/ordererOrganizations/example.com/orderers/orderer.example.com/msp/tlscacerts/tlsca.example.com-cert.pem --peerAddresses peer0.org1.example.com:7051 --tlsRootCertFiles /opt/gopath/src/github.com/hyperledger/fabric/peer/crypto/peerOrganizations/org1.example.com/peers/peer0.org1.example.com/tls/ca.crt --peerAddresses peer0.org2.example.com:9051 --tlsRootCertFiles /opt/gopath/src/github.com/hyperledger/fabric/peer/crypto/peerOrganizations/org2.example.com/peers/peer0.org2.example.com/tls/ca.crt 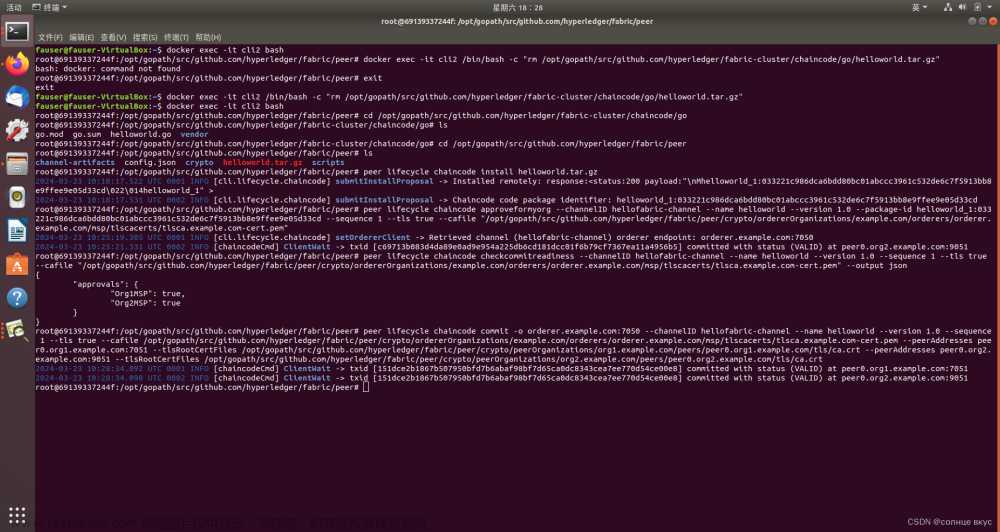
5.5 链码的调用
peer chaincode invoke -o orderer.example.com:7050 --isInit --ordererTLSHostnameOverride orderer.example.com --tls true --cafile /opt/gopath/src/github.com/hyperledger/fabric/peer/crypto/ordererOrganizations/example.com/orderers/orderer.example.com/msp/tlscacerts/tlsca.example.com-cert.pem -C hellofabric-channel -n helloworld --peerAddresses peer0.org1.example.com:7051 --tlsRootCertFiles /opt/gopath/src/github.com/hyperledger/fabric/peer/crypto/peerOrganizations/org1.example.com/peers/peer0.org1.example.com/tls/ca.crt --peerAddresses peer0.org2.example.com:9051 --tlsRootCertFiles /opt/gopath/src/github.com/hyperledger/fabric/peer/crypto/peerOrganizations/org2.example.com/peers/peer0.org2.example.com/tls/ca.crt -c '{"Args":["InitLedger"]}'
调用获取字符串函数
peer chaincode invoke -o orderer.example.com:7050 --ordererTLSHostnameOverride orderer.example.com --tls true --cafile /opt/gopath/src/github.com/hyperledger/fabric/peer/crypto/ordererOrganizations/example.com/orderers/orderer.example.com/msp/tlscacerts/tlsca.example.com-cert.pem -C hellofabric-channel -n helloworld --peerAddresses peer0.org1.example.com:7051 --tlsRootCertFiles /opt/gopath/src/github.com/hyperledger/fabric/peer/crypto/peerOrganizations/org1.example.com/peers/peer0.org1.example.com/tls/ca.crt --peerAddresses peer0.org2.example.com:9051 --tlsRootCertFiles /opt/gopath/src/github.com/hyperledger/fabric/peer/crypto/peerOrganizations/org2.example.com/peers/peer0.org2.example.com/tls/ca.crt -c '{"Args":["getMessage"]}'查询链码结果
peer chaincode query -C hellofabric-channel -n helloworld -c '{"Args":["GetMessage"]}'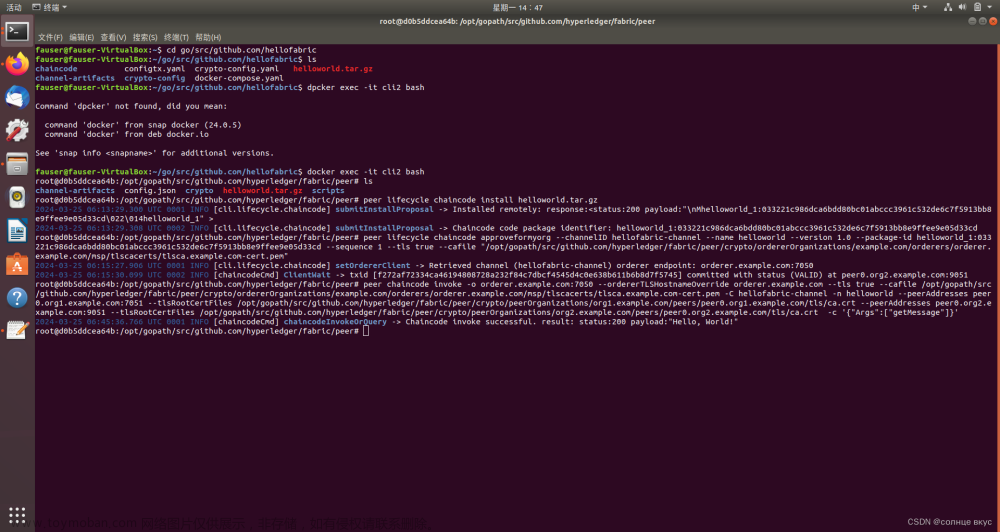 文章来源:https://www.toymoban.com/news/detail-843532.html
链码(helloworld.go):文章来源地址https://www.toymoban.com/news/detail-843532.html
package main

import (
	"fmt"
	"github.com/hyperledger/fabric-contract-api-go/contractapi"
)

type HelloWorldContract struct {
	contractapi.Contract
}

func (c *HelloWorldContract) Init(ctx contractapi.TransactionContextInterface) error {
	err := ctx.GetStub().PutState("message", []byte("Hello, World!"))
	if err != nil {
		return fmt.Errorf("failed to initialize contract: %v", err)
	}
	return nil
}

func (c *HelloWorldContract) GetMessage(ctx contractapi.TransactionContextInterface) (string, error) {
	message, err := ctx.GetStub().GetState("message")
	if err != nil {
		return "", fmt.Errorf("failed to get message: %v", err)
	}
	return string(message), nil
}

func main() {
	chaincode, err := contractapi.NewChaincode(new(HelloWorldContract))
	if err != nil {
		panic(err.Error())
	}
	if err := chaincode.Start(); err != nil {
		panic(err.Error())
	}
}
到了这里,关于区块链学习笔记(6)-搭建fabric开发网络的文章就介绍完了。如果您还想了解更多内容,请在右上角搜索TOY模板网以前的文章或继续浏览下面的相关文章,希望大家以后多多支持TOY模板网!