最近在公司要开发物联网项目,需要使用mqtt协议监听设备实时数据,因为要采用到后台展示不是很方便,可以使用阿里云服务器来做简单演示。
当然使用mqtt时需要两个软件结合使用,一个是技小新MQTT编程工具,一个是mqtt.fx软件,为了方便大家下载,我把软件已经整理好以下链接。
1.mqtt.fx
链接:https://pan.baidu.com/s/129Go2lOOgEjaYWeGmdElrg
提取码:4330
2.技小新MQTT编程工具
链接:https://pan.baidu.com/s/1HKKJ_DLRoPtmLfxcnQlNAw
提取码:wqf2
一.注册使用阿里云物联网平台
详细使用
可以参考以上大佬写的详细使用方法,如果你不要软件看到第七步即可,对了在使用技小新编程工具的时候,激活凭证不需要带{},否则会导致用户密码不对。如果需要软件即看后面即可,我这边需要代码连接设备就没有用到软件,不过如果你需要软件连接的时候记得配Address的时候不需要后面的:1883,否则连接会一直提示异常。
二.Vue安装mqtt
网上说因为高版本有可能兼容性不好,固安装低版本来保持稳定性
npm i mqtt@3.0.0
三.Vue使用mqtt
注意如果使用代码连接就不要使用mqtt.fx软件连接!!!
<template>
  <div>
    <p>{{ message }}</p>
    <button @click="duankai">断开连接</button>
    <el-card class="box-card">
      <el-descriptions title="用户信息">
        <el-descriptions-item label="温度">{{wd}}</el-descriptions-item>
        <el-descriptions-item label="版本号">{{bbh}}</el-descriptions-item>
        <el-descriptions-item label="百分比">{{bfb}}</el-descriptions-item>
        <el-descriptions-item label="开关">
          <el-switch v-model="kg" active-color="#13ce66" inactive-color="#ff4949"> </el-switch>
        </el-descriptions-item>
      </el-descriptions>
    </el-card>

  </div>
</template>

<script>
import * as mqtt from "mqtt/dist/mqtt.min";

export default {
  name: "App",
  data() {
    return {
      mqttfalg: true,
      message: "连接mqtt",
      mqttvalue: "mqtt接收的值",
      options: {
        connectTimeout: 4000, //超时时间
        clientId:
          "FESA234FBDS24|securemode=3,signmethod=hmacsha1,timestamp=789|", //id
        username: "LnKzG2XEEambu3OFUCOC&k0eokFazWTw", //用户名
        password: "93adb2687870736fe99ebcc9334a0d5d22efc8ab", //密码
        cleanSession: false,
        keepAlive: 60, //心跳值,心跳值太大可能会连接不成功,这个参考文档
      },
      client: null,
      wd: "",
      kg: false,
      bbh: "",
      bfb: "",
    };
  },
  mounted() {
    // 默认连接可以手动设置连接
    this.connect();
  },
  beforeDestroy() {
    this.disconnect(); // 销毁组件时断开连接
  },
  methods: {
    connect() {
      if (this.mqttfalg) {
        // 默认连接的协议
        this.client = mqtt.connect(
          "ws://pk.iot-as-mqtt.cn-shanghai.aliyuncs.com:443",
          this.options
        );

        this.client.on("connect", (e) => {
          this.message = `连接成功${e}`;
          // 设置mqttFlag为false,确保connect方法只执行一次
          this.mqttfalg = false;
          console.log("连接成功", e);
          // 订阅的设备配置
          this.client.subscribe(
            "/sys/k0eokJ7YN2R/demo/thing/service/property/set",
            { qos: 0 },
            (error) => {
              if (error) {
                console.log(error);
              } else {
                console.log("订阅成功");
              }
            }
          );
        });

        this.client.on("error", (error) => {
          console.log("连接出错", error);
        });

        this.client.on("message", (topic, message) => {
          this.mqttvalue = JSON.parse(message.toString());
          this.wd = this.mqttvalue.params.temperature;
          this.kg =
            this.mqttvalue.params.ForcedAlarmSwitch == "0" ? false : true;
          this.bbh = this.mqttvalue.params.Brightness;
          this.bfb = this.mqttvalue.params.IpcVersion;
        });
      }
    },
    disconnect() {
      if (this.client) {
        this.client.end();
        console.log("断开连接");
      }
    },
    duankai() {
      this.client.end();
      console.log("断开");
    },
  },
};
</script>
四.演示效果
首先在阿里云设备配置完成以后,使用以上代码成功连接设备后,需要以下步骤。
1.阿里云查看设备是否连接成功

2.阿里云添加自定义设备功能

3.阿里云草稿箱自定义编辑设备功能

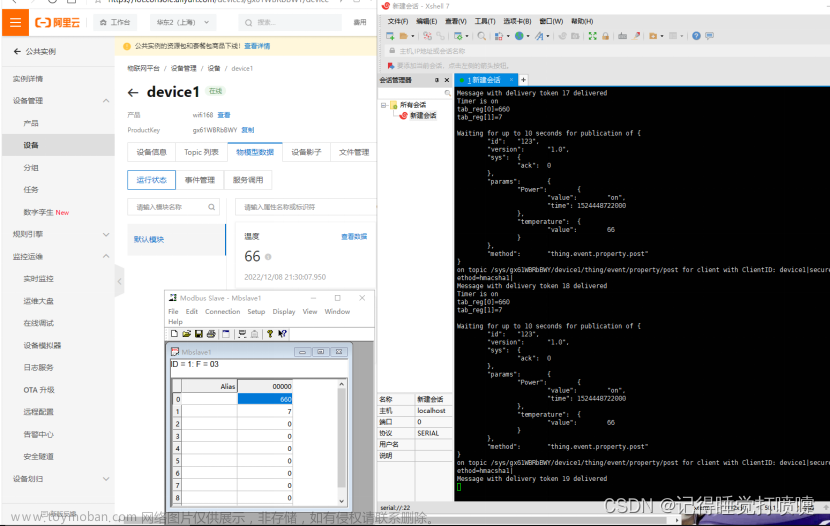
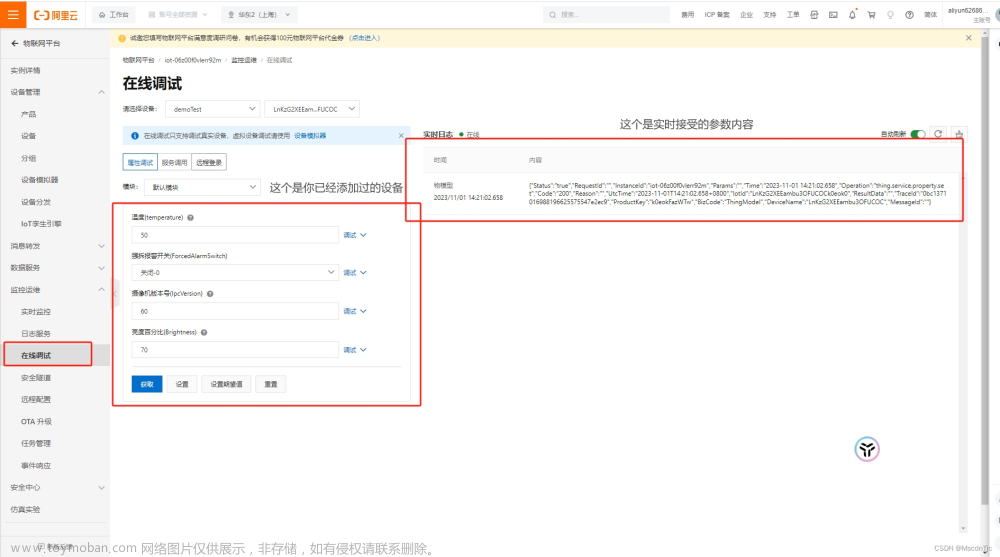
4.阿里云在线调试设备数据
5.Vue页面实时监听数据
 文章来源:https://www.toymoban.com/news/detail-860065.html
五.总结
其实Vue使用mqtt协议订阅数据不是很难,如果配合后端的话那会更加容易一些。这些只是我初步做个简单的使用方式和展现方式,毕竟也是第一次接触物联网项目才知道这个协议,若写的不是很好,希望各位大佬谅解。文章来源地址https://www.toymoban.com/news/detail-860065.html
到了这里,关于vue2.0使用mqtt协议订阅阿里云物联网获取实时数据的文章就介绍完了。如果您还想了解更多内容,请在右上角搜索TOY模板网以前的文章或继续浏览下面的相关文章,希望大家以后多多支持TOY模板网!