说在前面
大家好,我是子木。
以前没接触过小程序,刚好毕业设计选题选到了小程序,有前端基础,于是在提交完开题后开始自学小程序(云开发),属于边学边开发的那种。缝缝补补,最终耗时1个多月写完了我的课题。
这段时间刚写完论文比较闲,所以来记录一下自己的开发过程,同时也希望这篇文章对和我毕设课题一样的童鞋有所帮助。
第一次开发,失误在所难免,如有错误请大家指正,谢谢。
(小白篇,大神勿喷)
小程序展示
我的课题:基于微信小程序的房屋租赁系统的设计与实现
小程序tabBar页面展示

|

|

|
其他各个模块的功能页面见后边代码处。
一、各功能模块介绍
1.房产服务模块
要求用户可以进行房源列表浏览、房屋详情页查看(包括房屋租金、地理位置、基础设施等)、房屋收藏分享、下单租房等。
2.个人中心模块
用户登录退出功能、个人信息管理、咨询客服、投诉建议等。
3.动态发布模块
用户可发布房地产动态,包括房源照片,价格,地理位置,内容,发布人联系方式等。
4.订单管理模块
用户可查看自己的订单信息,需有订单分类。
5.房屋评价模块
用户可对已住过的房源进行入住体验评价,其他用户在浏览该房屋详情页时可以看到所有评价。
二、开发环境准备
小程序开发需要准备两样东西:小程序账号(小程序APPID)、微信开发者工具。
1、注册微信小程序账号
小程序账号可以去微信公众平台进行注册,一个人最多可注册5个。后面我会专门出一篇完整的小程序注册流程详细介绍。
注册完小程序后进入后台就可以拿到小程序APPID(务必保存好)
2、下载微信开发者工具
【点击下载】微信开发者工具
选择对应的系统版本进行下载安装即可
3、创建小程序项目
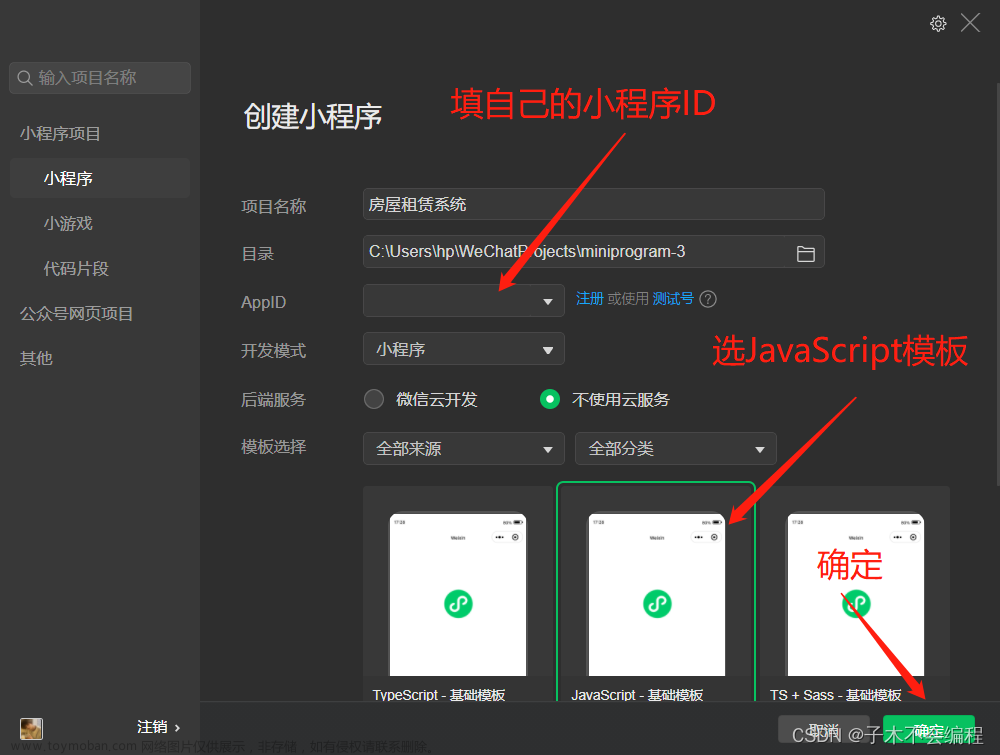
打开微信开发者工具,创建好小程序项目,准备开发。
三、功能模块开发
这一章将给大家从各个功能模块的视图层和逻辑层进行详细介绍
1、小程序首页
我参考了一下市面上的租房类小程序的布局,将我的小程序首页大致划分为了三个区域:
①顶部轮播图区域:放轮播图,可上广告
②中心功能键区域:功能按钮,跳转交互
③下方推荐化区域:推荐一些可能喜欢的房源
下面是详细的开发过程。
(1)顶部轮播图区域
先上成果图:
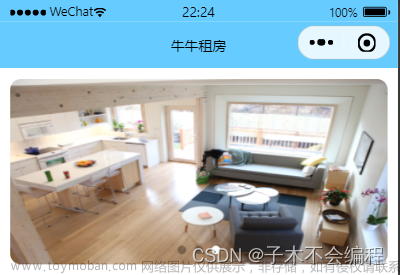
视图层:使用了微信自带的swiper组件(轮播图组件),设置了自动轮播,间隔时间3000ms。样式设置了宽高和圆角,更美观一点。轮播图的src地址是通过for循环swiper数组来获取每一项的图片地址数据,然后渲染到页面显示出来。
WXML代码:
<!-- 首页轮播图 -->
<swiper class="lunbotu" indicator-dots indicator-active-color="white" autoplay interval="3000">
  <swiper-item wx:for="{{swiper}}" wx:key="index">
    <image src="{{item.img}}"></image>
  </swiper-item>
</swiper>
WXSS代码:
/* 轮播图样式 */
swiper{
  height: 350rpx;
  margin: 20rpx;
  border-radius: 20rpx;
}
.lunbotu image{
  width: 100%;
  height: 100%;
  border-radius: 20rpx;
}
逻辑层:使用wx.cloud.database()方法获取了云数据库的轮播图照片,然后通过setData函数赋值给定义的swiper数组。
JS代码:文章来源地址https://www.toymoban.com/news/detail-500273.html
//获取轮播图数据
getSwiper(){
  wx.cloud.database().collection('swiper_photo')
  .get()
  .then(res => {
    this.setData({
      swiper:res.data
    })
    console.log('获取的轮播图数据',this.data.swiper);
  })
},
wx.cloud.database()是云开发获取云数据库中数据的语法,大家可以学一学,非常方便
(2)中心功能键区域
先上成果图:

视图层:为方便样式管理,最外层使用大view进行包裹,内层为六个view进行了display:flax弹性布局,宽度33.33%,实现两行三列的布局。考虑到要做跳转导航,所以使用了navigator导航组件,同时也使用了bindtap点击事件处理函数,url为目标页面地址,客服咨询和反馈建议使用了微信提供的button的open-type里的contact和feedbackAPI,可以直接跳转使用。
WXML代码:
<!-- 首页功能区 -->
<view class="home_view">
  <navigator class="home_item" url="/pages/home/rent_home/rent_home">
    <image src="/images/home-view/shop.png"></image>
    <text style="margin-top: 20rpx;">租住新房</text>
  </navigator>
  <view class="home_item" bindtap="goSellhome">
    <image src="/images/home-view/computer.png"></image>
    <text style="margin-top: 20rpx;">我要卖房</text>
  </view>
  <view class="home_item">
    <button size="mini" open-type="contact">
      <image src="/images/home-view/girl.png"></image>
    </button>
    <text>客服咨询</text>
  </view>
  <view class="home_item" bindtap="goOrder">
    <image src="/images/home-view/notebook.png"></image>
    <text style="margin-top: 20rpx;">购买记录</text>
  </view>
  <view bindtap="messageHome" class="home_item">
    <image src="/images/home-view/camera.png"></image>
    <text style="margin-top: 20rpx;">房源管理</text>
  </view>
  <view class="home_item"  bindtap="#">
    <button size="mini" open-type="feedback">
      <image src="/images/home-view/folder.png"></image>
    </button>
    <text>反馈建议</text>
  </view>
</view>
WXSS代码:
/* 功能区样式 */
.home_view{
  flex-wrap: wrap;
  display: flex;
  margin: 20rpx;
}
.home_item{
  width: 33.33%;
  height: 200rpx;
  display: flex;
  flex-direction: column;
  align-items: center;
  justify-content: center;
  background-color: #F8F8F8;
  border: 1rpx solid #e0dddd;
  box-sizing: border-box;
}
.home_item image{
  width: 60rpx;
  height: 60rpx;
}
逻辑层:使用bindtap点击事件执行函数来进行相应的页面导航操作,示例如下。
JS代码:
//去卖房页
goSellhome(){
    wx.navigateTo({
      url: '/pages/my/my_sellhome/my_sellhome',
    })
  }
//去租房页 ...
//去订单页 ...
//去管理页 ...
(3)下方推荐区域
先上成果图:
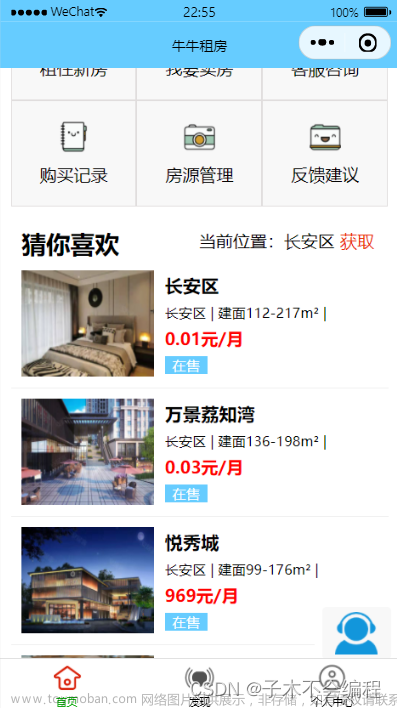
视图层:先用一个大view包裹该区域,然后再用一个view来包裹一条房源信息,左边是房源图片(view包裹image),右边是房源信息(view包裹三个text进行纵向排列)。然后通过wx:for循环homelist数组来获取房源列表数据,并依次渲染出来。
WXML代码:
<!-- 房屋列表组件 -->
<view class="like_content" wx:for="{{homelist}}" wx:key="index" >
    <view class="thumb">
      <image src="{{item.img}}"></image>
    </view>
    <view class="info">
      <text class="info_tltle">{{item.title}}</text>
      <text class="info_news">{{item.news}} | {{item.area}}</text>
      <text class="info_price">{{item.price}}元/月</text>
      <text class="info_state">{{item.state}}</text>
    </view>
</view >
WXSS代码:
/* 猜你喜欢区样式 */
.like{
  margin: 20rpx;
  margin-top: 40rpx;
}
.like_top{
  display: flex;
}
.like_top .address{
  margin-top: 5rpx;
}
.like_title{
  font-weight: bolder;
  font-size: 46rpx;
  padding-left: 20rpx;
  margin-right: 150rpx;
}
.like_content{
  display: flex;
  padding: 20rpx;
  border-bottom: 1rpx solid #efefef;
}
.like_content image{
  width: 250rpx;
  height: 200rpx;
  display: block;
}
.like_content .info{
  margin-left: 20rpx;
  display: flex;
  flex-direction: column;
  justify-content: space-around;
}
.info_tltle{
  font-weight: bolder;
  font-size: 34rpx;
}
.info_news{
  font-size: 28rpx;
}
.info_price{
  color: red;
  font-weight: bolder;
}
.info_state{
  font-size: 28rpx;
  background-color: #66ccff;
  color: white;
  width: 80rpx;
  text-align: center;
}
逻辑层:通过wx.cloud.database()语法从云数据库获取房源信息,并通过setData赋值函数将获取到的数据赋值给定义的homeList数组。规定一次获取10条记录,上拉可加载更多数据。
JS代码:
      let len = this.data.homelist.length
      const home = wx.cloud.database()
        home.collection('homelist')
        .skip(len)
        .limit(10)
        .get()
        .then(res => {
          if(res.data.length <= 0){
            wx.showToast({
              title: '没有更多数据啦!',
              icon: 'none'
            })
          }
          this.setData({
            homelist:this.data.homelist.concat(res.data)
          })
        })
        .catch( res => {
          wx.hideLoading()
          wx.showToast({
            title: '数据获取失败',
            icon: 'none'
          })
        })
    }
2、动态发布页
考虑到租客也会发布房屋资讯或者查看房源相关资讯,所以写了一个类似于朋友圈的动态发布页面,来满足用户这方面的需求。
主要分为两部分:
①动态浏览页:用户可浏览其他人发布的房源资讯等。
②动态编辑页:用户可在该页面编辑资讯内容进行发布。
开发过程如下:
(1)动态浏览页
先上成果图:

视图层:每一条资讯信息用一个大的view包裹。顶部的头像、昵称、房价单独用view包裹,头像用image组件显示,并设置100%圆角。昵称和价格用text显示,并进行纵向排列。位置、内容、图片、分别用独立的view进行包裹,并使用相应的组件进行渲染。和之前一样,还是使用for循环的方法遍历message数组,动态渲染出里面所有的内容。
蓝色的发布按钮通过定位固定到页面右下方不动,点击可跳转至编辑页。
WXML代码:
<view class="message">
<view class="mesage_list" wx:for="{{message}}" wx:key="index">
    <view class="list_head">
      <view class="head_sculpture">
        <image src="{{item.avatarUrl}}"></image>
      </view>
      <view class="news">
        <text>{{item.userName}}</text>
        <text style="color: #ff4800;">{{item.price}}元/月起</text>
      </view>
    </view>
    <view class="address" style="margin-bottom: 10rpx;font-size: 30rpx;color: rgb(110, 107, 110);">
      <text>位置:{{item.name}}</text>
    </view>
    <view class="content" >
      <text>{{item.content}}</text>
    </view>
    <view class="photo">
      <image src="{{item.img}}"></image>
    </view>
    <view class="callPhone">
    <text style="margin-right: 20rpx;">联系电话:{{item.phone}}</text>
    <image bindtap="call" data-phone="{{item.phone}}" src="/images/home-detail/phone.png"></image>
    </view>
  </view>
</view>
<!-- 发布按钮 -->
<view class="publish" bindtap="publish">
  <image src="cloud://cloud1-8g3dfacdb89991dd.636c-cloud1-8g3dfacdb89991dd-1305617743/logo_photos/我的发布 (1).png"></image>
</view>
WXSS代码:
/* 内容部分 */
page{
  background-color: #efefef;
}
.message{
  margin: 20rpx;
}
.mesage_list{
  background-color: #fff;
  margin-bottom: 20rpx;
  padding: 10rpx;
  border-radius: 20rpx;
}
.mesage_list .list_head{
  display: flex;
  background-color: #fff;
  margin-bottom: 20rpx;
}
.mesage_list .news{
  margin-left: 10rpx;
  display: flex;
  flex-direction: column;
  justify-content: space-around;
}
.callPhone{
  display: flex;
  margin-top: 20rpx;
  margin-bottom: 20rpx;
}
.callPhone image{
  width: 40rpx;
  height: 40rpx;
}
.head_sculpture image{
  width: 100rpx;
  height: 100rpx;
  border-radius: 100%;
}
.photo{
  margin-top: 20rpx;
}
.photo image{
  height: 400rpx;
  width: 100%;
  border-radius: 3%;
}
蓝色发布按钮WXSS代码:
/* 发布部分 */
.publish{
  position: fixed;
  right: 0;
  top: 1000rpx;
  width: 128rpx;
  height: 128rpx;
  margin-right: 20rpx;
  border-radius: 100%;
  background-color: #fff;
}
.publish image{
  width: 128rpx;
  height: 128rpx;
}
逻辑层:(前提–已经有人发布过相关资讯)通过wx.cloud.database() 语法获取云数据库中的房源资讯数据,规定一次获取10条数据,然后通过上拉触底生命周期函数来进行动态获取并拼接数组数据。每次获取通过setData赋值函数将获取到的数据赋值给message数组。
跳转至动态编辑页的按钮绑定了bindtap事件处理函数,通过wx.navitagor() 进行跳转操作。
获取动态列表JS代码:
/获取数据库动态列表
  getMessage(){
      wx.showLoading({
        title: '加载中...'
      })
      let len = this.data.message.length
      const mess = wx.cloud.database()
      mess.collection('message')
      .skip(len)
      .limit(10)
      .orderBy('creat_time','desc')//按创建时间降序排序
      .get()
      .then(res => {
        // console.log('获取成功',res);
        wx.hideLoading()
        wx.stopPullDownRefresh()
        if(res.data.length <= 0){
          wx.showToast({
            title: '没有更多数据啦!',
            icon: 'none'
          })
        }
        this.setData({
          message:this.data.message.concat(res.data)//拼接数组
        })
      })
      .catch(res => {
        wx.hideLoading()
        wx.showToast({
          title: '数据获取失败',
          icon: 'none'
        })
      })
  },
跳转至编辑页JS代码:
  //点发布动态跳转发布页面
  publish(){
      wx.navigateTo({
        url: '/pages/message/publish_message/publish_message',
      })
    }
(2)动态编辑页
先上成果图: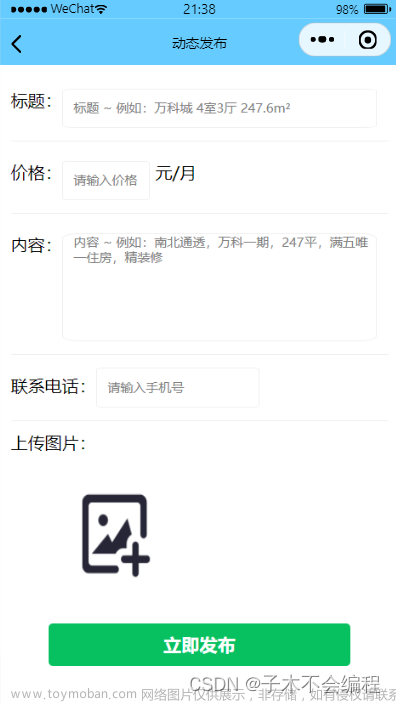
视图层:标题、价格、联系电话都使用了表单输入-input组件,并设置了输入框的提示文字。考虑到动态的内容可能文字比较多,所以使用了textarea富文本组件,可以设置行高等并自动进行换行。图片上传使用bindtap函数进行绑定,会唤起拍照和图库选择。
WXML代码:
<!-- 发布动态界面 -->
<view class="box">
  <view class="title">
    <text>标题:</text>
    <input type="text" class="input" bindinput="titleKey" placeholder="标题 ~ 例如:万科城 4室3厅 247.6m²"/>
  </view>
  <view class="price">
    <text>价格:</text>
    <input type="text" class="price_input" bindinput="priceKey" placeholder="请输入价格"/>
    <text>元/月</text>
  </view>
  <view class="content">
    <text>内容:</text>
    <textarea type="text" class="content_input" bindinput="contentKey" placeholder="内容 ~ 例如:南北通透,万科一期,247平,满五唯一住房,精装修">
    </textarea>
  </view>
  <view class="phone">
    <text>联系电话:</text>
    <input type="text" class="phone_input" bindinput="phoneKey" placeholder="请输入手机号"/>
  </view>
  <view class="picture">
    <text>上传图片:</text>
    <view class="add_picture" bindtap="add_photo">
      <image src="{{imgUrl}}"></image>
    </view>
  </view>
  <button type="primary" style="width: 80%" bindtap="publish">立即发布</button>
</view>
WXSS代码:
.box{
  margin: 20rpx;
}
.title,.content,.price,.phone{
  display: flex;
  padding-bottom: 25rpx;
  padding-top: 25rpx;
  border-bottom: 2rpx solid #efefef;
}
.title,.content,.price,.phone text{
  margin-top: 12rpx;
}
input,textarea{
  height: 70rpx;
  font-size: 24rpx;
  width: 80%;
  border-radius: 5%;
  padding-left: 20rpx;
  border: 2rpx solid #efefef;
}
.content textarea{
  line-height: 200rpx;
  height: 200rpx;
}
.price_input{
  width: 20%;
  margin-right: 10rpx;
}
.phone_input{
  width: 40%;
  margin-right: 10rpx;
}
.picture{
  margin-top: 20rpx;
  margin-bottom: 20rpx;
}
.add_picture{
  width: 400rpx;
  height: 300rpx;
}
.add_picture image{
  width: 400rpx;
  height: 300rpx;
}
逻辑层:通过bindinput 动态获取用户输入的内容,并保存到定义好的变量中。然后通过wx.cloud.database().add()将数据添加进云数据库。
动态获取用户输入内容JS代码:
//获取用户输入的数据
  titleKey(e){
    title = e.detail.value
  },
  priceKey(e){
    price = parseInt(e.detail.value)
  },
  contentKey(e){
    content = e.detail.value
  },
  phoneKey(e){
    phone = e.detail.value
  },
将输入内容添加进数据库JS代码:
wx.cloud.database()
  .collection('message')
  .add({
  data:{
    userName:this.data.user.nickName,
    avatarUrl:this.data.user.avatarUrl,
    name:title,
    price:parseInt(price),
    content:content,
    img:imageUrl,
    phone:phone,
    creat_time:new Date().getTime()
  }
  })
注:上传图片至云数据库采用的是通过uploadFile上传。
3、个人中心页
个人中心页可以说是客户的综合服务面板,集多种服务功能于一体。本文开发的小程序的个人中心主要分为以下几个部分:
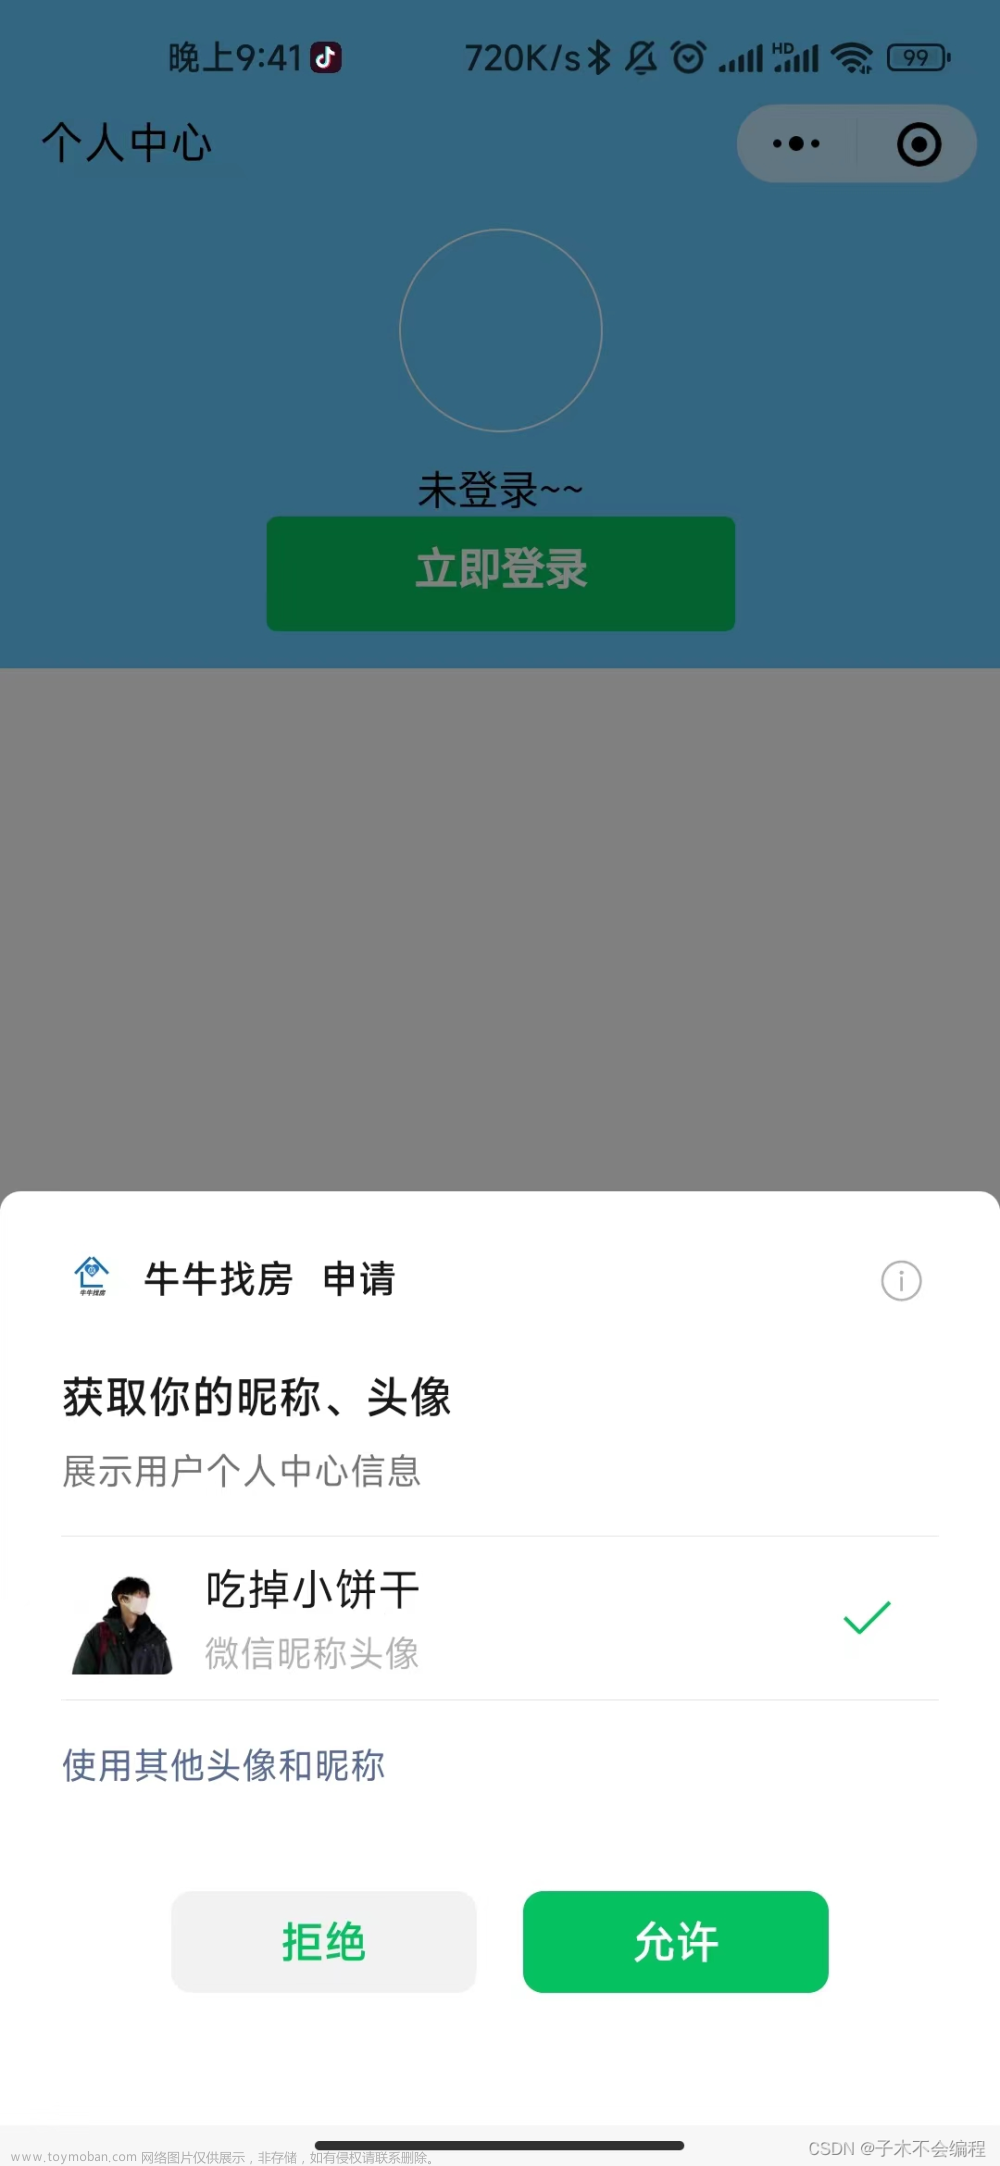
①登录退出模块:用户进行登录退出操作,登陆后可享受对应服务。
②客户服务区域:包括在线客服、投诉建议、订单管理、发布房源等。
③列表功能区域:包括房源管理、个人信息设置、关于我们等。
(1)登录退出模块
先上成果图:

|
|

|
视图层:顶部用户信息区用了一个大的view包裹,背景颜色设置为浅蓝色。头像用image组件来渲染,并设置100%圆角(border-radius:100%),用户昵称用text组件显示,登录按钮用button组件,三者进行纵向布局并居中。
登录退出按钮使用flag进行状态标记,未登录状态下显示登录按钮,已登录状态下显示退出按钮。
WXML代码:
<!-- 个人信息区 -->
<view class="my_top">
  <image src="{{logourl}}"></image>
  <text>{{name}}</text>
  <button bindtap="login" wx:if="{{!flag}}" class="login" type="primary">立即登录</button>
</view>
<!-- 退出登录 -->
<button bindtap="quit" wx:if="{{flag}}" class="quit">退出登录</button>
WXSS代码:
/* 用户信息区样式 */
.my_top{
  text-align: center;
  height: 350rpx;
  background-color: #66ccff;
  display: flex;
  flex-direction: column;
  align-items: center;
  margin-bottom: 30rpx;
}
.my_top text{
  margin-top: 20rpx;
}
.my_top image{
  margin-top: 20rpx;
  width: 150rpx;
  height: 150rpx;
  border-radius: 100%;
  border: 2rpx solid #fff;
}
.my_top .login{
  margin-bottom: 10rpx;
  padding-bottom: 25rpx;
}
逻辑层:用户首次进入小程序时标记为未登录状态,个人中心页的功能按钮均隐藏(通过wx:if判断flag)。当用户点击登陆按钮时,调用微信登录API-wx.getUserProfile() 拉起授权弹窗,授权后将用户的头像和昵称等信息获取并显示到用户信息区,同时改变登录状态,显示各个功能按钮。
JS代码:
//登录
  login(){
    wx.getUserProfile({
      desc: '必须授权后才能继续使用哦!',
      success:res =>{
        console.log('授权登录成功:',res);
        this.setData({
          name:res.userInfo.nickName,
          logourl:res.userInfo.avatarUrl,
          flag:true
        })
      },
      fail:res =>{
        console.log('授权失败');
      }
    })
  },
(2)客户服务区域
先上成果图:
视图层:最外层用view包裹,按钮区为四个view,每个里边包含image和text用来显示按钮icon和文字说明。四个view进行弹性布局(display:flex)使其排在一行。
由于在线客服和投诉建议采用的时微信官方提供的开放能力,所以view里还嵌套了button。
微信开放能力之button:
contact: 打开客服会话
share: 触发用户转发
feedback:打开“意见反馈”页面
WXML代码:
<!-- 客户服务区 -->
<view class="customer_service" wx:if="{{flag}}">
  <view class="title">
    <text>客户服务</text>
  </view>
  <!-- 客服按钮区 -->
  <view class="kefu">
  <view class="service">
    <button size="mini" open-type="contact">
      <image src="cloud://cloud1-8g3dfacdb89991dd.636c-cloud1-8g3dfacdb89991dd-1305617743/logo_photos/在线客服 (1).png"></image>
    </button>
    <text>在线客服</text>
  </view>
  <view class="service">
    <button size="mini" open-type="feedback">
      <image src="cloud://cloud1-8g3dfacdb89991dd.636c-cloud1-8g3dfacdb89991dd-1305617743/logo_photos/投诉建议2.png"></image>
    </button>
    <text>投诉建议</text>
  </view>
  <view class="service">
    <button size="mini">
      <image src="cloud://cloud1-8g3dfacdb89991dd.636c-cloud1-8g3dfacdb89991dd-1305617743/logo_photos/订单管理 (1).png" bindtap="order"></image>
    </button>
    <text>订单管理</text>
  </view>
  <view class="service">
    <button size="mini" bindtap="sellhome">
      <image src="cloud://cloud1-8g3dfacdb89991dd.636c-cloud1-8g3dfacdb89991dd-1305617743/logo_photos/我要卖房.png"></image>
    </button>
    <text>房源发布</text>
  </view>
  </view>
</view>
WXSS代码:
/* 客户服务区样式 */
.customer_service .title{
  font-weight: bolder;
  font-size: 38rpx;
}
.customer_service .kefu{
  margin-top: 10rpx;
}
.customer_service{
  margin-left: 20rpx;
  margin-right: 20rpx;
}
.customer_service .title{
  width: 100%;
}
.customer_service .kefu{
  display: flex;
}
.customer_service .service{
  padding: 15rpx;
  text-align: center;
  font-weight: bolder;
}
.service button{
  width: 130rpx;
  height: 100rpx;
  display: flex;
  padding-top: 10rpx;
}
.service image{
  width: 80rpx;
  height: 80rpx;
}
逻辑层:在线客服和投诉建议采用的微信开放能力可直接跳转,订单管理和房源发布采用bindtap事件处理函数进行页面导航跳转。
JS代码:
//订单界面
order(){
  wx.navigateTo({
    url: './order/order',
  })
},
//房屋发布页面
sellhome(){
  wx.navigateTo({
    url: '/pages/my/my_sellhome/my_sellhome',
  })
 },
(3)列表功能区域
先上成果图:
视图层:每一行外层采用一个大view进行包裹,view里又分为左右两个区域,左边用view来显示文字,右边用text显示>箭头,从而渲染出上图的点击列表。
WXML代码:
<!-- 功能区 -->
<view class="my_center" wx:if="{{flag}}">
  <view class="center_list" bindtap="home_manage">
    <view>房源管理</view>
    <text>></text>
  </view>
  <view class="center_list" bindtap="install">
    <view>账号设置</view>
    <text>></text>
  </view>
  <view class="center_list" bindtap="logout">
    <view>关于我们</view>
    <text>></text>
  </view>
</view>
WXSS代码:
/* 功能区样式 */
.my_center{
  height: 600rpx;
  margin-left: 20rpx;
  margin-top: 10rpx;
}
.center_list {
  display: flex;
}
.center_list text{
  margin-left: 75%;
}
.my_center .center_list{
  border-bottom: 2rpx solid #efefef;
  line-height: 110rpx;
  font-weight: 700;
}
逻辑层:每一行都设置了bindtap事件处理函数,进行对用的点击跳转操作。
JS代码:
//房源管理界面
home_manage(){
  wx.navigateTo({
    url: '/pages/home/home_manage/home_manage',
  })
},
//账号信息设置页面
install(){
  wx.navigateTo({
    url: '/pages/my/install/install'
  })
},
注:考虑到用户第二次进入小程序个人中心时,应保留之前的登陆状态,不用重复进行登录操作,提升用户体验。
所以我这里做了一个小小的优化:当用户第一次登录的时候,将获取到的用户信息通过wx.setStorageSync(‘user’, res.userInfo) 写入到本地缓存中,当用户再次进入小程序的时候,再通过wx.getStorageSync(‘user’) 获取到本地缓存中的用户信息,渲染到顶部用户信息区,同时改变登录状态标志flag的值,显示出隐藏的所有功能区按钮。
优化后的JS登录代码:
//登录
  login(){
    wx.getUserProfile({
      desc: '必须授权后才能继续使用哦!',
      success:res =>{
        console.log('授权登录成功:',res);
        wx.setStorageSync('user', res.userInfo)//将用户信息写入到本地缓存
        this.setData({
          name:res.userInfo.nickName,
          logourl:res.userInfo.avatarUrl,
          flag:true
        })
      },
      fail:res =>{
        console.log('授权失败');
      }
    })
  },
页面加载生命周期函数中的JS代码:
//生命周期函数--监听页面加载
onLoad: function (options) {
    let user = wx.getStorageSync('user')
    // console.log(user);
    if(user){
      this.setData({
        name:user.nickName,
        logourl:user.avatarUrl,
        flag:true
      })
    }
  },
(4)账号设置页面
考虑到用户还有设置个人信息的需求,所以又追加了一个账号设置页面,让用户可以设置和更新自己的个人信息。
先上成果图:
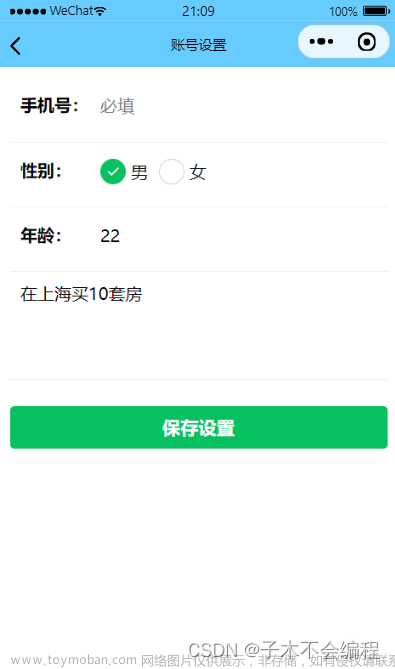
视图层:手机号和年龄都使用了input输入框组件,手机号设置的是number输入模式(只能输入数字)并且通过maxlength="11"设置限长11位。性别这一行使用了radio单项选择器组件,设置了两组数据(男、女),个性标签这里使用了textarea输入框,可多行输入,并设置默认值为:“可以填写个人签名哦”。
WXML代码:
<view class="inforall" >
  <view class="infor">
    <text>手机号:</text>
    <input type="number" value="{{userInfo.phone}}" placeholder="必填" 	maxlength="11" bindinput="getPhone"/>
  </view>
  <view class="infor">
    <text>性别:</text>
    <radio-group bindchange="getSex">
      <radio checked="{{man_flag}}" class="radio" value="男">男</radio>
      <radio checked="{{woman_flage}}" value="女">女</radio>
    </radio-group>
  </view>
  <view class="infor">
    <text>年龄:</text>
    <input type="number" value="{{userInfo.age}}" placeholder="选填" bindinput="getAge"/>
  </view>
  <view class="introduce">
    <textarea type="text" placeholder=" 可以填写个人签名哦~" value="{{userInfo.introduce}}" bindinput="getIntroduce">
    </textarea>
  </view>
  <button type="primary" style="width: 100%" bindtap="submit">保存设置</button>
</view>
WXSS代码:
.inforall{
  padding: 20rpx;
}
.infor{
  display: flex;
  height: 90rpx;
  border-bottom: 2rpx solid #efefef;
  padding-top: 30rpx;
}
.introduce{
  height: 200rpx;
  border-bottom: 2rpx solid #efefef;
  margin-bottom: 50rpx;
}
.introduce textarea{
  padding: 20rpx;
  height: 200rpx;
}
.infor text{
  font-weight: bolder;
  width: 150rpx;
  padding-left: 20rpx;
  padding-right: 20prx;
}
.infor .radio{
  margin-right: 20rpx;
}
逻辑层:设置了一个flag来标记用户是否已经填写过个人信息,flag默认值为0(代表未填写)。
当判断到用户未填写过个人信息时,每一个输入框都设置了bindinput键值获取函数来动态获取用户输入的内容并通过setData赋值函数将获取到的内容赋值给定义好的变量Key。当用户点击保存设置时,将各个变量里的内容通过wx.cloud.database().add() 添加进云数据库。
JS代码:
//提交用户输入的数据到数据库
baocun(){
  console.log('本次是保存信息');
  if(this.data.userPhone === ''){
    wx.showToast({
      title: '请输入必填项',
      icon:'error'
    })
  }
  else{
    wx.cloud.database().collection('userList')
    .doc()
    .add({
      data:{
        name:this.data.userName,
        avatarUrl:this.data.useravatarUrl,
        phone:this.data.userPhone,
        age:this.data.userAge,
        introduce:this.data.userIntroduce,
        sex:this.data.userSex
      }
    })
    .then(res =>{
      console.log('保存成功',res);
      wx.showLoading({
        title:'提交中...'
      })
    })
  }
},
当用户进入该页面时,先从数据库的user表里查找该用户是否提交过个人信息数据,如果获取到的个人数据不为空,并将获取到的用户信息数据渲染到页面对应的位置,并将flag=1,标记本次为修改更新信息。和上面一样,通过键值获取函数将用户重新输入的信息获取后更新至数据库中保存,完成个人信息的更新操作。
JS代码:
    wx.cloud.database().collection('userList')
    .where({
    _openid:this.data.openid
    })
    .update({
      data:{
        name:this.data.userName,
        avatarUrl:this.data.useravatarUrl,
        phone:this.data.userPhone,
        age:this.data.userAge,
        introduce:this.data.userIntroduce,
        sex:this.data.userSex
      }
    })
    .then(res =>{
      console.log('更新成功',res);
      wx.showLoading({
        title:'提交中...'
      })
    })
4、房产服务页
房产服务页主要是为租客提供房屋租赁服务,为房东提供发布房源服务,主要分为如下四个模块:
①租房列表模块:租客可在此页面查看各个房源价格、位置、照片等,并可通过顶部搜索框进行关键字搜索,通过筛选框进行条件筛选。
②房屋详情模块:租客可在此页面查看选定房源的详细信息,如基础设施、价格、最大入住数量、房东联系方式、房屋评价等,并可以进行下单操作。
③订单详情模块:当租客在详情页点击下单按钮后,会跳转到订单详情页,在此页面租客可以选择租住时长,查看订单编号并进行支付操作。
④发布房源模块:房东可在此页面进行房源发布,发布成功的房源会在房源列表页进行显示。
(1)租房列表页
先上成果图:

视图层:
顶部搜索框:外部用一个大的view包裹,view里面又分为左右两部分,左边使用一个view来包裹input用于渲染搜索框,icon使用的是微信自带的search-icon,尺寸可自行设置。右边是搜索按钮,设置了bindtap事件处理函数。
WXML代码:
<!-- 搜索框 -->
<view style="background-color: #efefef;" class="search">
	<view class="search_left">
		<icon class="icon" type="search" size="18"></icon>
		<input style="background-color: white; border-radius: 30rpx;" type="text" placeholder=" 请输入房屋名称或房型关键词" bindinput="searchInput"/>
	</view>
	<view class="search_button" bindtap="searchClick">搜索</view>
</view>
WXSS代码:
【注】:考虑到用户上拉滑动列表时,顶部的搜索框应该固定在上方而不随着页面上划被掩盖,所以使用了position定位来实现,
/* 搜索框 */
.keep{
  height: 200rpx;
  background-color:white;
}
.search{
  background-color: #fff;
  width: 100%;
  display: flex;
  padding: 20rpx;
  border-bottom: 2rpx solid #a8a0a0;
  position: fixed;/*定位在顶部*/
    left:0;
    top:0;
}
.search .search_left{
  display: flex;
  width: 85%;
  background-color: #efefef;
  border-radius: 5%;
}
.search_left .icon{
  margin-top: 5rpx;
  padding: 5rpx;
}
.search_left input{
  width: 100%;
  padding: 5rpx;
  font-size: 28rpx;
}
/* 搜索按钮 */
.search_button{
  padding-left: 14rpx;
  padding-right: 14rpx;
  font-weight: bolder;
  color: #66ccff;
  border-radius: 10rpx;
  border: 4rpx solid #66ccff;
}
顶部筛选栏:筛选框只写了价格排序和位置筛选两部分。找了两个上下箭头用image组件渲染上去并设置了bindtap事件处理函数,右边的地址筛选使用了picker多列选择器组件,租客可以滑动选择地址,然后进行房源筛选。重置按钮就是一个简单的button组件,绑定了bindtap事件处理函数。
WXML代码:
<!-- 筛选框 -->
<view class="choose">
  <view class="priceSort">
  <view>租金:</view>
  <view>
    <image src="cloud://cloud1-8g3dfacdb89991dd.636c-cloud1-8g3dfacdb89991dd-1305617743/logo_photos/升降序_升序-默认.png" bindtap="upSort"></image>
  </view>
  <view>
  <image src="cloud://cloud1-8g3dfacdb89991dd.636c-cloud1-8g3dfacdb89991dd-1305617743/logo_photos/升降序_降序-默认.png" bindtap="downSort"></image>
  </view>
  </view>
  <view class="addressSort">
    <text>地区:</text>
      <picker mode="region" bindchange="bindRegionChange" value="{{region}}" custom-item="{{customItem}}">
        <view class="picker">
      {{region[0]}},{{region[1]}},{{region[2]}}
        </view>
      </picker>
      <view>></view>
  </view>
  <view class="reset" bindtap="reset">重置</view>
</view>
WXSS代码:
/* 筛选框 */
.choose{
  display: flex;
  padding: 20rpx;
  position: fixed;
  top: 90rpx;
  height: 40rpx;
  left: 0;
  width: 100%;
  background-color: #fcfcfc;
  border-bottom: 2rpx solid #a8a0a0;
}
.priceSort{
  width: 25%;
  line-height: 40rpx;
  display: flex;
  border-right: 2rpx solid #a8a0a0;
}
.priceSort image{
  width: 35rpx;
  height: 35rpx;
  margin-right: 5rpx;
}
.addressSort{
  margin-left: 20rpx;
  line-height: 40rpx;
  display: flex;
  font-size: 30rpx;
}
.reset{
  margin-left: 20rpx;
  line-height: 40rpx;
  font-weight: bolder;
  color: green;
}
房源列表部分:
加粗样式
结构图:
视图层:每条房源信息分为左右两部分,左边用image组件来渲染房源展示照片,右边用一个view来包裹房源基础信息,每条信息用text组件来显示,text之间纵向排列并分散对齐。
【注】:考虑到用户点击该条房源信息时,应当跳转至对应的房屋详情页面,所以这里每条房源信息最外层使用navigator进行包裹,url为详情页地址。
WXML代码:
<!-- 房屋出售列表 -->
<navigator class="like_content" wx:for="{{homelist}}" wx:key="index" url="/pages/home/home_detail/home_detail?src={{item.img}}&title={{item.title}}&news={{item.news}}&price={{item.price}}&id={{item._id}}" wx:if="{{item.state != '已下架'}}">
    <view class="thumb">
      <image src="{{item.img}}"></image>
    </view>
    <view class="info">
      <text class="info_tltle">{{item.title}}</text>
      <text class="info_news">{{item.news}}</text>
      <text class="info_price">{{item.price}}元/月</text>
      <text class="info_state">{{item.state}}</text>
    </view>
</navigator>
WXSS代码:
/* 列表 */
.like_content{
  display: flex;
  padding: 20rpx;
  border-bottom: 1rpx solid #efefef;
}
.like_content image{
  width: 250rpx;
  height: 200rpx;
  display: block;
}
.like_content .info{
  margin-left: 20rpx;
  display: flex;
  flex-direction: column;
  justify-content: space-around;
}
.info_tltle{
  font-weight: bolder;
  font-size: 34rpx;
}
.info_news{
  font-size: 28rpx;
}
.info_price{
  color: red;
  font-weight: bolder;
}
.info_state{
  font-size: 28rpx;
  background-color: #66ccff;
  color: white;
  width: 80rpx;
  text-align: center;
}
逻辑层:当用户进入房屋租赁页时,JS页通过wx.cloud.database().get() 获取房东已经上传至云数据库的信息,然后将获取到的数据通过setData赋值函数赋值给定义的房源信息变量,再在视图层渲染出来。
当房源列表获取成功后,便可进行搜索和筛选操作了。
搜索逻辑:在JS页面中动态获取用户搜索框的输入值,一搜索房源为例,用户一般会直接搜索房源名称获取地区名称。当用户点击搜索按钮时,在按钮绑定的事件处理函数下执行检索操作,在通过wx.cloud.database().where() 检索的时候,规定检索数据库中房源表中的名称字段和地区字段,通过模糊查询来筛选符合条件的房源信息并通过setData函数赋值给homeList,然后展示到列表中–完成搜索。
搜索部分的JS代码:
//搜索功能
searchClick(){
  const db = wx.cloud.database()
  let _=db.command
  db.collection('homelist')
    .where(_.or([
      {
        title: db.RegExp({ //title字段,也就是房源名称
        regexp: this.data.searchKey,
        options: 'i'
        })
      },
      {
        news: db.RegExp({ //new字段,也就是房源地理位置介绍字段
        regexp: this.data.searchKey,
        options: 'i'
        })
      }
    ]))
    .get()
    .then(res => {
      this.setData({
        homelist:res.data //将成功检索到符合条件的数据赋值给HOMELIST
      })
    })
  }
  },
排序筛选:微信云开发有自带的排序获取语法,我们直接搬运即可,下面直接上代码。
代码中做了注释,升序降序只需要更换对应的属性值即可。
JS代码:
upSort(){
const db = wx.cloud.database()
  let _=db.command
  db.collection('homelist')
  .orderBy("price",'asc')//升序
  // .orderBy("字段",'desc')//降序
    .limit(10)
    .get()
    .then(res => {
      console.log('升序数据获取成功',res);
      this.setData({
        homelist:res.data,
      })
    })
    .catch(res => {
      wx.hideLoading()
    })
  }
}
地区筛选:和搜索逻辑一样,直接使用租客选择的目标地区的信息来在数据库里进行检索符合条件的数据,然后赋值给homelist进行渲染显示即可。
JS代码:
const db = wx.cloud.database()
      let _=db.command
      db.collection('homelist')
        .where(_.or([
          {
            address: db.RegExp({ //地区筛选
            regexp: this.data.address,
            options: 'i'
            })
          },
          {
            news: db.RegExp({
            regexp: this.data.address,
            options: 'i'
            })
          }
        ]))
        .get()
        .then(res => {
          wx.hideLoading()
          this.setData({
            homelist:res.data
          })
        })
(2)房屋详情页
先上成果图:
视图层:顶部使用一个view包裹image组件用于展示房源的图片,可以自己添加图片。信息栏用三个text标签进行纵向排列,用来显示房屋的价格、地理位置、最大房客数。标签气泡采用几个view嵌套text进行显示,view用display:flex进行弹性布局。底部操作栏(分享、收藏、拨打电话、立即下单)使用position定位在页面下方,方便用户操作。
给大家推荐一个免费的图标库,我这个系统用的图标都是在这个上面搞得
【阿里巴巴矢量图标库】www.iconfont.cn
非常好用哦!
WXML代码:
<swiper class="lunbotu" indicator-dots indicator-active-color="white" autoplay interval="3000">
  <swiper-item>
    <image src="{{homelist.src}}"></image>
  </swiper-item>
  <swiper-item>
    <image src="{{homelist.src}}"></image>
  </swiper-item>
</swiper>
<!-- 房间详情 -->
<view class="content">
  <view class="price">{{homelist.price}}元/月</view>
  <view class="address">
    <text class="title">{{homelist.title}} </text>
    <text class="news">{{homelist.news}}</text>
  </view>
  <view class="people_number">
    <text>最大房客数:3人</text>
  </view>
  <!-- 气泡标签 -->
  <view class="tagView">
    <view wx:for="{{bubble}}" class="brView">
      <text class="tagText">{{item}}</text>
    </view>
  </view>
  <!-- 底部支付栏 -->
<view class="bottom">
  <view class="bottom_left">
  <!-- 分享按钮 -->
    <view>
    <button size="mini" open-type="share">
      <image src="cloud://cloud1-8g3dfacdb89991dd.636c-cloud1-8g3dfacdb89991dd-1305617743/logo_photos/分享.png"></image>
     </button>
    </view>
  <!-- 收藏按钮 -->
    <view bindtap="collect">
      <image src="{{collectimg}}"></image>
    </view>
  </view>
  <view class="bottom_right">
  <!-- 打电话 -->
    <view class="bottom_phone" bindtap="call">
    <text>拨打电话</text>
    </view>
  <!-- 提交订单 -->
    <navigator class="submit" url="/pages/home/submit_order/submit_order?src={{homelist.src}}&title={{homelist.title}}&price={{homelist.price}}&news={{homelist.news}}&id={{homelist.id}}">
      <text>立即租房</text>
    </navigator>
  </view>
WXSS代码:
page{
  background-color: #efefef;
}
.lunbotu{
  height: 500rpx;
}
.lunbotu image{
  width: 100%;
  height: 100%;
}

.content{
  margin: 20rpx;
}

.content .price{
  font-size: 48rpx;
  color: orange;
  font-weight: bolder;
}

.content .address{
  margin-top: 20rpx;
  font-size: 36rpx;
}

.people_number{
  font-size: 28rpx;
  margin-top: 40rpx;
  padding-bottom: 40rpx;
  color: #867979;
  border-bottom: 1rpx solid #867979;
}
/* 底部菜单栏 */
.bottom{
  position: fixed;
  bottom: 0;
  height: 100rpx;
  padding: 20rpx;
  width: 100%;
  border-top: 1rpx solid #efefef;
  background-color: #F8F8F8;
}
.bottom_left,.bottom_right,.bottom{
  display: flex;
}
.bottom_left view{
  margin-right: 10rpx;
  margin-left: 10rpx;
  margin-top: 20rpx;
}
.bottom_left image{
width: 64rpx;
height: 64rpx;
}

.bottom_right .bottom_phone{
  width: 250rpx;
  height: 100rpx;
  color: white;
  background-color: rgb(238, 140, 12);
  border-radius: 10rpx;
  margin-right: 10rpx;
  text-align: center;
  line-height: 100rpx;
  margin-left: 10rpx;
}
.bottom_right .submit{
  width: 250rpx;
  height: 100rpx;
  color: white;
  background-color: #66ccff;
  border-radius: 10rpx;
  margin-right: 10rpx;
  text-align: center;
  line-height: 100rpx;
}
逻辑层:当房源详情页加载时,通过房源列表navigator组件传递过来的房源id通过wx.cloud.database().doc(‘id’) 在数据库中查找该条房源数据,然后通过setData赋值函数将获取到的房源数据赋值给定义好的变量,通过变量再将数据信息渲染到房源详情页中。
底部操作栏中的分享功能使用可微信开发能力中的‘share’,可直接调起微信分享,将小程序页面分享至好友或者微信群中。拨打电话使用wx.makePhoneCall()函数直接调起手机号码盘进行拨打。立即下单按钮通过绑定的bindtap事件处理函数跳转至订单创建和支付页面。
JS代码:
//页面加载时获取传递过来的参数
onLoad: function (options) {
    this.setData({
      homelist:options
    })
    //拨打房东电话
  call(){
    wx.showModal({
          wx.makePhoneCall({
            phoneNumber: '17691397621',
          })
    })
  },
(3)订单创建(支付)页
先上成果图:

视图层:最顶部用了两个拉长的image组件放了两个广告介绍条,看着还行吧!这种图可以自己做或者网上找,都很容易获取到。
订单详情区主要由五个部分组成,首先是用一个view包裹了两个弹性布局的view,然后左边的view里面放置了一个image组件来显示房源图片,右边的view里用3个纵向排列的text组件来显示房源的基础信息。下面四部分都是用view组件进行渲染,设置对应的宽高,和默认显示的内容,最底部的支付栏使用也是通过两个view进行display:flex进行弹性布局的,使他们排列在一行(否则会换行排列)。
WXML代码:
    <view class="detail_center">
      <view class="center_left">
        <image src="{{homelist.src}}"></image>
      </view>
      <view class="center_right">
        <text class="news">{{homelist.news}}</text>
        <text class="title">小区:{{homelist.title}}</text>
        <text class="price">¥{{homelist.price}}元/月</text>
      </view>
    </view>
    <view class="tenancy">
    <view>租住时长:</view>
    <image src="cloud://cloud1-8g3dfacdb89991dd.636c-cloud1-8g3dfacdb89991dd-1305617743/logo_photos/减号.png" bindtap="reduce_date"></image>
    <text>{{date}}</text>个月
    <image src="cloud://cloud1-8g3dfacdb89991dd.636c-cloud1-8g3dfacdb89991dd-1305617743/logo_photos/加号.png" bindtap="add_date"></image>
    </view>
    <view class="order_id">
      <view>订单编号:</view>
      <text>{{order_id}}</text>
    </view>
    <view class="order_price">
      <view>实付金额:¥</view>
      <text>{{price}}</text>
    </view>
    <view class="order_note">
      <view>订单备注:</view>
      <input type="text" placeholder="给房东备注"/>
    </view>
  </view>
</view>
<!-- 底部支付 -->
  <view class="pay">
    <view class="price">
      实付金额:<text>¥{{price}}</text>
    </view>
    <view class="goPay" bindtap="goPay">
      <text>立即支付</text>
    </view>
  </view>
</view>
WXSS代码:
.center_right .title{
  color: #696565;
}
.center_right .price{
  color: red;
}
.tenancy,.order_id,.order_price{
  font-size: 28rpx;
  height: 60rpx;
  line-height: 60rpx;
  display: flex;
  padding-top: 15rpx;
  padding-bottom: 15rpx;
  border-bottom: 2rpx solid #e6dcdc;
}
.tenancy image{
  width: 34rpx;
  height: 34rpx;
  margin-top: 14rpx;
}
.order_note{
  font-size: 28rpx;
  display: flex;
  padding-top: 40rpx;
  padding-bottom: 15rpx;
  line-height: 40rpx;
}
.pay{
  margin-top: 20rpx;
  display: flex;
  line-height: 100rpx;
  border-bottom-left-radius: 15rpx;
  background-color: rgb(223, 219, 219);
}
.pay .price{
  width: 45%;
  padding-left: 50rpx;
  color: #eb130b;
  font-size: 30rpx;
}
.goPay{
  width: 400rpx;
  background-color: #66ccff;
  text-align: center;
  height: 100rpx;
  border-bottom-right-radius: 15rpx;
}
逻辑层:当用户点击立即租房按钮时,在通过navigator导航至房源详情页的同时,通过url的参数传递将该条房源的所有信息传递到订单创建(支付页),并在该页面渲染出订单的信息。当点击立即支付按钮时,通过调用微信官方的wx.requestPayment()支付API拉起微信支付,从而实现支付功能。当用户支付成功时,将该条订单记录上传添加至数据库,为后期订单管理模块的编写做准备。
【注】要想在小程序中实现微信支付的话,首先需要两个条件:
①小程序的注提必须是企业
②必须有一个微信商户号(需要去微信商户平台申请)
JS代码:
//将创建好的订单数据写入到数据库中的‘order’表里
const db = wx.cloud.database()
   db.collection('order')
   .add({
   data:{
     order_name: this.data.homelist.title + this.data.homelist.news,
     order_price:this.data.price,
     order_time:db.serverDate(),
     order_img:this.data.homelist.src,
     order_tenancy:this.data.date + '个月',
     order_status:'未支付',
     order_homeId:this.data.homelist.id
      }
   })
//支付函数
exports.main = async (event, context) => {
  const res = await cloud.cloudPay.unifiedOrder({
    "body" : event.title + event.news,//商品描述等
    "outTradeNo" : event.order_id,//订单编号
    "spbillCreateIp" : "127.0.0.1",
    "subMchId" : "1xxxxx206",//自己的商户号
    "totalFee" : parseInt(event.price),//支付金额,单位是分
    "envId": "cloud1-xxxxxxxxxx",//自己的云开发环境id
    "functionName": "payCallback" //支付成功回调函数
  })
  return res
}
(4)发布房源页
先上成果图: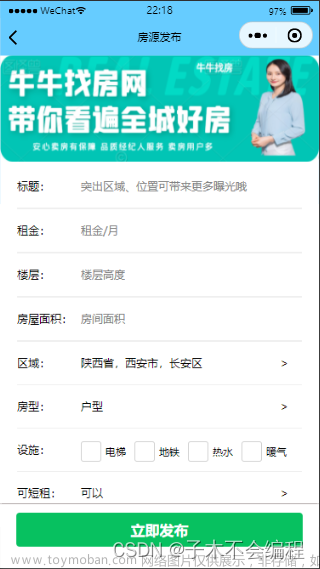
视图层:广告图:view包裹image组件实现;标题、租金、楼层、面积:都是view包裹input组件实现;区域、房型:使用picker多列选择器组件实现;设施:使用radio多项选择器实现。底部的立即发布按钮通过button组件显示,设置type为primary(默认为绿色按钮)。
WXML代码:
<!--部分代码如下-->
  <view class="upper_part">
    <view class="list">
      <text>标题:</text>
      <input type="text" placeholder="突出区域、位置可带来更多曝光哦" bindinput="getTitle"/>
    </view>
    <view class="list" >
      <text>租金:</text>
      <input type="text" placeholder="租金/月" bindinput="getPrice"/>
    </view>
    <view class="list">
      <text>楼层:</text>
      <input type="text" placeholder="楼层高度" bindinput="getFloor"/>
    </view>
    <view class="list">
      <text>房屋面积:</text>
      <input type="text" placeholder="房间面积" bindinput="getArea"/>
    </view>
  </view>
WXSS代码:
.top image{
  width: 100%;
  height: 250rpx;
}
.bigbox{
  margin-left: 40rpx;
  margin-right: 40rpx;
  margin-bottom: 200rpx;
}
.upper_part .list{
  display: flex;
  font-size: 28rpx;
  height: 100rpx;
  line-height: 100rpx;
  border-bottom: 4rpx solid #efefef;
}
.upper_part input{
  width: 60%;
  height: 100%;
}
逻辑层:通过bindinput动态获取到用户输入或者选择的数据,然后通过wx.cloud.database().add()写入到数据库章进行保存即可。然后用户在房源列表刷新即可看到刚发布的房源。
JS代码:
wx.cloud.database().collection('homelist')
    .add({
      data:{
        title:this.data.title,
        price:parseInt(this.data.price),
        floor:this.data.floor,
        news:this.data.address,
        area:this.data.area,
        address:this.data.address,
        home_type:this.data.home_type,
       sell_type:this.data.sell_type,
       introduce:this.data.introduce,
       name:this.data.username,
       avatarUrl:this.data.userUrl,
       img:imageUrl,
       state:'在售'
      }
    })
5、订单管理页
订单管理页,用户可以对自己产生的订单进行管理,例如对未支付的订单进行跳转支付,对已支付的页面进行评价等,并且可以根据订单名搜索对应的订单。
先上成果图: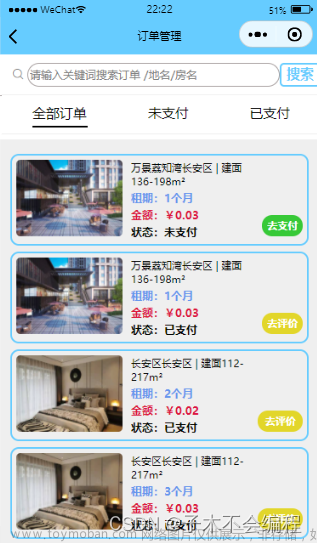
视图层:顶部采用一个view包裹搜索框和搜索按钮实现订单检索区域的构建,分类栏使用三个view通过wx:if条件渲染进行订单分类,底下订单区域使用vie包裹image组件、text组件,button组件实现订单数据渲染,其中中间的订单信息是用几个text进行弹性布局后纵向排列进行布局。
WXML代码:
<!-- 搜索框 -->
<view class="search">
	<view class="search_left">
		<icon class="icon" type="search" size="18"></icon>
		<input type="text" placeholder="请输入关键词搜索订单 /地名/房名" bindinput="searchInput"/>
	</view>
	<view class="search_button" bindtap="searchClick">搜索</view>
</view>
<view class="keep1"></view>
<!-- tabs导航区 -->
<view class="tabs">
  <view class="all_order" bindtap="all_order">
		<view>全部订单</view>
		<view wx:if="{{flag1}}" style="background-color: black;width: 130rpx;height: 4rpx;margin-top: 10rpx;"></view>
	</view>
  <view class="unpaid" bindtap="unpaid">
		<view>未支付</view>
		<view wx:if="{{flag2}}" style="background-color: black;width: 100rpx;height: 4rpx;margin-top: 10rpx;"></view></view>
  <view class="paid" bindtap="paid">
		<view>已支付</view>
		<view wx:if="{{flag3}}" style="background-color: black;width: 100rpx;height: 4rpx;margin-top: 10rpx;"></view></view>
</view>
<view class="keep2"></view>
<!-- 订单显示区域 -->
<view class="list_box">
<view class="order_box">
	<view class="order_list" wx:for="{{orderList}}" wx:key="index">
		<view class="left">
			<image src="{{item.order_img}}"></image>
			<view></view>
		</view>
		<view class="right">
			<text style="font-size: 24rpx;">{{item.order_name}}</text>
			<text style="color: cornflowerblue;font-weight: bolder;">租期:{{item.order_tenancy}}</text>
			<text style="color: crimson;font-weight: bolder;">金额:¥{{item.order_price}}</text>
			<text style="font-weight: bolder;">状态:{{item.order_status}}</text>
		</view>
		<!-- 未支付订单去支付按钮 -->
		<view class="pay" wx:if="{{item.order_status === '未支付'}}" bindtap="goPay" data-title="{{item.order_name}}" data-id="{{item._id}}" data-price="{{item.order_price}}">
		<text>去支付</text>
		</view>
		<!-- 已支付订单去评价按钮 -->
		<navigator url="./order_evaluate/order_evaluate?src={{item.order_img}}&title={{item.order_name}}&tenancy={{item.order_tenancy}}&price={{item.order_price}}&id={{item.order_homeId}}&order_id={{item._id}}" class="evaluate" wx:if="{{item.order_status === '已支付'}}">
		<text>去评价</text>
		</navigator>
	</view>
</view>
</view>
WXSS代码:
/* 订单列表区域 */
.list_box{
  background-color: #efefef;
  margin: 10rpx;
  border-radius: 10rpx;
}
.order_list{
  margin: 15rpx;
  padding: 10rpx;
  border: 4rpx solid #66ccff;
  display: flex;
  border-radius: 20rpx;
}
.order_box{
  padding-top: 10rpx;
}
.order_list image{
  width: 250rpx;
  height: 180rpx;
  border-radius: 10rpx;
}
.order_list .right{
  margin-left: 20rpx;
  font-size: 28rpx;
  display: flex;
  flex-direction: column;
  justify-content: space-around;
}
逻辑层:使用flag对三种订单状态进行标记,当点击对应的分类栏时,从数据库中筛选出对应订单状态的订单数据,赋值给js中的data定义的数组,再在wxml页面进行动态渲染出来。文章来源:https://www.toymoban.com/news/detail-500273.html
JS代码:
  //获取用户订单数据
  getOrder(e){
    const db = wx.cloud.database()
    if(e==='all_order'){ //根据点击的分类栏进行筛选
      db.collection('order')
    .get()
    .then(res =>{
      this.setData({
        orderList:res.data
      })
      if(this.data.orderList.length == 0){
        wx.showToast({
          title: '没有订单数据哦',
          icon:'none'
        })
      }
      console.log('获取订单数据成功',this.data.orderList);
    })
    }
到了这里,关于(后续更新)【微信小程序】毕业设计 租房小程序开发实战,零基础开发房屋租赁系统小程序的文章就介绍完了。如果您还想了解更多内容,请在右上角搜索TOY模板网以前的文章或继续浏览下面的相关文章,希望大家以后多多支持TOY模板网!


