目录
子组件 index.js
子组件 index.wxml
子组件 index.wxss
父组件引用:
子组件:preview-image
子组件 index.js
Component({
properties: {
previewData: {
type: Array,
default: [],
observer: function (newVal, oldVal) {
console.log('newVal, oldVal', newVal, oldVal);
const previewImages = [];
newVal.map(item => {
previewImages.push(item);
});
this.setData({
previewImages
});
this.formatImageList(newVal);
}
}
},
data: {
previewImages: [],
imgArr: [],
boxClass: 'one'
},
methods: {
formatImageList(imageArr) {
console.log('imageArr---', imageArr);
const arrLength = imageArr.length;
if (arrLength == 1) {
this.setData({
imgArr: imageArr,
boxClass: 'one'
});
}
if (arrLength == 2) {
this.setData({
imgArr: imageArr,
boxClass: 'two'
});
}
if (arrLength == 3) {
const firstArr = [...imageArr.splice(0, 1)];
const threeArr = [[...firstArr], [...imageArr]];
this.setData({
imgArr: threeArr,
boxClass: 'three'
});
}
if (arrLength == 4) {
this.setData({
imgArr: imageArr,
boxClass: 'four'
});
}
if (arrLength == 5) {
const firstArr = [...imageArr.splice(0, 1)];
const fiveArr = [[...firstArr], [...imageArr]];
this.setData({
imgArr: fiveArr,
boxClass: 'five'
});
}
if (arrLength == 6) {
this.setData({
imgArr: imageArr,
boxClass: 'six'
});
}
if (arrLength == 7) {
const firstArr = [...imageArr.splice(0, 1)];
const secondArr = [...imageArr.splice(0, 4)]
const sevenArr = [[...firstArr], [...secondArr], [...imageArr]];
console.log('sevenArr', sevenArr);
this.setData({
imgArr: sevenArr,
boxClass: 'seven'
});
}
if (arrLength == 8) {
const firstArr = [...imageArr.splice(0, 1)];
const secondArr = [...imageArr.splice(0, 4)]
const eightArr = [[...firstArr], [...secondArr], [...imageArr]];
console.log('eightArr', eightArr);
this.setData({
imgArr: eightArr,
boxClass: 'eight'
});
}
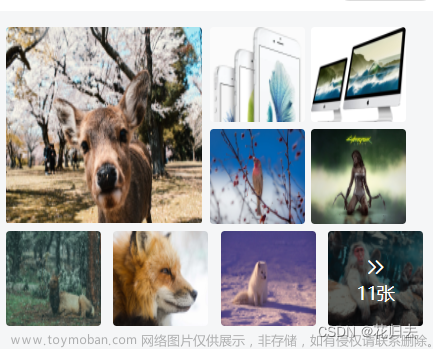
if (arrLength >= 9) {
const firstArr = [...imageArr.splice(0, 1)];
const secondArr = [...imageArr.splice(0, 4)]
const nineArr = [[...firstArr], [...secondArr], [...imageArr]];
console.log('nineArr', nineArr);
this.setData({
imgArr: nineArr,
boxClass: 'nine'
});
}
},
onImageMore(e) {
console.log('onImageMore', e);
const {url} = e.currentTarget.dataset;
const {previewImages} = this.data;
wx.previewImage({
urls: previewImages,
current: url
});
}
}
});
子组件 index.wxml
<view class="preview-img {{boxClass}}"
      wx:if="{{previewImages.length == 3 || previewImages.length == 5 || previewImages.length == 7 || previewImages.length == 8 || previewImages.length >= 9}}">
    <view class="img-box" wx:for="{{imgArr}}" wx:key="index">
        <block wx:for="{{item}}" wx:for-item="_item" wx:for-index="_index" wx:key="_index">
            <view class="box-image" wx:if="{{_index <= 3}}">
                <image mode="scaleToFill" src="{{_item}}"></image>
                <view class="box-image-shade" data-url="{{_item}}" bindtap="onImageMore"
                      wx:if="{{item.length > 4 && _index == 3}}">
                    <view class="shade-more">
                        <van-icon name="arrow"/>
                        <van-icon name="arrow" custom-style="margin-left:-16rpx;"/>
                    </view>
                    <view>{{previewImages.length}}张</view>
                </view>
            </view>
        </block>
    </view>
</view>
<view class="preview-img {{boxClass}}" wx:else>
    <view class="box-image" wx:for="{{imgArr}}" wx:key="index">
        <image mode="scaleToFill" src="{{item}}"></image>
    </view>
</view>
子组件 index.wxss
.preview-img {
    padding: 16rpx 5rpx 0;
    box-sizing: border-box;
}

.box-image {
    margin-top: 10rpx;
    width: 315rpx;
    height: 315rpx;
    border-radius: 6rpx;
    overflow: hidden;
}

.box-image image {
    width: 100%;
    height: 100%;
    display: block;
}

.two {
    display: flex;
    align-items: center;
    justify-content: flex-start;
}

.two .box-image + .box-image {
    margin-left: 12rpx;
}

.three, .five, .seven, .eight, .nine {
    display: flex;
    align-items: center;
    justify-content: flex-start;
}

.three .img-box + .img-box {
    margin-left: 12rpx;
}

.three .img-box + .img-box .box-image {
    width: 154rpx;
    height: 153rpx;
}

.four {
    display: flex;
    flex-wrap: wrap;
    align-items: center;
    justify-content: flex-start;
}

.four .box-image {
    width: 205rpx;
    height: 205rpx;
    margin-right: 14rpx;
    margin-top: 14rpx;
}

.five .img-box + .img-box {
    margin-left: 12rpx;
    display: flex;
    justify-content: space-between;
    flex-wrap: wrap;
}

.five .img-box + .img-box .box-image {
    width: 153rpx;
    height: 153rpx;
}

.six {
    display: flex;
    flex-wrap: wrap;
    align-items: center;
    justify-content: space-between;
}

.six .box-image {
    width: 205rpx;
    height: 205rpx;
    margin-top: 14rpx;
}

.seven, .eight, .nine {
    flex-wrap: wrap;
}

.seven .img-box:nth-child(2), .eight .img-box:nth-child(2), .nine .img-box:nth-child(2) {
    margin-left: 12rpx;
    display: flex;
    justify-content: space-between;
    flex-wrap: wrap;
    width: 315rpx;
}

.seven .img-box:nth-child(2) .box-image, .eight .img-box:nth-child(2) .box-image, .nine .img-box:nth-child(2) .box-image {
    width: 153rpx;
    height: 153rpx;
}

.seven .img-box:nth-child(3) {
    width: 100%;
    display: flex;
    align-items: center;
    justify-content: flex-start;
}

.seven .img-box:nth-child(3) .box-image + .box-image {
    margin-left: 12rpx;
    margin-top: 14rpx;
    width: 315rpx;
}

.eight .img-box:nth-child(3), .nine .img-box:nth-child(3) {
    width: 100%;
    display: flex;
    align-items: center;
    justify-content: space-between;
}

.eight .img-box:nth-child(3) .box-image {
    width: 206rpx;
    height: 206rpx;
    margin-top: 14rpx;
}

.nine .img-box:nth-child(3) .box-image {
    width: 152rpx;
    height: 152rpx;
    margin-top: 12rpx;
    position: relative;
}

.box-image-shade {
    width: 152rpx;
    height: 152rpx;
    position: absolute;
    top: 0;
    left: 0;
    background-color: rgba(0, 0, 0, 0.55);
    text-align: center;
    font-size: 28rpx;
    font-family: PingFang-SC-Medium, PingFang-SC;
    font-weight: 500;
    color: #FFFFFF;
    line-height: 42rpx;
    padding-top: 36rpx;
    box-sizing: border-box;
}
父组件引用:
引用的时候在外层包一个盒子设置宽度
wxml:
<preview-image model:preview-data="{{limagePreviewArn}}"></preview-image>js:文章来源:https://www.toymoban.com/news/detail-648153.html
 data: {
        limagePreviewArn: ["https://fuss10.elemecdn.com/a/3f/3302e58f9a181d2509f3dc0fa68b0jpeg.jpeg",
        "https://img01.yzcdn.cn/vant/apple-1.jpg",
        "https://img01.yzcdn.cn/vant/apple-2.jpg",
        "https://fuss10.elemecdn.com/e/5d/4a731a90594a4af544c0c25941171jpeg.jpeg",
        "https://fuss10.elemecdn.com/1/8e/aeffeb4de74e2fde4bd74fc7b4486jpeg.jpeg",
        "https://fuss10.elemecdn.com/9/bb/e27858e973f5d7d3904835f46abbdjpeg.jpeg",
        "https://fuss10.elemecdn.com/d/e6/c4d93a3805b3ce3f323f7974e6f78jpeg.jpeg",
        "https://fuss10.elemecdn.com/3/28/bbf893f792f03a54408b3b7a7ebf0jpeg.jpeg",
        "https://fuss10.elemecdn.com/2/11/6535bcfb26e4c79b48ddde44f4b6fjpeg.jpeg",
        "https://fuss10.elemecdn.com/1/34/19aa98b1fcb2781c4fba33d850549jpeg.jpeg",
        "https://img01.yzcdn.cn/vant/cat.jpeg",]
    },
文章来源地址https://www.toymoban.com/news/detail-648153.html
到了这里,关于小程序多图片组合的文章就介绍完了。如果您还想了解更多内容,请在右上角搜索TOY模板网以前的文章或继续浏览下面的相关文章,希望大家以后多多支持TOY模板网!