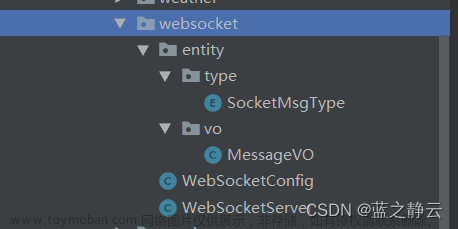
文件目录结构

 文章来源地址https://www.toymoban.com/news/detail-724538.html
web(vue)
destroyWs(){
      // 断开ws
      if(window.ws) {
        window.ws.onclose = null;
        window.ws.onerror = null;
        window.ws.close();
        window.ws = null;
      }
    },
    connSocket() {
      const _t = this;
      try{
        window.ws = new WebSocket(`${socketUrl}${shortUrl}${wsShortUrl}/${_t.loginScanParams.scene}/${_t.loginScanParams.oldScene || '-'}`);
        //申请一个WebSocket对象,参数是服务端地址,同http协议使用http://开头一样,WebSocket协议的url使用ws://开头,另外安全的WebSocket协议使用wss://开头
        window.ws.onopen = function () {
          console.log("即时通讯已启动");
        }
        window.ws.onmessage = function (Message) {
          // 判断消息类型作出相应操作
          let data = {};
          try {
            data = JSON.parse(Message.data);
          } catch (e) {
            console.error(e);
          }
          console.log("收到消息", data)
          // 更新扫码状态
          if(data.type === 5){
            if(data.data) _t.scanResultAction(data.data);
          }
        }
        window.ws.onclose = function (e) {
          //当客户端收到服务端发送的关闭连接请求时,触发onclose事件
          console.log("连接断开", e);
          // 断线重连尝试6次
          if(wsConnCount > 4) return;
          if(window.wsTimer) clearTimeout(window.wsTimer)
          window.wsTimer = setTimeout(() => {
            // 断线重连计数
            wsConnCount ++;
            // 断线重连
           _t.connSocket();
          }, 3000)
        }
        window.ws.onerror = function (e) {
          //如果出现连接、处理、接收、发送数据失败的时候触发onerror事件
          console.log("网络错误,连接断开", e);
          // 断线重连尝试6次
          if(wsConnCount > 4) return;
          if(window.wsTimer) clearTimeout(window.wsTimer)
          window.wsTimer = setTimeout(() => {
            // 断线重连计数
            wsConnCount ++;
            _t.connSocket();
          }, 3000)
        }
      }catch(e){
        console.log(e);
      }
    },
    async scanLogin() {
      const _t = this;
      _t.loginScanParams.scanStatus = "wait";
      _t.loginScanParams.loading = true
      // 获取二维码
      const res = await createLogin({
        scene: _t.loginScanParams.scene
      });
      console.log("创建二维码返回结果:", res)
      // 存储旧的场景值
      _t.loginScanParams.oldScene = _t.loginScanParams.scene;
      const scene = _t.loginScanParams.scene = res
      //  拼接 小程序码url
      _t.loginScanParams.qrcodeUrl = `${baseUrl}${shortUrl}/login/qrcode/${scene}.jpg`
      _t.loginScanParams.loading = false
      _t.connSocket();
    },
    scanResultAction(res){
      const _t = this;
      const { avatar, status, openId } = res;
      if (status === 'ing') {
        // 用户进入小程序(已扫码)
        _t.loginScanParams.scanStatus = 'ing'
        // 显示已扫码
        _t.loginScanParams.scanning = 'true'
        // 显示用户头像
        if(avatar) _t.loginScanParams.qrcodeUrl = `data:image/png;base64, ${avatar}`
        else _t.loginScanParams.qrcodeUrl = require('./logo.png')
      } else if (status === 'success') {
        _t.loginScanParams.scanStatus = "success"
        // 执行常规登录
        _t.$store.dispatch("scanLogin", {
          userType: "0",
          loginType: "web",
          openid: sm2Encrypt(openId)
        }).then(res => {
          console.log("扫码登录情况:", res)
          const { success, code, result } = res;
          if(success) {
            if(result.data.menus.length === 0) {
              _t.loginScanParams.scanStatus = "noAuth"
              _t.loginScanParams.qrcodeUrl = require("./sad.png")
            }else {
              // 断开ws
              _t.destroyWs()
              // 拿到必要信息执行登录
            }
          }else {
            if(code === 502) {
              _t.loginScanParams.scanStatus = "noRegister"
              _t.loginScanParams.qrcodeUrl = require("./sad.png")
            }
          }
        })
      } else if (status === "cancel") { // 用户点击取消认证,处理业务结束轮询
        _t.loginScanParams.scanStatus = status
      }
    },
uni-app
<template>
	<view class="auth" :style="{ paddingTop: navigationBarHeight +'px' }">
		<view class="top">
			<view style="padding-right: 10px; display: inline-block;" @click="exit">
				<text class="iconfont icon-delete" style="color: #212121;font-size: 19px;"></text>
			</view>
		</view>
		<view class="center">
			<view style="height: 60%; flex-direction: column;" class="flex-center">
				<view v-if="showAvatar" class="flex-center" style="width: 300rpx; height: 300rpx;">
					<image v-if="authInfo.avatar" :src="avatarCpd" mode="widthFix" style="width: 100%; border-radius: 10px; box-shadow: 4px 2px 6px #ccc;"></image>
					<loading v-else></loading>
				</view>
				<text v-else class="iconfont icon-PC" style="font-weight: 100; font-size: 150px; color: #8d8d8d;"></text>
				<text style="margin-top: 10px; color: #333333; font-size: 38rpx; font-weight: 500" v-if="status !== 'success'">登录 PC 正域绿能</text>
				<text style="margin-top: 10px; color: #333333; font-size: 38rpx; font-weight: 500" v-else>已成功认证</text>
			</view>
			<view style="height: 40%; flex-direction: column;" class="flex-center">
				<navigator open-type="exit" target="miniProgram" v-if="status === 'success'">
					<button
					  type="default"
					  style="padding: 0 150rpx; color: #24b155">我知道了</button>
				</navigator>
				<template v-else>
					<button type="primary" :loading="loading" @tap="handleUserAuth"
						style="background-color: #27c05e; padding: 0 150rpx">登录</button>
					<text @tap="exit" style="margin-top: 25px; color: #62708e; font-size: 17px">取消登录</text>
					<template v-if="!isRelease">
						<uni-easyinput v-model="scene" :inputBorder="true" style="margin-top: 10px" placeholder="场景值"
							clearable />
						<text @tap="load" style="margin-top: 25px; color: #62708e; font-size: 17px">模拟进入</text>
					</template>
				</template>
			</view>
		</view>
	</view>
</template>

<script>
	import {
		mapGetters
	} from 'vuex'
	import {
		handleUserScan,
		handleUserCancel,
		handleUserAuth
	} from '@/common/api/user'
	import { isRelease } from '@/common/env'
	export default {
		data() {
			return {
				showAvatar: true,
				isRelease: isRelease,
				loading: false,
				// 用户信息
				authInfo: {},
				// 用户唯一标识
				openid: '',
				// 场景值
				scene: '',
				// 扫描状态,用于退出登录界面
				status: 'wait'
			};
		},
		computed: {
			...mapGetters(['systemInfo']),
			avatarCpd(){
				return `data:image/png;base64,${this.authInfo.avatar}`.replace(/[\r\n]/g, "");
			},
			navigationBarHeight(){
				return this.systemInfo.navigationBarHeight
			}
		},
		async onLoad(options) {
			const _t = this;
			if(!options.scene && _t.isRelease) return _t.$mRouter.redirectTo("/pages/transfer/transfer")
			_t.showAvatar = true;
			// 对scene进行解码
			const scene = decodeURIComponent(options.scene) || ""
			// const scene = _t.scene
			console.log('scene >>>', scene)
			_t.scene = scene
			const code = await _t.getCode();
			// 1、修改 认证状态为 已扫码
			const res = await handleUserScan({
				scene: scene,
				code: code
			})
			console.log("修改状态情况", res)
			const {
				code: resCode,
				data
			} = res.data;
			if (resCode === 200) _t.authInfo = data;
			if(!_t.authInfo.avatar) _t.showAvatar = false
		},
		methods: {
			async load() {
				const _t = this;
				// 对scene进行解码
				// const scene = decodeURIComponent(options.scene)
				const scene = _t.scene
				console.log('scene >>>', scene)
				_t.scene = scene
				const code = await _t.getCode();
				// 1、修改 认证状态为 已扫码
				const res = await handleUserScan({
					scene: scene,
					code: code
				})
				console.log("修改状态情况", res)
				const {
					code: resCode,
					data
				} = res.data;
				if (resCode === 200) _t.authInfo = data;
				if(!_t.authInfo.avatar) _t.showAvatar = false
			},
			// 获取微信code
			async getCode() {
				const code = await this.login();
				return code ? code : '';
			},
			// 微信登录
			login() {
				return new Promise(resolve => {
					uni.login({
						provider: 'weixin',
						success(loginRes) {
							console.log("获取code成功")
							resolve(loginRes.code)
						},
						fail(err) {
							resolve('');
						}
					});
				})
			},
			// 点击认证时绑定的事件,获取用户信息
			async handleUserAuth() {
				const _t = this;
				_t.loading = true;
				const code = await _t.getCode();
				console.log("权限信息:", _t.authInfo);
				const res = await handleUserAuth({
					nickname: _t.authInfo.username || "",
					openId: _t.authInfo.wechatOpenid || "",
					avatar: _t.authInfo.avatar || "",
					scene: _t.scene || ""
				})
				console.log("认证情况", res);
				const {
					success,
					code: resCode,
					message
				} = res.data
				if (resCode === 200) {
					_t.status = 'success'
					_t.$cu.showToast("认证成功");
				}
				_t.loading = false;
			},
			// 用户点击 取消认证,或已认证,返回微信
			async exit() {
				const _t = this;
				// 如果状态为 wait 说明用户 未认证点击了取消登录
				if (_t.status === 'wait') {
					// 发送请求,将数据库状态修改为 cancel,再执行退出
					const res = await handleUserCancel({
						scene: _t.scene
					});
					console.log("取消认证情况", res);
					if (res.data.code === 200) {
						console.log("退出小程序");
						// 执行退出小程序
						wx.exitMiniProgram({
							success: res => {
								console.log(res)
							}
						})
					}
				} else {
					//否则,说明已认证,直接退出小程序即可
					console.log("退出小程序");
					wx.exitMiniProgram({
						success: res => {
							console.log(res)
						}
					})
				}
			}
		}
	}
</script>

<style lang="scss">
	.auth {
		width: 100%;
		height: 100vh;
		background-color: #ededed;
		box-sizing: border-box;
		position: relative;
		padding: 0 20rpx;

		.top {
			width: 100%;
		}

		.center {
			width: 100%;
			height: 75vh;
			margin-top: 5vh;
			border-radius: 10px;
			background-color: #fff;
		}
	}
</style>
SocketMsgType
import lombok.Getter;
import java.util.HashMap;
import java.util.Map;

/**
* @company BN
* @description 用户类型枚举
* @author WuTongYue
* @date 2022-01-06
**/
public enum SocketMsgType {

    CONN_SUCCESS(1, "连接成功"),
    CONN_FAIL(2, "连接失败"),
    SHUT_LINE(3, "被踢下线"),
    USER_ONLINE(4, "用户在线情况"),
    SCAN_STATUS(5, "扫码状态");

    @Getter
    private final Integer code;
    @Getter
    private final String name;

    SocketMsgType(Integer code, String name) {
        this.code = code;
        this.name = name;
    }

    private static Map<Integer, SocketMsgType> KEY_MAP_CODE = new HashMap<>();
    private static Map<String, SocketMsgType> KEY_MAP_NAME = new HashMap<>();

    static {
        for (SocketMsgType value : values()) {
            KEY_MAP_CODE.put(value.getCode(), value);
            KEY_MAP_NAME.put(value.getName(), value);
        }
    }

    public static SocketMsgType getCode(Integer code) {
        return KEY_MAP_CODE.get(code);
    }

    public static SocketMsgType getName(String name) {
        return KEY_MAP_NAME.get(name);
    }
}
MessageVO
import lombok.Data;

import java.io.Serializable;

@Data
public class MessageVO<T> implements Serializable {
    /**
     * 消息类型
     */
    private Integer type;
    /**
     * 消息
     */
    private String message;
    /**
     * 数据
     */
    private T data;

}
WebSocketConfig
import org.springframework.context.annotation.Bean;
import org.springframework.context.annotation.Configuration;
import org.springframework.web.socket.server.standard.ServerEndpointExporter;

/**
 * 开启ws支持
 * @author wutongyue
 */
@Configuration
public class WebSocketConfig {

    @Bean
    public ServerEndpointExporter serverEndpointExporter() {
        return new ServerEndpointExporter();
    }

}
WebSocketServer
import com.alibaba.fastjson.JSON;
import com.alibaba.fastjson.JSONObject;
import com.bn.ies.appapi.scanLogin.service.LoginService;
import com.bn.ies.base.websocket.entity.type.SocketMsgType;
import com.bn.ies.base.websocket.entity.vo.MessageVO;
import org.apache.commons.lang.StringUtils;
import org.apache.logging.log4j.LogManager;
import org.apache.logging.log4j.Logger;
import org.springframework.beans.factory.annotation.Autowired;
import org.springframework.stereotype.Component;
import javax.websocket.*;
import javax.websocket.server.PathParam;
import javax.websocket.server.ServerEndpoint;
import java.io.IOException;
import java.util.concurrent.ConcurrentHashMap;

/**
 * ws
 * @Author WuTongYue
 * @Date 2023/06/05
 */
@ServerEndpoint("/ws/{userId}/{oldUserId}")
@Component
public class WebSocketServer {
    // 日志
    private static Logger log = LogManager.getLogger(WebSocketServer.class);
    /**静态变量,用来记录当前在线连接数。应该把它设计成线程安全的。*/
    private static int onlineCount = 0;
    /**concurrent包的线程安全Set,用来存放每个客户端对应的MyWebSocket对象。*/
    private static ConcurrentHashMap<String,WebSocketServer> webSocketMap = new ConcurrentHashMap<>();
    /**与某个客户端的连接会话,需要通过它来给客户端发送数据*/
    private Session session;
    /**接收userId*/
    private String userId = "";

    /**查询用户在线情况服务类*/
    private static LoginService loginService;
    @Autowired
    public void setSysUserOnlineService(LoginService loginService){
        WebSocketServer.loginService = loginService;
    }

    /**
     * 连接建立成功调用的方法*/
    @OnOpen
    public void onOpen(Session session, @PathParam("userId") String userId, @PathParam("oldUserId") String oldUserId) {
        System.out.println("用户"+userId+"连接建立");
        this.session = session;
        this.userId = userId;
        // 清除单个旧的连接(多人同时扫码可能存在相同scene,可用雪花算法保证唯一,或者场景值增加客户端ip)
        if(webSocketMap.containsKey(oldUserId)){
            webSocketMap.remove(oldUserId);
            subOnlineCount();
        }
        if(webSocketMap.containsKey(userId)){
            webSocketMap.remove(userId);
            webSocketMap.put(userId,this);
        }else{
            webSocketMap.put(userId,this);
            //在线数加1
            addOnlineCount();
        }

        log.info("用户连接:"+userId+",当前在线人数为:" + getOnlineCount());

        try {
            MessageVO<String> messageVO = new MessageVO<>();
            messageVO.setMessage("连接成功~");
            messageVO.setData(SocketMsgType.CONN_SUCCESS.getName());
            messageVO.setType(SocketMsgType.CONN_SUCCESS.getCode());
            sendMessage(JSON.toJSONString(messageVO));
        } catch (IOException e) {
            log.error("用户:"+userId+",网络异常!");
        }
    }

    /**
     * 连接关闭调用的方法
     */
    @OnClose
    public void onClose() {
        if(webSocketMap.containsKey(userId)){
            webSocketMap.remove(userId);
            // 从set中删除
            subOnlineCount();
            // 业务删除
            loginService.delete(userId);
        }
        log.info("用户退出:"+userId+",当前在线人数为:" + getOnlineCount());
    }

    /**
     * 收到客户端消息后调用的方法
     *
     * @param message 客户端发送过来的消息*/
    @OnMessage
    public void onMessage(String message, Session session) {
        log.info("用户消息:"+userId+",报文:"+message);
        //可以群发消息
        //消息保存到数据库、redis
        if(StringUtils.isNotBlank(message)){
            try {
                webSocketMap.get(userId).sendMessage("lys");
                //解析发送的报文
                JSONObject jsonObject = JSON.parseObject(message);
                //追加发送人(防止串改)
                jsonObject.put("fromUserId",this.userId);
                String toUserId=jsonObject.getString("toUserId");
                //传送给对应toUserId用户的websocket
                if(StringUtils.isNotBlank(toUserId)&&webSocketMap.containsKey(toUserId)){
                    webSocketMap.get(toUserId).sendMessage(JSON.toJSONString(jsonObject));
                }else{
                    log.error("请求的userId:"+toUserId+"不在该服务器上");
                    //否则不在这个服务器上,发送到mysql或者redis
                }
            }catch (Exception e){
                e.printStackTrace();
            }
        }
    }

    /**
     *
     * @param session
     * @param error
     */
    @OnError
    public void onError(Session session, Throwable error) {
        log.error("用户错误:" + userId + ",原因:" +error.getMessage());
        error.printStackTrace();
        // 业务删除
        loginService.delete(userId);
    }
    /**
     * 实现服务器主动推送
     */
    public void sendMessage(String message) throws IOException {
        this.session.getBasicRemote().sendText(message);
    }

    /**
     * 发送自定义消息
     * */
    public static void sendInfo(String message,@PathParam("userId") String userId) throws IOException {
        if(StringUtils.isNotBlank(userId)&&webSocketMap.containsKey(userId)){
            webSocketMap.get(userId).sendMessage(message);
        }else{
            log.error("用户"+userId+",不在线!");
        }
    }

    public static synchronized int getOnlineCount() {
        return onlineCount;
    }

    public static synchronized void addOnlineCount() {
        WebSocketServer.onlineCount++;
    }

    public static synchronized void subOnlineCount() {
        WebSocketServer.onlineCount--;
    }
}
ScanStatus
import lombok.AllArgsConstructor;
import lombok.Getter;

/**
 * 登录扫码状态
 *
 * @author 蓝之静云
 */
@AllArgsConstructor
@Getter
public enum ScanStatus {

	/**
	 * 等待扫码
	 */
	WAIT("wait"),

	/**
	 * 已扫码
	 */
	ING("ing"),

	/**
	 * 认证成功
	 */
	SUCCESS("success"),

	/**
	 * 取消认证
	 */
	CANCEL("cancel");

	/**
	 * 扫码状态
	 */
	private String status;

}
LoginController
import com.alibaba.fastjson.JSON;
import com.alibaba.fastjson.JSONObject;
import com.bn.ies.appapi.scanLogin.constant.ScanStatus;
import com.bn.ies.appapi.scanLogin.entity.dto.ScanLoginDTO;
import com.bn.ies.appapi.scanLogin.service.LoginService;
import com.bn.ies.appapi.system.utils.WeixinUtils;
import com.bn.ies.base.config.FileProperties;
import com.bn.ies.base.entity.Result;
import com.bn.ies.base.entity.po.SysUser;
import com.bn.ies.base.websocket.WebSocketServer;
import com.bn.ies.base.websocket.entity.type.SocketMsgType;
import com.bn.ies.base.websocket.entity.vo.MessageVO;
import io.swagger.annotations.ApiOperation;
import org.springframework.beans.factory.annotation.Autowired;
import org.springframework.web.bind.annotation.*;
import javax.servlet.ServletOutputStream;
import javax.servlet.http.HttpServletRequest;
import javax.servlet.http.HttpServletResponse;
import java.io.File;
import java.io.FileInputStream;
import java.io.IOException;

/**
 * @author 蓝之静云
 */
@RestController
@RequestMapping("/login")
public class LoginController {

	@Autowired
	private LoginService loginService;

	@Autowired
	private FileProperties properties;
	/**
	 * 创建 scanLoginDTO 数据
	 *
	 * @return 文件名
	 */
	@PostMapping("create")
	public String createUserLogin(@RequestBody ScanLoginDTO scanLoginDTO){
		return loginService.createAndGetQrcodeFile(scanLoginDTO.getScene());
	}

	@GetMapping("/qrcode/{name:.+}")
    @ApiOperation("根据名称获取图片资源")
    public void getImg(@PathVariable("name") String name, HttpServletResponse response) throws Exception {
        ServletOutputStream outputStream = null;
        FileInputStream inputStream = null;
        try {
            String imgPath = properties.getPath().getQrCode() + File.separator + name;
            inputStream = new FileInputStream(imgPath);
            response.setContentType("image/" + name.split("\\.")[1]);
            outputStream = response.getOutputStream();
            int len;
            byte[] buffer = new byte[4096];
            while ((len = inputStream.read(buffer)) != -1) {
                outputStream.write(buffer, 0, len);
            }
            outputStream.flush();
        } catch (Exception e) {
            e.printStackTrace();
        } finally {
            outputStream.close();
            inputStream.close();
        }
    }

	/**
	 * 修改扫码状态为 已扫码
	 *
	 * @param scanLoginDTO 登录信息
	 */
	@PostMapping("scan")
	public Result<?> userScanQrcode(ScanLoginDTO scanLoginDTO, HttpServletRequest request) throws Exception{
		JSONObject json = WeixinUtils.getSession(scanLoginDTO.getCode());
        if (json == null) return Result.fail("获取openid失败");
        String openId = json.getString("openid");
        // 通过openid查询用户信息返回
        SysUser userInfo = loginService.getUserInfoByOpenid(openId, request);
        userInfo.setWechatOpenid(openId);
        scanLoginDTO.setAvatar(userInfo.getAvatar());
		scanLoginDTO.setOpenId(openId);
		scanLoginDTO.setStatus(ScanStatus.ING.getStatus());
		MessageVO<ScanLoginDTO> messageVO = new MessageVO<>();
		messageVO.setData(scanLoginDTO);
		messageVO.setType(SocketMsgType.SCAN_STATUS.getCode());
		WebSocketServer.sendInfo(JSON.toJSONString(messageVO), scanLoginDTO.getScene());
        return Result.success(userInfo);
	}

	/**
	 * 用户点击确认
	 *
	 * @param scanLoginDTO 登录信息
	 */
	@PostMapping("auth")
	public Result<?> userAuthWebPro(ScanLoginDTO scanLoginDTO) throws IOException {
		scanLoginDTO.setStatus(ScanStatus.SUCCESS.getStatus());
		MessageVO<ScanLoginDTO> messageVO = new MessageVO<>();
		messageVO.setData(scanLoginDTO);
		messageVO.setType(SocketMsgType.SCAN_STATUS.getCode());
		String scene = scanLoginDTO.getScene();
		WebSocketServer.sendInfo(JSON.toJSONString(messageVO), scene);
		loginService.delete(scene);
		return Result.success("认证成功");
	}

	/**
	 * 用户取消认证
	 *
	 * @param params
	 */
	@PostMapping("cancel")
	public Result<?> userCancelAuth(@RequestBody JSONObject params) throws IOException {
		ScanLoginDTO scanLoginDTO = new ScanLoginDTO();
		String scene = params.getString("scene");
		scanLoginDTO.setScene(scene);
		scanLoginDTO.setStatus(ScanStatus.CANCEL.getStatus());
		MessageVO<ScanLoginDTO> messageVO = new MessageVO<>();
		messageVO.setData(scanLoginDTO);
		messageVO.setType(SocketMsgType.SCAN_STATUS.getCode());
		WebSocketServer.sendInfo(JSON.toJSONString(messageVO), scene);
		loginService.delete(scene);
		return Result.success("取消认证成功");
	}
}
ScanLoginDTO
import lombok.Data;

/**
 * @author 蓝之静云
 */
@Data
public class ScanLoginDTO {

    private String id;

	/**
	 * 场景值
	 */
	private String scene;

	/**
	 * 状态
	 */
	private String status;

	/**
	 * 用户ID
	 */
	private String userId;

	/**
	 * code码
	 */
	private String code;

	/**
	 * 开放ID
	 */
	private String openId;

	/**
	 * 用户头像
	 */
	private String avatar;
}
LoginServiceImpl
import com.alibaba.fastjson.JSON;
import com.alibaba.fastjson.JSONObject;
import com.bn.df.common.api.vo.Result;
import com.bn.ies.appapi.scanLogin.service.LoginService;
import com.bn.ies.appapi.scanLogin.utils.FileManage;
import com.bn.ies.base.config.FileProperties;
import com.bn.ies.base.entity.po.SysUser;
import com.bn.ies.util.HeaderUtil;
import com.bn.ies.util.IscPropertiesUtils;
import com.bn.ies.util.UserUtil;
import org.apache.http.HttpEntity;
import org.apache.http.HttpResponse;
import org.apache.http.client.methods.HttpPost;
import org.apache.http.entity.StringEntity;
import org.apache.http.impl.client.DefaultHttpClient;
import org.apache.http.message.BasicHeader;
import org.apache.http.protocol.HTTP;
import org.springframework.beans.factory.annotation.Autowired;
import org.springframework.beans.factory.annotation.Value;
import org.springframework.http.HttpHeaders;
import org.springframework.http.HttpMethod;
import org.springframework.http.ResponseEntity;
import org.springframework.stereotype.Service;
import org.springframework.web.client.RestTemplate;
import javax.servlet.http.HttpServletRequest;
import java.io.*;
import java.util.HashMap;
import java.util.Map;
import java.util.UUID;

/**
 * @author 蓝之静云
 */
@Service
public class LoginServiceImpl implements LoginService {

	@Value("${wxmini.appid}")
	private String appid;

	@Value("${wxmini.secret}")
	private String secret;

	@Autowired
	private FileProperties properties;

	@Autowired
    private RestTemplate restTemplate;

	@Override
	public String createAndGetQrcodeFile(String s) {
		// 1、创建文件名及scene值
		String scene = UUID.randomUUID().toString().replaceAll("-", "");
		// 2、获取token
		String accessToken = getAccessToken();
		// 3、请求图片流
		InputStream inputStream = getwxacode(accessToken, scene);
		// 删除原有图标文件(若存在)
		FileManage.delFileByPath(properties.getPath().getQrCode() + File.separator + s + ".jpg");
		// 4、保存图标文件
		saveToImgByInputStream(inputStream,scene);
		// 5、删除冗余数据
		this.delete(s);
		return scene;
	}

	@Override
	public SysUser getUserInfoByOpenid(String openid, HttpServletRequest request) {
		 SysUser sysUser = new SysUser();
        try {
            //设置请求头携带token
            HttpHeaders headers = HeaderUtil.getHttpHeaders(UserUtil.getToken(request));
            JSONObject json = new JSONObject();
            json.put("openid", openid);
            org.springframework.http.HttpEntity<JSONObject> params = new org.springframework.http.HttpEntity<>(json, headers);
            //请求获取用户列表
            ResponseEntity<Result> usernameListResponse = restTemplate.exchange(IscPropertiesUtils.getUserInfoByOpenidUrl(), HttpMethod.POST, params, Result.class);
            Map<String, Object> userInfo = (HashMap)usernameListResponse.getBody().getResult();
            sysUser.setAvatar((String)userInfo.getOrDefault("avatar", ""));
            sysUser.setUsername((String)userInfo.getOrDefault("username", ""));
        } catch (Exception e) {
            return sysUser;
        }
		return sysUser;
	}

	@Override
	public void delete(String scene) {
		// 删除图片文件
		FileManage.delFileByPath(properties.getPath().getQrCode() + File.separator + scene + ".jpg");
	}

	/**
	 * 获取access_token
	 * @return access_token
	 */
	private String getAccessToken(){
		RestTemplate restTemplate = new RestTemplate();
		Map<String, String> params = new HashMap<>();
		params.put("APPID", appid);
		params.put("APPSECRET", secret);
		ResponseEntity<String> responseEntity = restTemplate.getForEntity(
				"https://api.weixin.qq.com/cgi-bin/token?grant_type=client_credential&appid={APPID}&secret={APPSECRET}",
				String.class, params);
		String body = responseEntity.getBody();
		JSONObject object = JSON.parseObject(body);
		return object.getString("access_token");
	}

	/**
	 1. 带参数有限个数小程序码接口
	 2. @param url
	 3. @param access_token
	 4. @param path
	 5. @param width
	 6. @return
	 */
	private static InputStream getwxacode(String accessToken, String scene){
		String url = "https://api.weixin.qq.com/wxa/getwxacodeunlimit?access_token=" + accessToken;
		JSONObject jsonParam = new JSONObject();
		// 封装请求对象
		// scene值
		jsonParam.put("scene", scene);
		// 跳往的小程序页面,一般为认证界面
		jsonParam.put("page","pages/oauth/oauth");
		// 图片宽度,默认为 430
		jsonParam.put("width","430");
		// 检测页面是否存在,默认为 true
		jsonParam.put("check_path",true);
		// 返回请求结果
		return doWxPost(url, jsonParam);
	}

	/**
	 * IO流保存图片
	 *
	 * @param instreams 需要保存的流
	 * @param imagePath 保存的图片路径
	 * @param fileName  文件名
	 * @return 保存状态
	 */
	private static boolean uploadImages( InputStream instreams,String imagePath,String fileName) {
		File f = new File(imagePath);
		f.setWritable(true, false);
		boolean flag = false;
		try {
			// 1K的数据缓冲
			byte[] bs = new byte[1024];
			// 读取到的数据长度
			int len;
			// 输出的文件流
			File file = new File(imagePath,fileName);
			if (!file.getParentFile().exists()) {
				file.getParentFile().mkdirs();
				try {
					// 创建新文件
					file.createNewFile();
				} catch (IOException e) {
					System.out.println("创建新文件时出现了错误。。。");
					e.printStackTrace();
				}
			}
			OutputStream os = new FileOutputStream(imagePath+File.separator+fileName);
			// 开始读取
			while ((len = instreams.read(bs)) != -1) {
				os.write(bs, 0, len);
			}
			// 完毕,关闭所有链接
			os.close();
			instreams.close();
			flag = true;
		} catch (IOException e) {
			e.printStackTrace();
		}
		return flag;
	}

	/**
	 * 通过流保存图片
	 *
	 * @param instreams 二进制流
	 * @param fileName  图片的名称
	 */
	private void saveToImgByInputStream(InputStream instreams, String fileName) {
		if (instreams != null) {
			boolean b = uploadImages(instreams, properties.getPath().getQrCode(), fileName + ".jpg");
		}
	}

	/**
	 * 发送post请求
	 *
	 * @param url       请求地址
	 * @param jsonParam 请求参数
	 * @return 响应流
	 */
	private static InputStream doWxPost(String url, JSONObject jsonParam) {
		InputStream instreams = null;
		// 创建HttpPost对象
		HttpPost httpRequst = new HttpPost(url);
		try {
			StringEntity se = new StringEntity(jsonParam.toString(),"utf-8");
			se.setContentType("application/json");
			se.setContentEncoding(new BasicHeader(HTTP.CONTENT_TYPE,"UTF-8"));
			httpRequst.setEntity(se);
			HttpResponse httpResponse = new DefaultHttpClient().execute(httpRequst);
			if (httpResponse.getStatusLine().getStatusCode() == 200) {
				HttpEntity httpEntity = httpResponse.getEntity();
				if (httpEntity != null) {
					instreams = httpEntity.getContent();
				}
			}
		} catch (IOException e) {
			e.printStackTrace();
		}
		return instreams;
	}

}
LoginService
import com.bn.ies.base.entity.po.SysUser;
import javax.servlet.http.HttpServletRequest;

/**
 * @author 蓝之静云
 */
public interface LoginService {

	/**
	 * 请求创建图片文件并返回文件名
	 *
	 * @return 返回scene值,作为网站做剩余操作的依据
	 */
	String createAndGetQrcodeFile(String scene);

	/**
	 * 通过openid获取用户信息
	 * @return
	 */
	SysUser getUserInfoByOpenid(String openid, HttpServletRequest request);


	/**
	 * 根据场景值执行删除冗余数据
	 * @param scene
	 */
	void delete(String scene);
}
FileManage
import org.springframework.web.multipart.MultipartFile;

import java.io.File;
import java.io.IOException;
import java.util.UUID;

/**
 * 文件管理工具
 *
 * @author 蓝之静云
 */
public class FileManage {

    /**
     * 根据路径和文件名删除图片
     *
     * @param path 路径和文件名
     * @return 1表示删除成功
     * 0表示删除失败
     * -1表示文件不存在
     */
    public static int delFileByPath(String path){
        int resultInfo;
        File file = new File(path);
        //文件是否存在
        if (file.exists()) {
            //存在就删了,返回1
            if (file.delete()) {
                resultInfo = 1;
            } else {
                resultInfo = 0;
            }
        } else {
            resultInfo = -1;
        }
        return resultInfo;
    }

    /**
     * 上传保存图片
     *
     * @param file       文件
     * @param uploadPath 上传路径
     * @return 文件名
     * @throws IOException
     */
    public static String saveUploadFile(MultipartFile file, String uploadPath) throws IOException {
        // 获取文件名
        String fileName = file.getOriginalFilename();
        String subfix = fileName.substring(fileName.lastIndexOf("."));
        String uploadFileName = UUID.randomUUID().toString() + subfix;
        System.out.println("上传文件名 : " + uploadFileName);
        //如果路径不存在,创建一个
        File realPath = new File(uploadPath);
        if (!realPath.exists()) {
            realPath.mkdir();
        }
        System.out.println("上传文件保存地址:"+realPath);
        file.transferTo(new File(uploadPath+"/"+uploadFileName));
        return uploadFileName;
    }
}
操作流程
#### 操作流程
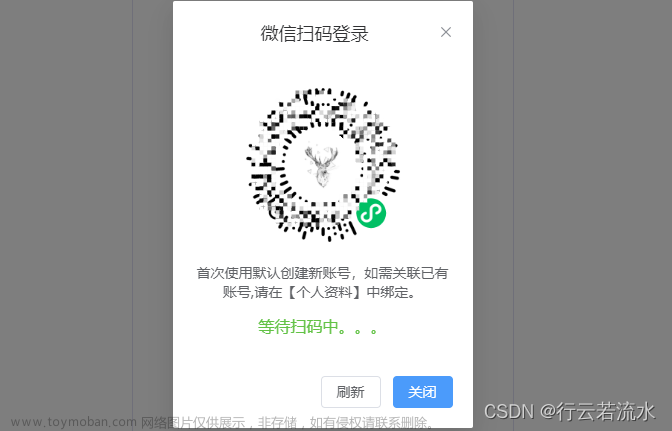
此项目结合webSocket实现扫码登录
**微信扫码登录时序**
1、获取小程序码时,建立ws,并返回scene值。
2、之后后端根据用户客户端操作情况推动认证状态至网页端。
3、扫码进入后更新扫码状态为 正在扫码
4、用户点击认证或者取消认证,更改扫码状态为对应的内容。
5、如果是已认证,通过openId执行常规登录
6、为了避免垃圾信息。在已认证或取消认证后清除相关信息
yml
# 文件存储路径
file:
  mac:
    #扫码登录生成的二维码存放路径
    qrCode: ~/wxImgs/qrCode/
  linux:
    qrCode: /home/wxImgs/qrCode/
  windows:
    qrCode: D:\wxImgs\qrCode\
  # 文件大小 /M
  maxSize: 10
FileProperties
/*
 *  Copyright 2019-2020 WuTongyue
 *
 *  Licensed under the Apache License, Version 2.0 (the "License");
 *  you may not use this file except in compliance with the License.
 *  You may obtain a copy of the License at
 *
 *  http://www.apache.org/licenses/LICENSE-2.0
 *
 *  Unless required by applicable law or agreed to in writing, software
 *  distributed under the License is distributed on an "AS IS" BASIS,
 *  WITHOUT WARRANTIES OR CONDITIONS OF ANY KIND, either express or implied.
 *  See the License for the specific language governing permissions and
 *  limitations under the License.
 */
package com.bn.ies.base.config;

import com.bn.ies.base.constant.PhysicsConstant;
import lombok.Data;
import org.springframework.boot.context.properties.ConfigurationProperties;
import org.springframework.context.annotation.Configuration;

/**
 * @author WuTongyue
 * @date 2023/03/17
 */
@Data
@Configuration
@ConfigurationProperties(prefix = "file")
public class FileProperties {

    /** 文件大小限制 */
    private Long maxSize;

    private ElPath mac;

    private ElPath linux;

    private ElPath windows;

    public ElPath getPath(){
        String os = System.getProperty("os.name");
        if(os.toLowerCase().startsWith(PhysicsConstant.WIN)) {
            return windows;
        } else if(os.toLowerCase().startsWith(PhysicsConstant.MAC)){
            return mac;
        }
        return linux;
    }

    @Data
    public static class ElPath{
        private String qrCode;
    }
}
文章来源:https://www.toymoban.com/news/detail-724538.html
到了这里,关于即时通讯实现微信扫码登录web网站(vue + uni-app + java + 微信小程序)的文章就介绍完了。如果您还想了解更多内容,请在右上角搜索TOY模板网以前的文章或继续浏览下面的相关文章,希望大家以后多多支持TOY模板网!