目录
1、文章介绍
2、具体思路和写法
(1)AB包的打包
(2)AB包的加载
(3)AB包卸载
3、结语
1、文章介绍
本篇博客主要起记录和学习作用,简单的介绍一下AB包批量的打包和加载AB包的方式,若各位同学有幸看到本篇博客,希望能够对你有所帮助。
2、具体的思路和写法
(1)AB包的打包
先介绍一下打ab包所要用到的api BuildPipeline.BuildAssetBundle(string outputPath,AssetBundleBuild[] builds,BuildAssetBundleOptions assetBundleOptions,BuildTarget targetPlatform)
参数1:ab包输出路径 参数2:ab包信息(主要是assetBundleName=ab包名字,assetNames=资源名) 注意:assetNames一定是要Assets下的路径,不要使用windows路径,不然打包会报错!!!
    /// <summary>
    ///   <para>Build AssetBundles from a building map.</para>
    /// </summary>
    /// <param name="outputPath">Output path for the AssetBundles.</param>
    /// <param name="builds">AssetBundle building map.</param>
    /// <param name="assetBundleOptions">AssetBundle building options.</param>
    /// <param name="targetPlatform">Target build platform.</param>
    /// <returns>
    ///   <para>The manifest listing all AssetBundles included in this build.</para>
    /// </returns>
    public static AssetBundleManifest BuildAssetBundles(
      string outputPath,
      AssetBundleBuild[] builds,
      BuildAssetBundleOptions assetBundleOptions,
      BuildTarget targetPlatform)
    {
      BuildTargetGroup buildTargetGroup = BuildPipeline.GetBuildTargetGroup(targetPlatform);
      return BuildPipeline.BuildAssetBundles(outputPath, builds, assetBundleOptions, buildTargetGroup, targetPlatform);
    }
打包之前的准备工作:
一般ToB的小项目会有一些资源迭代的需求,所以场景资源单独放到文件夹中管理,每次有新的迭代时,只对最新版本中的场景资源进行增量打包。
UI资源同样的道理,但是小项目UI资源不需要分版本管理,除非是企业级的项目需要热更或者需要版本管理,则分版本管理。


下面是具体代码:
打包的时候需要注意的事项,打场景包一定不能压缩,否则会加载不出来要使用BuildAssetBundleOptions.None。打其他资源的时候可以选择LZ4压缩BuildAssetBundleOptions.ChunkBasedCompression。LZ4压缩是LZMA和不压缩之间的折中方案,构建的 AssetBundle 资源文件会略大于 LZMA 压缩,但是在加载资源时不需要将所有的资源都加载下来,所以速度会比 LZMA 快。建议项目中使用它。
using System;
using System.Collections.Generic;
using System.IO;
using NWH.Common.AssetInfo;
using UnityEditor;
using UnityEngine;
using Object = UnityEngine.Object;

namespace editor.AssetBundle
{
    public class BuildAssetBundle : Editor
    {
        /// <summary>
        /// 场景资源路径
        /// </summary>
        private static string _scenePath = $"{Application.dataPath}/AssetBundle/";

        /// <summary>
        /// UI资源路径
        /// </summary>
        private static string _uiPath = $"{Application.dataPath}/AssetBundle/Resources/";

        /// <summary>
        /// 最终场景包输出目录
        /// </summary>
        public static string SceneOutPutPath = $"{Application.persistentDataPath}/assetbundle_orgin";

        /// <summary>
        /// 最终prefab包输出目录
        /// </summary>
        public static string UiOutputPath = $"{Application.persistentDataPath}/assetbundle_uiorgin";

        [MenuItem("UnityTools/打包资源")]
        public static void BuildAssetsBundle()
        {
            BuildAllScenes();
            BuildAllPrefabs();
            //刷新文件
            AssetDatabase.Refresh();
        }

        private static void BuildAllScenes()
        {
            var directorys = Directory.GetDirectories(_scenePath, "V*");
            var folder = directorys[directorys.Length - 1];

            //获取指定文件夹下所有的.unity文件
            var sceneFiles = Directory.GetFiles(folder + $"/Scenes/", $"*.unity",
                SearchOption.AllDirectories);

            for (int i = 0; i < sceneFiles.Length; i++)
            {
                //打包进度
                EditorUtility.DisplayProgressBar($"正在打包场景中...", sceneFiles[i], 1.0f);

                if (!Directory.Exists(SceneOutPutPath))
                {
                    Directory.CreateDirectory(SceneOutPutPath);
                }

                //批量打包所有的.unity文件  设置输出路径和输出windows平台
                AssetBundleBuild buildPacket = new AssetBundleBuild();
                buildPacket.assetBundleName = $"{Path.GetFileNameWithoutExtension(sceneFiles[i]).ToLower()}.unity3d";
                buildPacket.assetNames = new string[] { sceneFiles[i].Substring(sceneFiles[i].IndexOf("Assets/")) };

                var abManifest = BuildPipeline.BuildAssetBundles(
                    SceneOutPutPath,
                    new AssetBundleBuild[]{buildPacket},
                    BuildAssetBundleOptions.None,
                    BuildTarget.StandaloneWindows64
                );
            }

            EditorUtility.ClearProgressBar();
        }

        private static void BuildAllPrefabs()
        {
            //获取指定文件夹下所有的.prefab文件
            var uiFiles = Directory.GetFiles(_uiPath, $"*.prefab",
                SearchOption.AllDirectories);

            if (!Directory.Exists(UiOutputPath))
            {
                Directory.CreateDirectory(UiOutputPath);
            }

            List<AssetBundleBuild> buildInfoList = new List<AssetBundleBuild>();

            for (int i = 0; i < uiFiles.Length; i++)
            {
                //打包进度
                EditorUtility.DisplayProgressBar($"正在打包预设中...", uiFiles[i], 1.0f);

                AssetBundleBuild buildInfo = new AssetBundleBuild();
                buildInfo.assetBundleName = $"{Path.GetFileNameWithoutExtension(uiFiles[i]).ToLower()}.unity3d";
                buildInfo.assetNames = new string[] { uiFiles[i].Substring(uiFiles[i].IndexOf("Assets/")) };
                buildInfoList.Add(buildInfo);

                AssetBundleManifest buildManifest = BuildPipeline.BuildAssetBundles(
                    UiOutputPath,
                    buildInfoList.ToArray(),
                    BuildAssetBundleOptions.ChunkBasedCompression,
                    BuildTarget.StandaloneWindows64
                    );
            }

            EditorUtility.ClearProgressBar();
        }
    }
}
打包完成后输出的文件:


(2)AB包的加载
加载场景和UI资源我使用的是同步加载,需要用到异步加载或者网络加载的同学可以去看看其他的文章介绍。
AssetBundle.LoadFromFile 从磁盘上的文件同步加载 AssetBundle。该函数支持任意压缩类型的捆绑包。 如果是 lzma 压缩,则将数据解压缩到内存。可以从磁盘直接读取未压缩和使用块压缩的捆绑包。
与 LoadFromFileAsync 相比,该版本是同步的,将等待 AssetBundle 对象创建完毕才返回。
这是加载 AssetBundle 的最快方法。
using System.Collections;
using System.Collections.Generic;
using UnityEditor.VersionControl;
using UnityEngine;
using utils;

public class ABMgr : IMgr<ABMgr>
{
    /// <summary>
    /// 包路径
    /// </summary>
    private string packagePath;

    /// <summary>
    /// ab包缓存
    /// </summary>
    private Dictionary<string, AssetBundle> abCache;

    /// <summary>
    /// 主包
    /// </summary>
    private AssetBundle mainAB = null;

    /// <summary>
    /// 主包中的配置文件---->用来获取依赖包
    /// </summary>
    private AssetBundleManifest manifest = null;

    protected override void Init()
    {
        base.Init();

        abCache = new Dictionary<string, AssetBundle>();
        packagePath = $"{Application.persistentDataPath}/assetbundle_uiorgin/";
    }

    private AssetBundle LoadABPackage(string abName)
    {
        AssetBundle ab;

        if (mainAB == null)
        {
            mainAB = AssetBundle.LoadFromFile(packagePath + "assetbundle_uiorgin");
            manifest = mainAB.LoadAsset<AssetBundleManifest>("AssetBundleManifest");
        }

        var dependencies = manifest.GetAllDependencies(abName);

        for (int i = 0; i < dependencies.Length; i++)
        {
            if (!abCache.ContainsKey(dependencies[i]))
            {
                ab = AssetBundle.LoadFromFile(packagePath + dependencies[i]);

                abCache.Add(dependencies[i], ab);
            }
        }

        if (abCache.ContainsKey(abName)) return abCache[abName];
        else
        {
            ab = AssetBundle.LoadFromFile(packagePath + abName);
            abCache.Add(abName, ab);
            return ab;
        }
    }

    public T LoadResources<T>(string abName, string resName) where T : Object
    {
        AssetBundle ab = LoadABPackage(abName);

        return ab.LoadAsset<T>(resName);
    }
}
ab包加载单例基类:
using System;
using System.Collections;
using System.Collections.Generic;
using UnityEngine;
namespace utils
{
public class IMgr<T> : MonoBehaviour where T: IMgr<T>
{
private static T instance;
public static T Instance
{
get
{
if (instance != null) return instance;
instance = FindObjectOfType<T>();
//防止脚本还未挂到物体上,找不到的异常情况,自行创建空物体挂上去
if (instance == null)
{
new GameObject("IMgrTo" +typeof(T)).AddComponent<T>();
}
else instance.Init(); //保证Init只执行一次
return instance;
}
}
private void Awake()
{
instance = this as T;
Init();
}
protected virtual void Init()
{
}
}
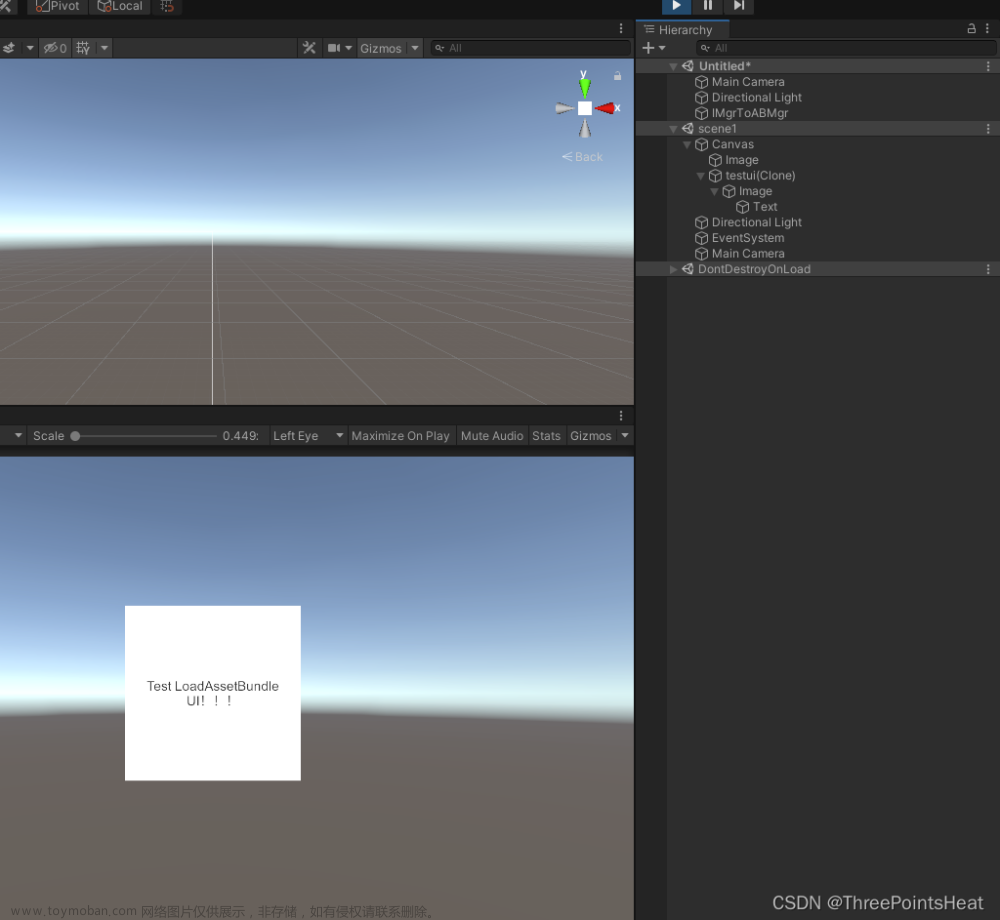
}下面随便写一个例子看看加载出来的效果:
    // Update is called once per frame
    void Update()
    {
        if (Input.GetKeyDown(KeyCode.Space))
        {
            OnLoadScene();
        }

        if (Input.GetKeyDown(KeyCode.A))
        {
            var go = GameObject.Find("Canvas")?.gameObject;
            //加载资源
            var testui = Instantiate(ABMgr.Instance.LoadResources<GameObject>("testui.unity3d", "testui"));
            if (testui != null && go != null)
            {
                testui.transform.SetParent(go.transform);
                testui.transform.localPosition = Vector3.zero;
                testui.transform.localScale = Vector3.one;
            }
        }
    }

    private void OnLoadScene()
    {
        var ab = AssetBundle.LoadFromFile($"{Application.persistentDataPath}/assetbundle_orgin/scene1.unity3d");

        Debug.LogError(ab.name);
        SceneManager.LoadScene("scene1", LoadSceneMode.Additive);
    }
(3)AB包的卸载
在AssetBundle的资源使用完成后,需要对其进行卸载,以释放其占用的内存空间。AssetBundle的卸载主要靠AssetBundle.Unload这个API实现。该方法需要传入一个bool类型的参数,如果传入的是true,则会卸载AssetBundle本身及从AssetBundle加载的全部资源。如果传入的是false,则会保留已经加载的资源。
在大多数情况下都推荐使用AssetBundle.Unload(true),因为如果传入false会造成内存资源的浪费。
如果不得不使用AssetBundle.Unload(false),则只能用以下两种方式卸载单个对象:
在场景和代码中消除对不需要的对象的所有引用。完成此操作后,调用Resources.UnloadUnusedAssets。
以非附加方式加载场景。这样会销毁当前场景中的所有对象并自动调用Resources.UnloadUnusedAssets。文章来源:https://www.toymoban.com/news/detail-760622.html
// 1.解除引用后调用
Resources.UnloadUnusedAssets();
// 2.上文提到的,卸载ab所加载的所有asset
ab.Unload(true);
3、结语
这篇文章到这里就结束了,主要是记录一下自己在项目中使用到的对场景和UI打AB包用法,后续还会进行更深入的研究资源加密、解密、分类管理等等。希望这篇文章对你有帮助,喜欢的朋友点个赞吧。谢谢。文章来源地址https://www.toymoban.com/news/detail-760622.html
到了这里,关于Unity AssetBundle批量打包、加载(场景、Prefab)完整流程的文章就介绍完了。如果您还想了解更多内容,请在右上角搜索TOY模板网以前的文章或继续浏览下面的相关文章,希望大家以后多多支持TOY模板网!


![[游戏开发][Unity]Assetbundle打包篇(1)打包流程介绍](https://imgs.yssmx.com/Uploads/2024/02/498138-1.png)
![[游戏开发][Unity]Assetbundle打包篇(2)打包资源配置篇](https://imgs.yssmx.com/Uploads/2024/02/703361-1.png)