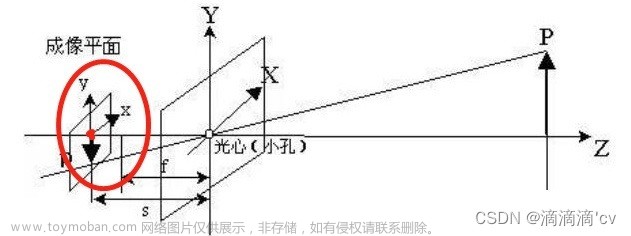
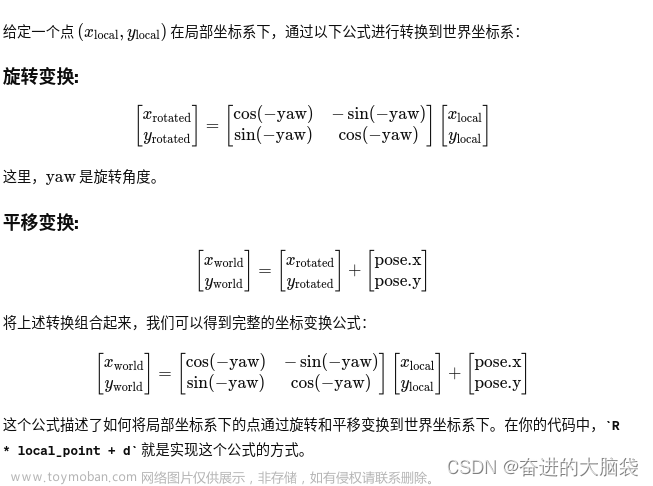
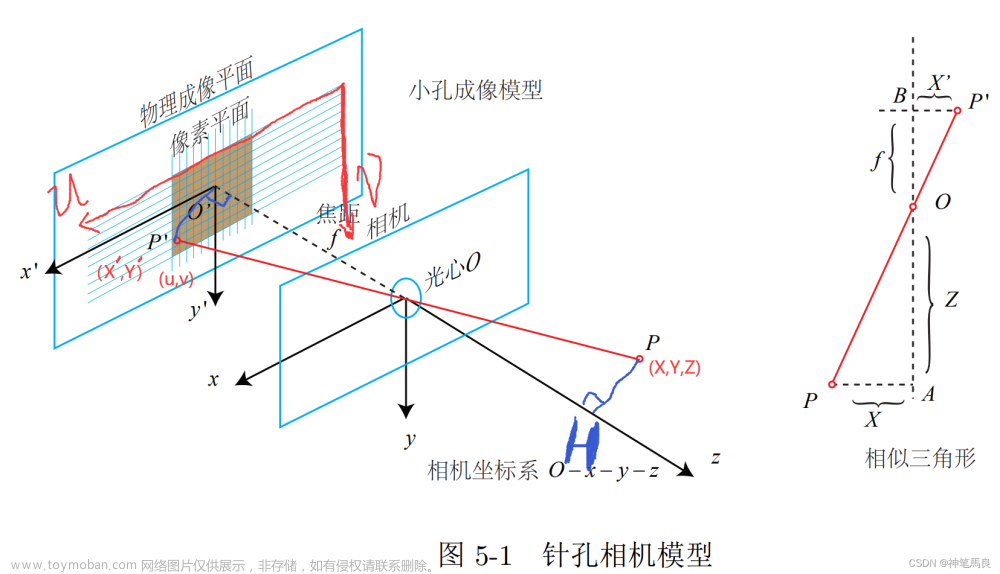
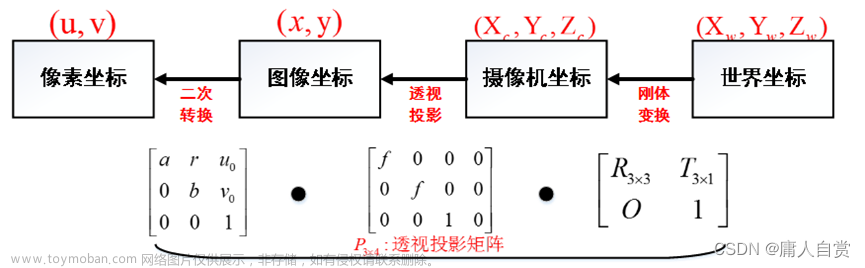
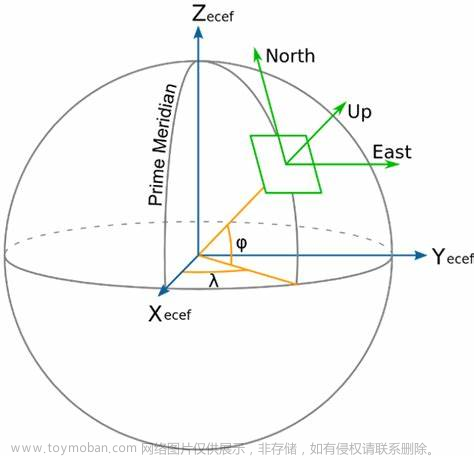
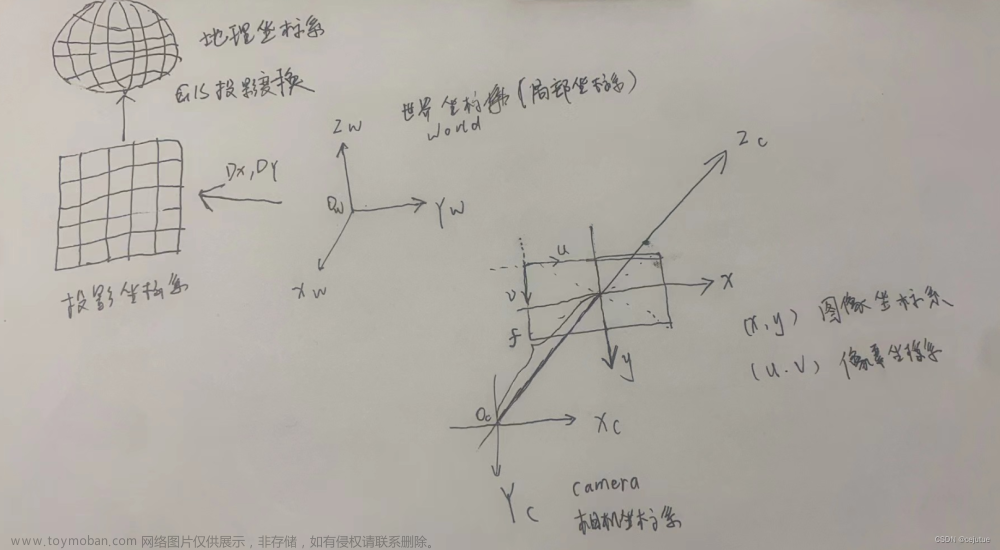
相机坐标和世界坐标变换原理就是在4个坐标系直接转换, 如果考虑GIS系统那么还需要考虑空间参考坐标, 空间参考坐标系又需要考虑地理和投影坐标系, 加起来就是6个坐标系. 示例图如下
文章来源:https://www.toymoban.com/news/detail-536695.html
此段代码基于opencv, 畸变参数未考虑, 采用pnp求解内外参数,封装相机坐标和世界坐标转换方法, GIS系统的坐标系都是一种世界坐标, 一般标定都是局部世界坐标系和GIS中投影空间参考坐标有一个x,y方向的平移参数即可完成转换, 投影转地理这直接GDAL中转换即可搞定. 具体代码如下:文章来源地址https://www.toymoban.com/news/detail-536695.html
#include <iostream>

#include <opencv2/opencv.hpp>
#include <iostream>
#include <ctype.h>
using namespace cv;
using namespace std;
#ifdef _DEBUG
	#pragma comment(lib,"opencv_world460d.lib")
#else
	#pragma comment(lib,"opencv_world460.lib")
#endif // _DEBUG

void CameraToWorld(InputArray cameraMatrix, InputArray rV, InputArray tV, Point2d& imgPoints, Point3d& worldPoints)
{
	cv::Mat cameraMatrix1 = cameraMatrix.getMat();
	///根据公式求Zc,即s
	cv::Mat imagePoint = cv::Mat::ones(3, 1, cv::DataType<double>::type);
	cv::Mat tempMat, tempMat2;
	//输入一个2D坐标点,便可以求出相应的s
	imagePoint.at<double>(0, 0) = imgPoints.x;
	imagePoint.at<double>(1, 0) = imgPoints.y;
	imagePoint.at<double>(2, 0) = 1;
	double zConst = 0;//实际坐标系的距离
	//计算参数s
	double s;
	tempMat = rV.getMat().inv() * cameraMatrix1.inv() * imagePoint;
	tempMat2 = rV.getMat().inv() * tV.getMat();
	s = zConst + tempMat2.at<double>(2, 0);
	s /= tempMat.at<double>(2, 0);

	cv::Mat imagePoint_your_know = cv::Mat::ones(3, 1, cv::DataType<double>::type); //u,v,1
	imagePoint_your_know.at<double>(0, 0) = imgPoints.x;
	imagePoint_your_know.at<double>(1, 0) = imgPoints.y;
	imagePoint_your_know.at<double>(2, 0) = 1;
	Mat wcPoint = rV.getMat().inv() * (cameraMatrix1.inv() * s * imagePoint_your_know - tV.getMat());

	worldPoints.x = wcPoint.at<double>(0, 0);
	worldPoints.y = wcPoint.at<double>(1, 0);
	worldPoints.z = wcPoint.at<double>(2, 0);
	cout << "CameraToWorld 2D to 3D:   " << worldPoints << endl;
}

void WorldToCamera(InputArray cameraMatrix, InputArray rV, InputArray tV, Point3d& worldPoint, Point2d& imgPoint)
{
	cv::Mat cameraMatrix1 = cameraMatrix.getMat();

	cv::Mat worldPoints = Mat::ones(4, 1, cv::DataType<double>::type);
	worldPoints.at<double>(0, 0) = worldPoint.x;
	worldPoints.at<double>(1, 0) = worldPoint.y;
	worldPoints.at<double>(2, 0) = worldPoint.z;
	cout << "world Points :  " << worldPoints << endl;
	Mat image_points = Mat::ones(3, 1, cv::DataType<double>::type);
	//setIdentity(image_points);
	Mat RT_;
	hconcat(rV, tV, RT_);
	cout << "RT_" << RT_ << endl;
	cout << "cameraMatrix1_" << cameraMatrix1 << endl;
	image_points = cameraMatrix1 * RT_ * worldPoints;
	Mat D_Points = Mat::ones(3, 1, cv::DataType<double>::type);
	D_Points.at<double>(0, 0) = image_points.at<double>(0, 0) / image_points.at<double>(2, 0);
	D_Points.at<double>(1, 0) = image_points.at<double>(1, 0) / image_points.at<double>(2, 0);
	//cv::projectPoints(worldPoints, rV, tV, cameraMatrix1, distCoeffs1, imagePoints);
	cout << "WorldToCamera 3D to 2D:   " << D_Points << endl;
}

int main()
{
	// 求内外参数通过PnP求解相机的R&T//
	Point2f point;
	vector<Point2f> boxPoints; //存入像素坐标
	// Loading image
	Mat sourceImage = imread("D:/source/kernel/example/opencv_uvxyztest/x64/Debug/a.bmp");
	namedWindow("Source", 1);
	// Setting box corners in image
		//one Point
		point = Point2f((float)558, (float)259); //640X480
	boxPoints.push_back(point);
	circle(sourceImage, boxPoints[0], 3, Scalar(0, 255, 0), -1, 8);

	//two Point
		point = Point2f((float)629, (float)212); //640X480
	boxPoints.push_back(point);
	circle(sourceImage, boxPoints[1], 3, Scalar(0, 255, 0), -1, 8);

	//three Point
		point = Point2f((float)744, (float)260); //640X480
	boxPoints.push_back(point);
	circle(sourceImage, boxPoints[2], 3, Scalar(0, 255, 0), -1, 8);

	//four Point
		point = Point2f((float)693, (float)209); //640X480
	boxPoints.push_back(point);
	circle(sourceImage, boxPoints[3], 3, Scalar(0, 255, 0), -1, 8);

	//Setting box corners in real world
	vector<Point3f> worldBoxPoints;  //存入世界坐标
	Point3f tmpPoint;
	tmpPoint = Point3f((float)2750, (float)890, (float)0);
	worldBoxPoints.push_back(tmpPoint);
	tmpPoint = Point3f((float)3500, (float)450, (float)0);
	worldBoxPoints.push_back(tmpPoint);
	tmpPoint = Point3f((float)2790, (float)-240, (float)0);
	worldBoxPoints.push_back(tmpPoint);
	tmpPoint = Point3f((float)3620, (float)-50, (float)0);
	worldBoxPoints.push_back(tmpPoint);
	//camera  intristic///
	cv::Mat cameraMatrix1 = Mat::eye(3, 3, cv::DataType<double>::type);  //相机内参矩阵
	cv::Mat distCoeffs1(5, 1, cv::DataType<double>::type);  //畸变参数
	distCoeffs1.at<double>(0, 0) = 0.061439051;
	distCoeffs1.at<double>(1, 0) = 0.03187556;
	distCoeffs1.at<double>(2, 0) = -0.00726151;
	distCoeffs1.at<double>(3, 0) = -0.00111799;
	distCoeffs1.at<double>(4, 0) = -0.00678974;

	//Taken from Mastring OpenCV d  相机固定参数
	double fx = 328.61652824;
	double fy = 328.56512516;
	double cx = 629.80551148;
	double cy = 340.5442837;
	cameraMatrix1.at<double>(0, 0) = fx;
	cameraMatrix1.at<double>(1, 1) = fy;
	cameraMatrix1.at<double>(0, 2) = cx;
	cameraMatrix1.at<double>(1, 2) = cy;

	//PnP solve R&T///
	cv::Mat rvec1(3, 1, cv::DataType<double>::type);  //旋转向量
	cv::Mat tvec1(3, 1, cv::DataType<double>::type);  //平移向量
	cv::solvePnP(worldBoxPoints, boxPoints, cameraMatrix1, distCoeffs1, rvec1, tvec1, false, 0);
	cv::Mat rvecM1(3, 3, cv::DataType<double>::type);  //旋转矩阵
	cv::Rodrigues(rvec1, rvecM1);

	//此处用于求相机位于坐标系内的旋转角度, 2D - 3D的转换并不用求
	const double PI = 3.1415926;
	double thetaZ = atan2(rvecM1.at<double>(1, 0), rvecM1.at<double>(0, 0)) / PI * 180;
	double thetaY = atan2(-1 * rvecM1.at<double>(2, 0), sqrt(rvecM1.at<double>(2, 1)*rvecM1.at<double>(2, 1)
		+ rvecM1.at<double>(2, 2)*rvecM1.at<double>(2, 2))) / PI * 180;
	double thetaX = atan2(rvecM1.at<double>(2, 1), rvecM1.at<double>(2, 2)) / PI * 180;
	cout << "theta x  " << thetaX << endl << "theta Y: " << thetaY << endl << "theta Z: " << thetaZ << endl;


	///World To Camera
	Point2d d2p;
	Point3d wd(3620, -590, 345);
	cout << "world Points :  " << wd << endl;
	WorldToCamera(cameraMatrix1, rvecM1, tvec1, wd, d2p);

	// Camera To World
	Point2d d2pcw(757.0414822810177, 213.3698894820287);
	Point3d wdcw;
	cout << "camera Points :  " << d2pcw << endl;
	CameraToWorld(cameraMatrix1, rvecM1, tvec1, d2pcw, wdcw);

	return 0;
}
到了这里,关于相机照片的像素坐标和世界坐标转换的文章就介绍完了。如果您还想了解更多内容,请在右上角搜索TOY模板网以前的文章或继续浏览下面的相关文章,希望大家以后多多支持TOY模板网!